Pages

Showing posts with label Animated. Show all posts

Monday, December 1, 2014

♥ Boxed In ♥ Animated CT Tutorial - ADI Old School Style Featuring Terri Lynne Albright.


with a dark background


This tutorial was created with Photoshop CS6 or CS2 depending on what filters I use. Some older filters will no longer work in CS6. Can be done with other versions and/or programs.

Supplies:
Artist's Tube of choice: I am using the PTU art of Terri Lynne Albright. Please DO NOT use her images without the proper license. You can find this tube here

Fonts of choice: I am using PF Arma Five for the © and Sepian for the name/text.

Filters of choice: DSB Flux – Bright Noise and Bubbles
Alien Skin Xenofex 2 – Constellation.

Custom Shape of choice: Preferably a frame or square/box type. I got mine at Deviant Art but I can't remember the creators name and the file name does not specify.

Ok, grab a cuppa, and a munchie, and let's go!!

Please remember to SAVE your work often, RENAME your layers, and if you feel you have really messed up.... Remember that UNDO is your bestest friend!!

Abbreviations
C/P = Drag and Drop OR Edit>Select All>Edit>Copy>Edit>Paste
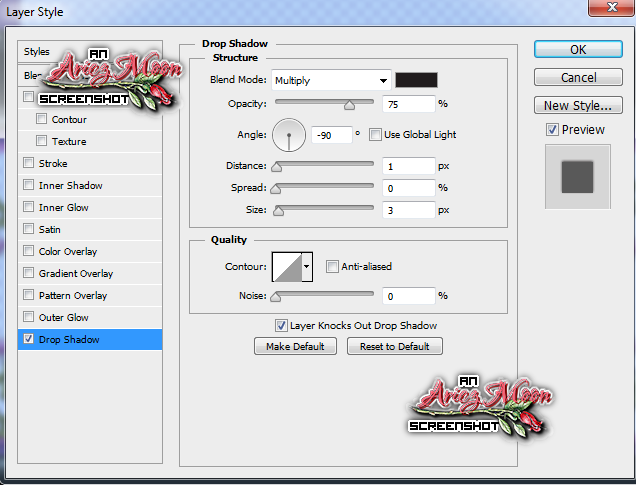
DS = Drop Shadow
MV – Merge Visible

Create a new image 950x950 , background color of your choice, we will be deleting it later unless you plan on animating.. 72dpi/ppi. Name the file whatever you wish and hit ok.

C/P your tube to the center of the canvas. Duplicate it 2 times. On the bottom tube apply Toadies – What Are You? At what ever settings you like best. Leave the other two tube copies be for the moment.
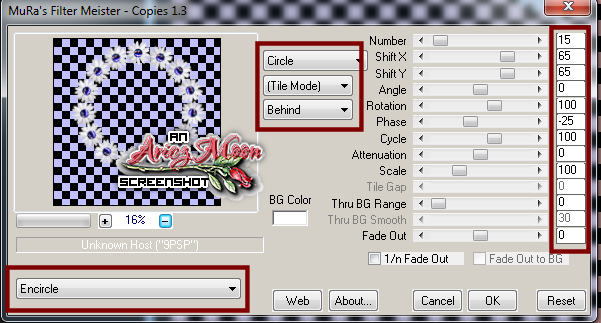
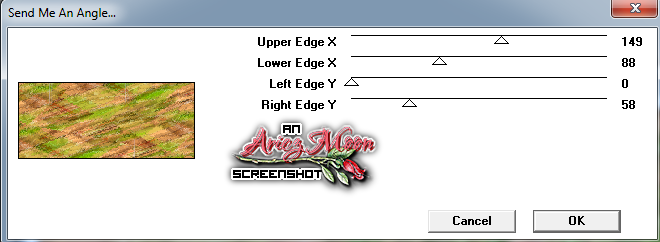
Grab your custom shapes tool with the following settings
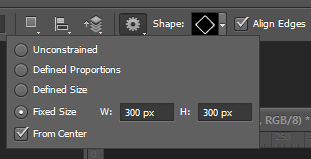

Click one time on your canvas. You might have to reinsert your dimensions.. 
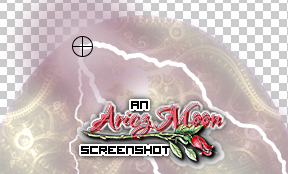
Duplicate your frames and position them around your tube. They don't have to be in any perfect order. As you see in my example some frames have small gaps, some are touching. It all depends on the look you want to go for. When you are finished placing your boxes close all but the boxes in your layers palette, right click on one of them and choose rasterize. Then shift click on each of the box layers click on the rasterized layer last. Right click and choose MV.

Open up both of your tube layers that were previously closed. CTRL+click on the thumbnail of your boxes to make a selection around them. Click on one of the tube layers and hit the Delete key on your keyboard. Drag this layer under your boxes layer in the layers palette. 
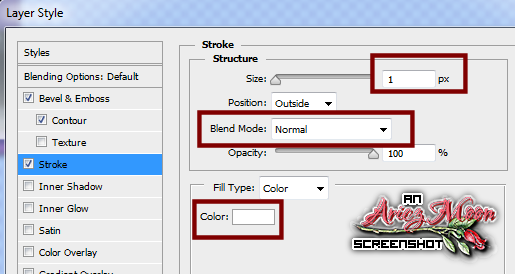
Deselect. Add a DS of your choice to this tube layer and a 5px stroke of your color choice. Lower the stroke opacity down to about 30.

Make a selection around your boxes one more time and invert the selection. On the last tube layer, which should be at the very top of your layer palette, make it active and hit delete on your keyboard. Deselect. 
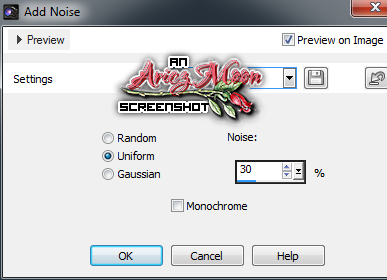
Add noise at 30% and add a DS and a stroke color of your choice.

Resize your image down a bit.... between 70 and 80%
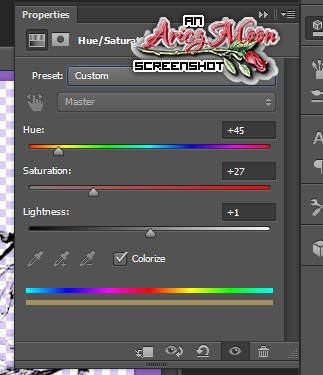
Duplicate your box layer. Place this copy just above your toadies layer and use a color overlay of your choice. I chose pink. Right click and Rasterize layer style. Duplicate this layer and in the layers palette position it so that is sits just under the top layer.

Click back on your first copy, the one that sits above the toadies layer and apply DSB Flux – Bubbles with the following settings.
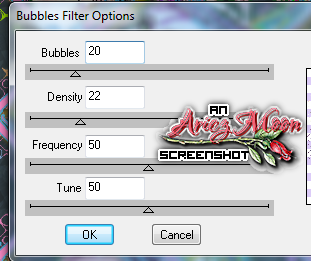
If your bubbles go all the way to the edge of the canvas you may have to undo and resize your image down a bit more. Now with your Color Replacer Tool in your brushes menu choose colors from your tube to change the colors of different areas of the bubbles.

Add your name and © info, with whatever effects you wish to add to them.

If you do not wish to animate, add noise of your choice to box layer that sits under the very top layer in the layers palette. Crop your image to size and Save for web as PNG=24.

If you wish to animate continue on.
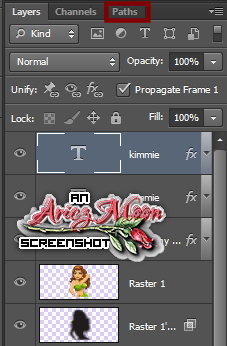
These next instructions refer to any layers you wish to animate, In my case it is my name and the pink boxes layers.
Here we go.

If you are animating any text layers, the text needs to be rasterized before you can continue.
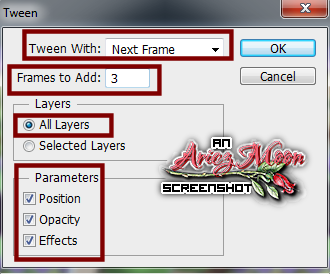
Duplicate 3 times, the layers you wish to animate so there will be a total of 4 layers for each. That would mean that for my pink boxes layer, I have a total of 4 and for my name I also have a total of 4. Rename the layers something like boxes 1 – 4 and Name 1 – 4 starting from the bottom up.

Close off layers 4 – 2. On layer 1 click on it to make it an active layer and apply DSB Flux- Bright Noise at 50%.
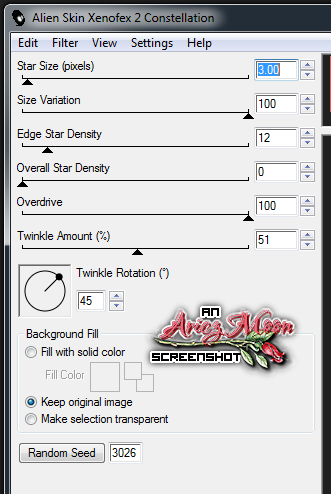
Then apply Alien Skin Xenofex 2 – Constellation with the following settings.

Repeat for your Name 1 layer.

Hide layers numbered 1 and unhide layers numbered 2.
Apply the same settings for each filter except for flux hit the mix button a couple of times, and for Constellation hit the random seed button.
Follow the same steps for all layers numbered 3 and 4. Don't forget to close the previous layers and make sure the layer you are working on is active/highlighted.

Let's make sure your animation window is open. If it isn't go to Window>Timeline. It should now be open. Click on the long button that says “ Create Frame Animation”

Make sure all layers are open including your background layer, except for your animation layers numbered 2 – 4.
If you look in the animation window, you will now see that frame 1 is already there for you. Click the Duplicate Frame button. 
In your LAYERS palette Hide layers numbered 1 and unhide layers numbered 2.
Hit the Duplicate Frame button. Hide layers numbered 2 and unhide layers numbered 3.
Hit the Duplicate Frame button hide layers numbered 3 and unhide layers numbered 4.
You should now have 4 FRAMES in your animation window and FRAME 4 should be the highlighted layer.
SHIFT+click on FRAME 1 and set the frame delay to 0.01 sec. 
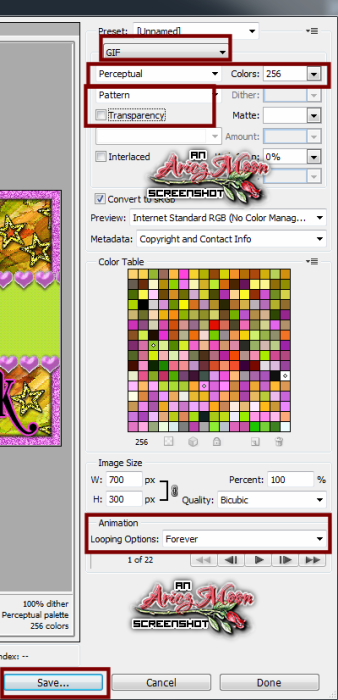
Set the Looping Options to Forever.
 
Click the play button to make sure that your animation runs smoothly.
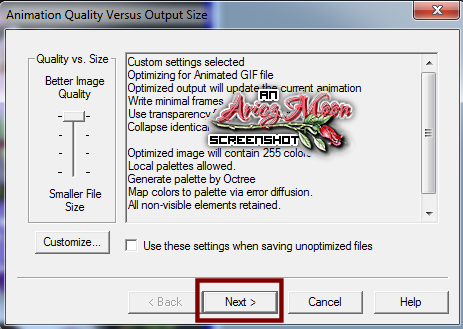
Click on Frame 1 then Save for Web as Gif, no transparency.

Congrats!! Woot Woot!! you are finshed!!!

This tutorial was created by me, Mary Oakes aka Ariez Moon, on 11/26/2014. Any similarity to any other tutorial is purely coincidental. Please abide by my TOU and the TOU of Artists and Designers that you may use.

I hope you all enjoyed this tutorial, and I hope that I did not do too bad of a job writing it. If you have any problems, questions, comments, or suggestions just give me a hollar in my Cbox, or connect with me on FB. I will get back to you as fast as I can.

As always, Happy PSPing.... and Photoshop too :) !!
post signature

Monday, November 10, 2014

♥ Of Dragonflies and Dreams ♥ Animated Tutorial


This tutorial was created with Animation Shop 3 and PaintShop Pro X4 but can be done with other versions and/or programs.

Supplies:
Artist's Tube of choice: I am using the gorgeous PTU work of Carla Morrow. Please DO NOT use his/her images without the proper license or permission. You can find this tube here

Scrap Kit of choice: I am using the wonderful PTU kit Fantasy by BLT Dezignz. You can find this kit HERE
Mask of choice: I am using mask WSL_mask5 by WeeScott Lass and you can find it HERE
Fonts of choice: I am using PF Tempesta Five for the © and ( font ) for the name/text.
Filters of choice: MuRa's - Copies
Animation of choice: We will be making our own.

Ok, grab a cuppa, and a munchie, and let's go!!

Please remember to SAVE your work often, RENAME your layers, and if you feel you have really messed up.... Remember that UNDO is your bestest friend!!

Abbreviations
C/P – Copy and Paste
DS = Drop Shadow
MV – Merge Visible
AS – Animation Shop

Create a new Image 1000x1000, Transparent background. 72Dpi.
C/P Flower5 to center of canvas. Resize way down.
C/P the gem and position it in the center of the flower. Hide Bottom layer, and MV
Go to Effects>Plugins>MuRa's>Copies with the following settings.

Edit>Cut Edit>Paste as New Layer. This will center your new frame on the canvas.
C/P Bow 1. Resize down and position on top of the frame.
C/P Ribbon 1. Resize it down and put at the top but under the frame.

C/P leaves. Resize and place on the lower left under the frame. Duplicate and move this set of leaves just up a bit. Go to Ajustment>Hue/Saturation>Vibrancy. Bring the vibrancy of the leaves up so a setting that looks good to you. On the lower leaves bring the vibrancy down just a bit.
C/P Flower6 resize as needed and position on the of the lower leaves.
C/P Flower4 resize and rotate as needed to fit just above Flower6. Change the vibrancy of this later to what you like best. Either up or Down.
C/P the Dangle. Resize down and place on top of the two flowers..
Click on these last layers individually and erase any parts that are inside the frame with your eraser tool.

C/P your tube into the center of the frame Duplicate and drag the layer under your frame layer. On the top tube layer, erase sections of the tail to make it look as though the tail is curling up from the underside of the frame to up over it. Do the same with the upper right wing.
C/P the dragonflies from the tube where ever you wish.
Open the paper you wish to add to your mask and the mask itself. C/P your paper as new layer. Drag all the way to the bottom. Layers>New Mask Layer>From Image. Select your mask from the drop down menu. Close all layers but the mask layers. Merge Down. Open layers.
With your sparkle brush. Add sparkles where ever you want them. Duplicate layer and add a colorful shadow with a large blur set to hard light. Duplicate the original layer again and set to hard light.

Take one last look at your tag and add anything else that you wish to add.
Select all layers (CTRL+click on each layer) Crop to Layer Opaque. Resize shortest size to 750px. Sharpen each layer. Add your © and your name with any effects that you wish to add.

If you do not plan to animate. Stop here an save as png. You are done!
If you are going to animate. Continue on.
Please remember, there may be other ways of doing this, but this is the way that I know how, and I'm not saying that is the absolute right way!!

Add a new layer. Flood Fill this layer with whatever background color you wish to use. My blog is a very dark grey, so I am using that as my background color.

Open Animation Shop and minimize for the time being.
In PSP C/P the middle dragonfly tube layer as a new image. Zoom in to about 3 or 400%
With your lasso tool or other custom selection tool that you are comfortable with, Make a selection around both of the wings. Go to Edit>Cut.

Then go to Edit>Paste As New Animation.
Back in PSP deselect the wings and copy the body. In AS paste as new animation.
One more time.... In PSP Copy MERGED your tag, paste as new animation in AS. You can minimize PSP. We are done with it now.

Back in AS. Go to File>New. Make the width and height 300x300px and make sure that Transparent is ticked.
Now duplicate this so that you have a total of 21 frames. To do this click on the Duplicate Frames button.... it looks like this.

 If you look at the bottom of the frames window it will tell you how many frames you have so far.

When you see frame 17, click on that and hit Duplicate Frames 3 more times and that will give you a total of 21.
Do the same for the Dragonfly body and your tag. Minimize those three for right now.

Working on your wings. Go to Effects>Insert Image Effect with the following settings.

You should now have 21 frames of the wings.

Are ya with me so far? It really isn't hard once you get used to it.

Ok, Maximize your Blank animation and the dragonfly body.
On the dragonfly body click on the first frame and go to Edit>Select All>Edit>Copy.
Now be careful with this next part. Don't click on the canvas until you are sure that you have the body where you want it...... If not you will have to repeat these last few steps.
On the Blank click on the first frame and go to Edit>Select All>Edit>Paste>Into Selected frames. The body will kinda be like stuck on your cursor. Hover your cursor where you want the body to be placed. Make sure that there will be enough room for the wings. Click once. Now all 21 frames should have the body. If it looks ok you can go ahead and close the OLD body frames.

Now, do the same thing with the wings. Select first frame, edit select all edit copy.
On the new body frames click on first frame etc....
Hover the wings over the body and match it up to where the wings would naturally be placed on the body. Click. Now all 21 frames should have the whole dragonfly. Press the play button to view your dragonfly in action to make sure you pasted the wings ok. If not, just UNDO and retry it. The play button looks like this

Now lets crop the transparent pixels.. Click on the crop tool and drag. You know how it works :) Don't get too close as to chop any of the animation off though.

Now follow the same steps as above to get the dragonfly on your tag. I wanted 2 but I didn't want them going in the same direction so I selected all frames on the dragonfly again and mirrored and rotated it.. Now play your animation to make sure that it runs smoothly. Got it? Great!! Just hit save and follow the prompts through the animation wizard!

That's all Folks!! That is all there is to it! I know it seems hard but just keep practicing and you will have it down in no time!! 

This tutorial was created by me, Mary Oakes aka Ariez Moon, on 11/10/2014. Any similarity to any other tutorial is purely coincidental. Please abide by my TOU and the TOU of Artists and Designers that you may use.

I hope you all enjoyed this tutorial, and I hope that I did not do too bad of a job writing it. If you have any problems, questions, comments, or suggestions just give me a hollar in my Cbox, or connect with me on FB. I will get back to you as fast as I can.

As always, Happy PSPing.... and Photoshop too :) !!


post signature

Thursday, November 6, 2014

♥ Sass With Class ♥ Animated Banner Old School Style - CT Tutorial For Kenny K - PTU


This tutorial was created with Photoshop CS6 but can be done with other versions and/or programs.

Supplies:
Artist's Tube of choice: I am using the adorable PTU work of KennyK. Please DO NOT use his/her images without the proper license or permission. You can find this tube here

Fonts of choice: I am using ( font ) for the © and 4 Magic DNA, Ginebra Bolds, and Charlamagne STD for the name/text.

Brushes of choice: Small heart and Stars (or you can create your own). The star brush I found by searching Deviant Art, a long time ago. The heart brush was made by me, and you can find it HERE Tutorial for making your own HERE-Coming Soon.

Filters of choice: Xenofex - Constellation
Toadies – What are you?
Filter Factory L – Send Me An Angle

Ok, grab a cuppa, and a munchie, and let's go!!

Please remember to SAVE your work often, RENAME your layers, and if you feel you have really messed up.... Remember that UNDO is your bestest friend!!

Create a new Image 700x300px, transparent background 72 dpi. Name and save the file whatever you wish.
Copy and paste your closeup tube, over and over again flipping, rotating and position until the whole canvas is covered. Merge Visible.
Go to Filter>Toadies>What are you? With these settings.

Then apply Filter Factory L>Send Me An Angle with these settings.

Filter>Sharpen>Sharpen Edges. Do this two or three times until you get an effect that you like.
Apply Xenofex>Constellation with settings of your choice.
Duplicate and set the Blend Mode of this layer to Hard Light and Merge Visible.

Create an new raster layer. Select>All >Select>Modify>Border. Set it at 10px. Using your paint bucket, flood fill with a color of your choice. Select>Deselect.
Filter>Noise>Add Noise. 30% Uniform, Monochrome checked. Add a drop shadow of your choice.

Create new Raster layers.
On the bottom Raster layer Grab your Rectangle tool and draw out a rectangle that goes from left edge of the canvas, to the right edge. Extend it out a bit so you make sure that you cover the edges.
Just above your layers palette there is a tab that says Paths. Click on that tab. 

Right click on Work Path and choose Fill Path. Choose whatever color you would like. Click back on your Layers tab.

Change your Forground color to one of your choice. Grab your brush tool. And choose your heart with the following settings.

Make the top layer active and click back on the Paths tab, right click and this time choose stroke path. When the box pops up, choose Brush and make sure the pressure setting is unticked. Right click on work path for the last time and choose Delete Path. Apply the following layer style.


Right click on the hearts layer and choose Copy Layer Style. Then go to Layer>Layer Style>Create Layers. 
Right click again on your hearts layer and choose Paste Layer Style. Double click on the layer to bring up the Belding options. Uncheck all except the Drop Shadow. Leave all settings the same except the angle. Change that +90 degrees.
Close off all layers except your hearts and your layer style and Merge Visible.

Grab your brush tool. Select your star and a color of your choice. With the following brush settings

Create a new layer and stroke your brush in an up and down fashion across the upper half of your canvas, above the hearts.. Almost like drawing rolling hills.
Create a new layer and do the same thing on the lower half of your canvas.
Apply noise at 30% Gaussian, monochrome checked. Apply drop shadow and stroke of choice.

Drag and drop your tube to the middle of the canvas. Add a drop shadow.

. Add your name and © information. With What ever effects you would like to add.

Now, if you do not plan on animating Add your word art however you would like. Save to web as a JPEG and you are finished.

If you are animating, please continue on.

Make sure your Animation Window is open. If it isn't go to Window>Timeline (CS6) or Animation (earlier versions). You should now be able to see it at the bottom of your workspace.
Each word HAS to go on it's own layer.
With one type of font in a size and color of your choice. Type out
I'm
High
And
All
AGAIN, each one on it's own layer. Add any effects that you wish to add.
In another font size and color of choice type out
Class
Sass
Add any effect you wish to add.

Position I'm, and High layers to the left edge of the canvas just under your hearts layer on top of the rectangle. Then position And, and All to the right.
Position Class below I'm and High. Position Sass below And and All.

Make sure all your layes are where and how you want them to be..
Close of all text layers except for your name and © info. Make sure all the rest of the layers are open.

Click on the button that says Create Frame Animation (CS6.... earlier versions don't have the timeline so it is already set)

You will see that your first frame is there for you already FRAME 1. Click on Duplicate frame. It looks like a piece of paper with a folded corner.

In your layer palette, unhide the words I'm and And You now have FRAME 2
Go back to the animation window and click duplicate frame.

Back to your layers palette, unhide High and All. Make sure they are positioned next to the previous words. You now have FRAME 3
Back to animation window. Click duplicate frame.

In your layers palette, click on the word High and CTRL click on the word All. With your move tool or your arrow keys, move these words to the right, as far as you want them to go without cutting off any shadow.
In your animation window click on FRAME 3 then click on the Tween Animation button. It is right before the Duplicate Frame button. Looks like 4 fading squares.

When the window pops up choose these settings

You now have FRAMES 4 5 6 and 7.
Duplicate FRAME 7. In your layers palette unhide Class and Sass. Activate the Class layer by clicking on it then CTRL click on Sass. Lower the opacity to O%. You now have FRAME 8. Duplicate FRAME 8.
In your layers palette bring the opacity of the Class and Sass layers back up to 100%, then lower the opacity of the I'm High and the And All layers to 0%.
Click on Frame 8 and then click on the tween button. Leave all settings the same except change the number to 10. You should now have a total of 19 FRAMES!!.

Almost done now. Duplicate FRAME 19 to make FRAME20. Click on the tween button and this time change the drop down to With First Frame, and change the number of frames to 2. You should now have a total of 22 frames.

Since Frame 22 is already selected SHIFT click on Frame one. Set your Frame Delay to 0.1 seconds.

Click on FRAME 2 and CTRL click on FRAMES 3 7 and 20. Change the Frame Delay to 0.5.
Set your Looping, the button right under frame that currently says once, to Forever.

Play your animitation to make sure that it runs smoothly.

Save to web, with the following settings

Congrats!!! You are finished. Waaa Hoooo!!

This tutorial was created by me, Mary Oakes aka Ariez Moon, on 11/05/2014. Any similarity to any other tutorial is purely coincidental. Please abide by my TOU and the TOU of Artists and Designers that you may use.

I hope you all enjoyed this tutorial, and I hope that I did not do too bad of a job writing it. If you have any problems, questions, comments, or suggestions just give me a hollar in my Cbox, or connect with me on FB. I will get back to you as fast as I can.

As always, Happy PSPing.... and Photoshop too :) !!

post signature

Monday, November 3, 2014

♥ Myth N Magic ♥ ~CT tutorial for Mysterfeerie's PTU kit Lili Jocker


This tutorial was created with PaintShop Pro x4 but can be done with other versions and/or programs.

Supplies:
Artist's Tube of choice: I am using the gorgeous PTU work of Norma J. Burnell. Please DO NOT use her images without the proper license. You can find this tube here

Scrap Kit of choice: I am using the wonderful PTU kit Lili Jocker by Mysterfeerie. You can find this kit from these stores

Fonts of choice: I am using PF Rhonda Seven for the © and Always Black for the name/text.
Filters of choice: DSB Flux

Ok, grab a cuppa, and a munchie, and let's go!!

Please remember to SAVE your work often, RENAME your layers, and if you feel you have really messed up.... Remember that UNDO is your bestest friend!!

C/P element 02 in center of canvas. After the two frames are on the canvas, you may have to nudge this over to the right a bit.
C/P element 04 in center of canvas
C/P element 03 in center of canvas
C/P element 86 Image>Mirror. Place to the upper left and slide under your frame layers in the layers palette.
C/P your tube to the center of canvas. Risize to your choice and place on top of the frame. Go to Adjust>Hue/Saturation>Vibrance pull the slider all the way over to 100. Do this one more time except slide the slider to 80.
C/P element 81, resize it a bit and place where the tubes hand should actually be.
C/P element 34 onto canvas. Rsize to your liking and plave to the right of the frame.
C/P element 83, resize an plave over the tree that you just placed. Coloriz by using the Change to Target Brush. I changed mine to purple. For a quick overview on how to use this brush, select the brush tool itself, then go to View>Palettes>Learning Center. It is really quick an easy to learn.

C/P element 12. Resize and place on the frame over to the left.
C/P element 22. Resize and place just near the unicorns feet. With your lasso tool. Draw a selection around your potion bottle. Use your Color Replacer Brush to change the color of the potion. Again, refer to the the learning center for easy instrusctions on how to use this tool. This is what we are animating. Fyi, so we will be revisiting this layer.

Ok. so take one last look at your tag. Add various drop shadows to your layers. Give your potion and your bow a slight glow.

Crop around your image. Resize if you would like.

Add your name and your © info.
New Raster layer. Flood fill with the color that you wouild like to have for your background.
Merge all layers visible except your bow and your potion. Duplicate your main background layer twice so that you have a totale of 3. Duplicate your potion twice, so that you have three layers of potion all together. Duplicate your bow twice, so that you have 3 layers of bows all together. Close off the top two layers of the potion Highlight the first layer and draw a selection around just the bottle part of the potion so that the cork dioesn't get effected. Choose Adjust>Add Remove Noise>Add Noise with these settings

Close off this layer. Open the second potion layer. Same settings for the noise EXCEPT change the noise percentage to 35. Close the layer.
Do the same for the third potion layer but change the noise percentage to 40.
Ok, so now you should have a total of 9 layers. Open the very bottom background layer. The very bottom potion layer and the very bottom bow layer. Merge visible Repeat with the rest of the layers. You should now only have three full layers.
File>Save

Open Animation Shop.

In PSP Click on the bottom Layer to highlight it. Right click on the image window and and choose copy. In AS right click and in the workspace and choose Paste>As New Animation.

Back in PSP click on the middle layer to activate it. Right click on the image window. Copy
Back to AS right click on the image window>Paste> Paste AFTER current frame.

Follow the same steps for the last layer.

Now up in the tool bar in AS you will see a little icon that looks like a film strip. Click it and watch your animation go!! Now close the new animation window that popped up.
Go to File>Save Give your new animation a name and put it in the directory of your choice.
Then follow along with my settings.


, Next, Next, Finish.

Yippie!!! You are finished!!

OH, here is one done on a white BG too!


This tutorial was created by me, Mary Oakes aka Ariez Moon, on 11/03/2014. Any similarity to any other tutorial is purely coincidental. Please abide by my TOU and the TOU of Artists and Designers that you may use.

I hope you all enjoyed this tutorial, and I hope that I did not do too bad of a job writing it. If you have any problems, questions, comments, or suggestions just give me a hollar in my Cbox, or connect with me on FB. I will get back to you as fast as I can.

As always, Happy PSPing.... and Photoshop too :) !!

post signature

♥ Daughter of Skullz ♥ Tutorial ~ CT ADI ~ Featuring PTU art of Ian Daniels!!


This tutorial was created with Photoshop CS6 but can be done with other versions and/or programs.

Supplies:
Artist's Tube of choice: I am using Daughter of Skulls and she is the wonderful PTU work of Ian Daniels. Please DO NOT use his images without the proper license. You can find this tube here

Scrap Kit of choice: I am using the wonderful FTU kit Oh So Skully by Abstract Creations. You can find this kit HERE
Fonts of choice: I am using PF Rhonda Seven for the © and JackLantern BB for the name/text.
Filters of choice: Alien Skin Xenofex 2 - Lightning

Ok, grab a cuppa joe, and a munchie, and let's go!!

Please remember to SAVE your work often, RENAME your layers, and if you feel you have really messed up.... Remember that UNDO is your bestest friend!!

OK, don't freak out, you need to open a large canvas, but it will be ok. We will resize later.

Create a new image 1200 x 1200, 72dpi with a transparent background. Drag and drop element 24 onto your canvas. Duplicate and merge visible.
Duplicate. Edit>Transform>Flip Vertically and rotate it to the right so that the left bottom point meets the left bottom point of the first layer. Merge Visible.
Duplicate. Rotate to the right and position so that the arc is straight up. Duplicate one more time, rotate and position that , when put together all three look like a half webby circle. Merge Visible.
Duplicate, Flip Vertically and move this half down until the middles meet. It should look like a spiky web. Merge Visible. If you have any extra transparent canvas go to Image>Trim. Transparent pixels ticked, and all four boxes on the bottom checked. Click ok. Go to Image>Resize, and change the Width to 800..

Drag and drop paper1 onto the middle of you canvas. With your Ellipse Shape tool. Set to feather 3.5, Circle and from middle, draw out a large circle, invert the selectin and hit delete on your keyboard.

Drag and drop element 35 onto the center of the canvas.. This is what we are going to use for our frame. With your magic wand tool, hold the Shift key and click inside each section, of the inside of the frame. Seclect>Modify>Expand and expand by 10

Open paper 2. Go to Window, and look to make sure you have a check mark next to Adjustments. This will make our adjustments panel available in our palettes.

See my screen shot. Click on Hue/Saturation and follow my settings, or play until you find one you like. Select>All, Edit>Copy.

Back to your working image. Layer>New Fill Layer>Solid color. Choose white. Edit>Paste Special>Paste in place. Right click and choose Create clipping mask. Change the layer mode to hard light. Close your frame layer and your web layer then merge visible. Lower the opacity of the lower down, to something that looks good for you. Mine is about 40%.

Drag and drop your tube, resize and place to the left of the frame. Position right knee (our right) so that it looks like she is in part of the frame. Erase the wood that sits on top of the skull medallion.

Now add some elements from the kit. Any ones you want to make the tag look like your own style. Resize, layer, rotate, recolor..... Whatever you wish to do!

Take a last look at your tag. Add drop varying drop shadows to some or all of your layers. Add a glow around your moon if you used one.

Resize your image, making sure that you keep styles and such to be reduced along with the image. Resize to your choice. I brought my longes side down to 700.

Add your © and your name.

If you don't wish to animate, you can add a lightning brush to a new layer set to hard light on top of your frames background layer, then stop here and save as a PNG-24

If you are animating, please follow along here.

First make sure your animation window is open down at the bottom of your screen. If it is not there go to Window and click on Animation. Now should see it. Click on the Create Frame Animation button right there in the middle.

Add a new raster layer and with your paint bucket fill it white. Drag the layer all the way down to the bottom.
Click on your frames background layer and duplicate it two times, so that you actually have three layers of them.
Close the top two layers and on the original layer hold your cursor over the thumbnail and CTRL Click to make a selection around it, then go to Filter>Xenofex 2>Lightning, with these settings and move the circle for the starting position to match my example below.


Hide that layer, and open the second layer. Don't change anything EXCEPT hit the Random Seed button, then click ok. Close that layer and do the same for the last layer.
While on your last layer go to Selection>Inverse. Hit delete on your keyboard. Close that layer. Click on the layer underneath. Open the layer hit Delete. Close it. Do the same for the last layer only dont close the layer off. Deselect.

Ok here we go, in your layer palette you should have all layers open EXCEPT the two top lightning layers. If you look down in your animation window, you will see that your first frame is already there.
Click on the folded paper icon, if you hover your cursor over it, it will say Duplicate frame.
In your layer palette, close of the first layer, and open the second.
Back to your animation window. Click on the Duplicate Frame button and in your layer palette close of the second layer and open the last layer.

Are you with me so far? Awesome! If not, you can go HERE to watch a video of how to do it.

So now, you should have 3 frames in your animation window. Now this took me forever to get right, and me all day today forever! Click on the very first frame. Then click on the Tween Animation Button, it is the one right before your Duplicate Frame button.
When the window pops up, type in the number 3 and hit ok. You will see that more frames were added. Click on frame number 5 and hit the Tween button. Make sure it says 3 still and then hit ok. Now do this again for frame number 9 EXCEPT in the drop down menu where it says Tween With, choose First Frame, hit ok!!
Click on your very last frame and while holding the shift key click on your very first frame. Just underneath the thumbnail of frame on is a tiny arrow, click on that and choose 0.1 sec. Just underneath that you have your looping options. Choose Forever.

Click on the first Frame.
Hit the play button to make sure that everything is running smooth
Is it? Fantabulous!!

Click on the first frame and then go to File>Save for Web with these settings

OH lala you are finished!!!

This tutorial was created by me, Mary Oakes aka Ariez Moon, on 11/02/2014. Any similarity to any other tutorial is purely coincidental. Please abide by my TOU and the TOU of Artists and Designers that you may use.

I hope you all enjoyed this tutorial, and I hope that I did not do too bad of a job writing it. If you have any problems, questions, comments, or suggestions just give me a hollar in my Cbox, or connect with me on FB. I will get back to you as fast as I can.

As always, Happy PSPing.... and Photoshop too :) !!


post signature