This
tutorial was created with Photoshop CS6 or CS2
depending on what filters I use. Some older
filters will no longer work in CS6. Can be done with other
versions and/or programs.
Supplies:
Artist's
Tube of choice: I am using the
PTU art of Terri Lynne Albright. Please DO NOT use her images without
the proper license. You can find this tube here
Fonts
of choice: I am using PF Arma
Five for the © and Sepian for the name/text.
Filters
of choice: DSB Flux – Bright
Noise and Bubbles
Alien
Skin Xenofex 2 –
Constellation.
Custom
Shape of choice: Preferably a
frame or square/box type. I got mine at Deviant Art but I can't
remember the creators name and the file name does not specify.
Ok,
grab a cuppa, and a munchie, and let's go!!
Please
remember to SAVE your work often, RENAME
your layers, and if you feel you have really messed up.... Remember
that UNDO is your bestest friend!!
Abbreviations
C/P
= Drag and Drop OR Edit>Select All>Edit>Copy>Edit>Paste
DS
= Drop Shadow
MV
– Merge Visible
Create
a new image 950x950 , background color of your choice, we will be
deleting it later unless you plan on animating.. 72dpi/ppi. Name the
file whatever you wish and hit ok.
C/P
your tube to the center of the canvas. Duplicate it 2 times. On the
bottom tube apply Toadies – What Are You? At what ever settings you
like best. Leave the other two tube copies be for the moment.
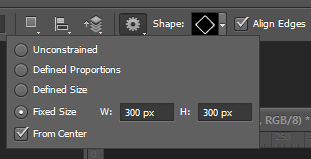
Grab
your custom shapes tool with the following settings
Click
one time on your canvas. You might have to reinsert your dimensions..
Duplicate your frames and position them around your tube. They don't
have to be in any perfect order. As you see in my example some frames
have small gaps, some are touching. It all depends on the look you
want to go for. When you are finished placing your boxes close all
but the boxes in your layers palette, right click on one of them and
choose rasterize. Then shift click on each of the box layers click on
the rasterized layer last. Right click and choose MV.
Open
up both of your tube layers that were previously closed. CTRL+click
on the thumbnail of your boxes to make a selection around them. Click
on one of the tube layers and hit the Delete key on your keyboard.
Drag this layer under your boxes layer in the layers palette.
Deselect. Add a DS of your choice to this tube layer and a 5px stroke
of your color choice. Lower the stroke opacity down to about 30.
Make
a selection around your boxes one more time and invert the selection.
On the last tube layer, which should be at the very top of your layer
palette, make it active and hit delete on your keyboard. Deselect.
Add noise at 30% and add a DS and a stroke color of your choice.
Resize
your image down a bit.... between 70 and 80%
Duplicate
your box layer. Place this copy just above your toadies layer and use
a color overlay of your choice. I chose pink. Right click and
Rasterize layer style. Duplicate this layer and in the layers palette
position it so that is sits just under the top layer.
Click
back on your first copy, the one that sits above the toadies layer
and apply DSB Flux – Bubbles with the following settings.
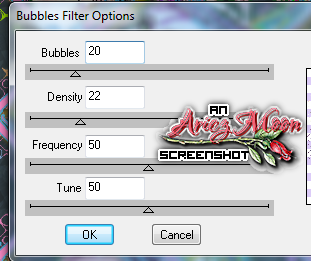
If
your bubbles go all the way to the edge of the canvas you may have to
undo and resize your image down a bit more. Now with your Color
Replacer Tool in your brushes menu choose colors from your tube to
change the colors of different areas of the bubbles.
Add
your name and © info, with whatever effects you wish to add to them.
If
you do not wish to animate, add noise of your choice to box layer
that sits under the very top layer in the layers palette. Crop your
image to size and Save for web as PNG=24.
If
you wish to animate continue on.
These
next instructions refer to any layers you wish to animate, In my case
it is my name and the pink boxes layers.
Here
we go.
If
you are animating any text layers, the text needs to be rasterized
before you can continue.
Duplicate
3 times, the layers you wish to animate so there will be a total of 4
layers for each. That would mean that for my pink boxes layer, I have
a total of 4 and for my name I also have a total of 4. Rename the
layers something like boxes 1 – 4 and Name 1 – 4 starting from
the bottom up.
Close
off layers 4 – 2. On layer 1 click on it to make it an active layer
and apply DSB Flux- Bright Noise at 50%.
Then
apply Alien Skin Xenofex 2 – Constellation with the following
settings.
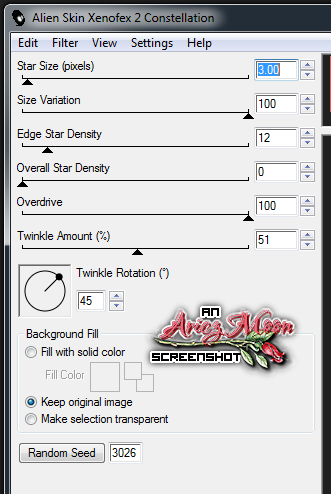
Repeat
for your Name 1 layer.
Hide
layers numbered 1 and unhide layers numbered 2.
Apply
the same settings for each filter except for flux hit the mix button
a couple of times, and for Constellation hit the random seed button.
Follow
the same steps for all layers numbered 3 and 4. Don't forget to close
the previous layers and make sure the layer you are working on is
active/highlighted.
Let's
make sure your animation window is open. If it isn't go to
Window>Timeline. It should now be open. Click on the long button
that says “ Create Frame Animation”
Make
sure all layers are open including your background layer, except for
your animation layers numbered 2 – 4.
If
you look in the animation window, you will now see that frame 1 is
already there for you. Click the Duplicate Frame button.
 In your
LAYERS palette Hide layers numbered 1 and unhide layers numbered 2.

Hit
the Duplicate Frame button. Hide layers numbered 2 and unhide layers
numbered 3.
Hit
the Duplicate Frame button hide layers numbered 3 and unhide layers
numbered 4.
You
should now have 4 FRAMES in your animation window and FRAME 4 should
be the highlighted layer.
SHIFT+click
on FRAME 1 and set the frame delay to 0.01 sec.
 Set the Looping
Options to Forever.

Click the play button to make sure that your animation runs smoothly.


Click the play button to make sure that your animation runs smoothly.
Click
on Frame 1 then Save for Web as Gif, no transparency.
Congrats!!
Woot Woot!! you are finshed!!!
This
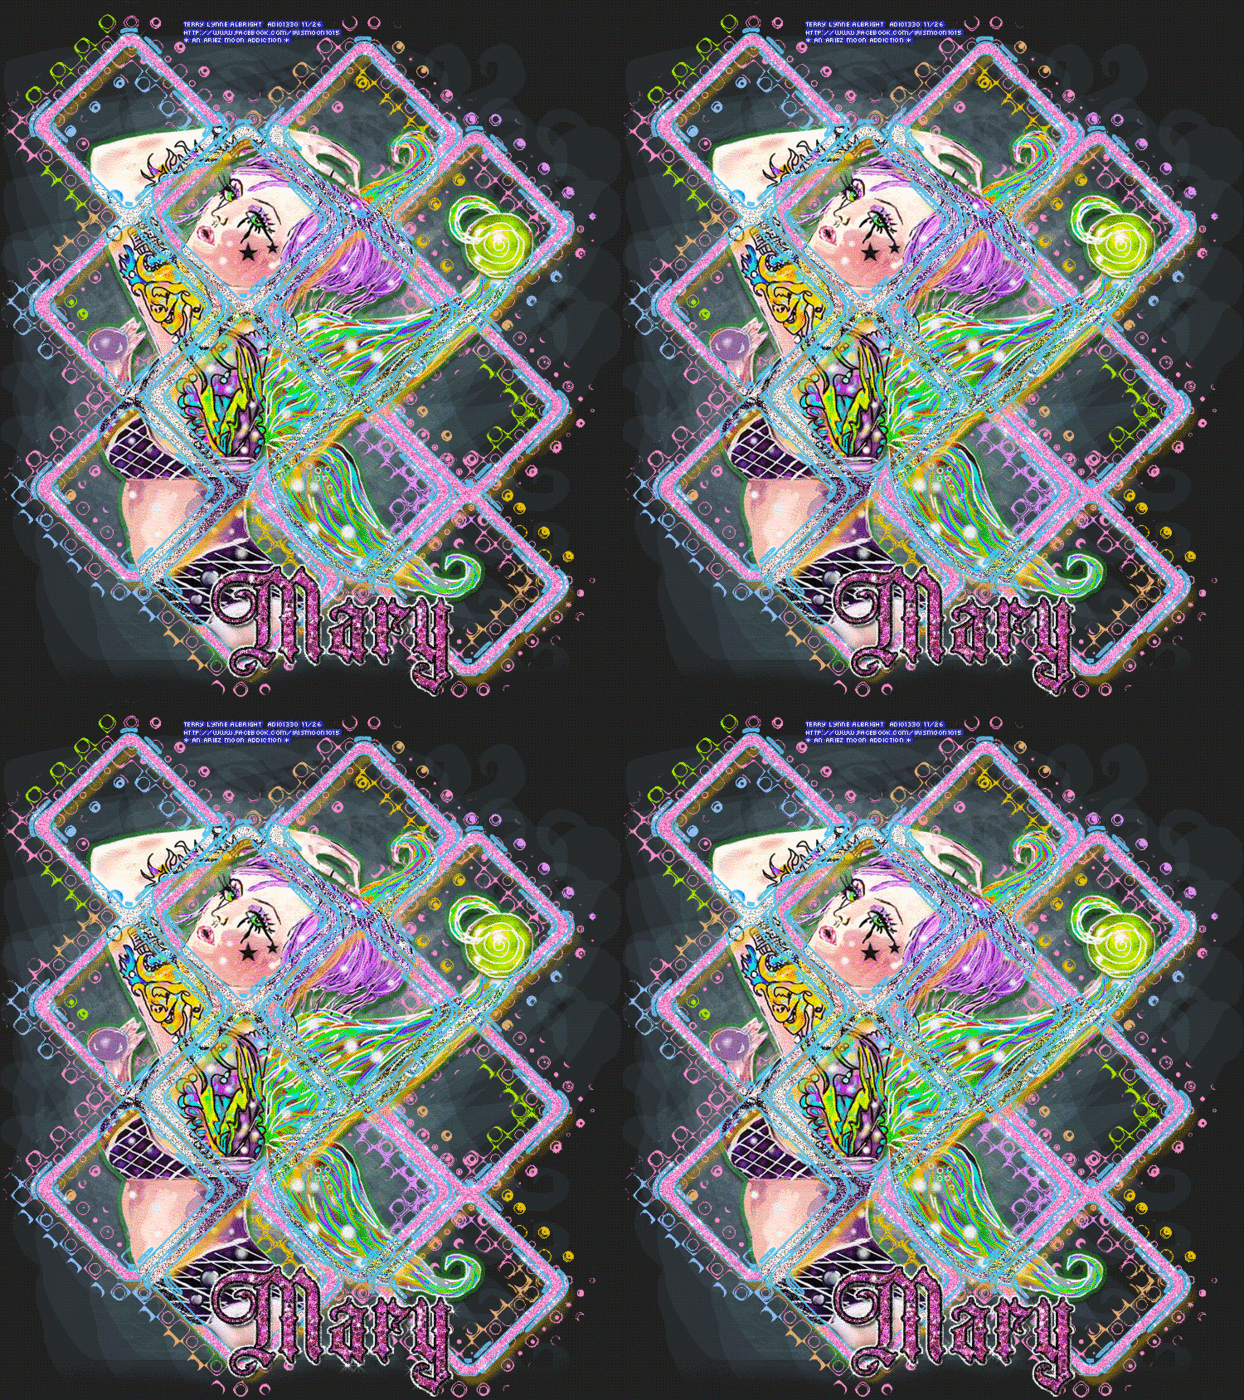
tutorial was created by me, Mary Oakes aka Ariez Moon, on 11/26/2014.
Any similarity to any other tutorial is purely coincidental. Please
abide by my TOU and the TOU of Artists and Designers that you may
use.
I
hope you all enjoyed this tutorial, and I hope that I did not do too
bad of a job writing it. If you have any problems, questions,
comments, or suggestions just give me a hollar in my Cbox, or connect
with me on FB. I will get back to you as fast as I can.
As
always, Happy PSPing.... and Photoshop too :) !!





No comments:
Post a Comment