
This
tutorial was created with Animation Shop 3 and PaintShop
Pro X4 but can be done with other versions and/or programs.
Supplies:
Artist's
Tube of choice: I am using the
gorgeous PTU work of Carla Morrow. Please DO NOT use his/her images
without the proper license or permission. You can find this tube here

Scrap
Kit of choice: I am using the
wonderful PTU kit Fantasy by BLT Dezignz. You can find this kit HERE
Mask
of choice: I am using mask
WSL_mask5 by WeeScott Lass and you can find it HERE
Fonts
of choice: I am using PF
Tempesta Five for the © and ( font ) for the name/text.
Filters
of choice: MuRa's - Copies
Animation
of choice: We will be making
our own.
Ok,
grab a cuppa, and a munchie, and let's go!!
Please
remember to SAVE your work often, RENAME
your layers, and if you feel you have really messed up.... Remember
that UNDO is your bestest friend!!
Abbreviations
C/P
– Copy and Paste
DS
= Drop Shadow
MV
– Merge Visible
AS
– Animation Shop
Create
a new Image 1000x1000, Transparent background. 72Dpi.
C/P
Flower5 to center of canvas. Resize way down.
C/P
the gem and position it in the center of the flower. Hide Bottom
layer, and MV
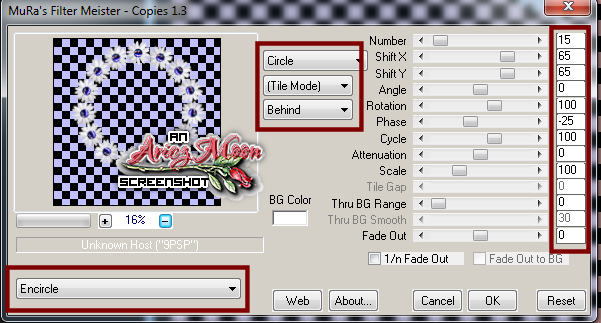
Go
to Effects>Plugins>MuRa's>Copies with the following
settings.
Edit>Cut
Edit>Paste as New Layer. This will center your new frame on the
canvas.
C/P
Bow 1. Resize down and position on top of the frame.
C/P
Ribbon 1. Resize it down and put at the top but under the frame.
C/P
leaves. Resize and place on the lower left under the frame. Duplicate
and move this set of leaves just up a bit. Go to
Ajustment>Hue/Saturation>Vibrancy. Bring the vibrancy of the
leaves up so a setting that looks good to you. On the lower leaves
bring the vibrancy down just a bit.
C/P
Flower6 resize as needed and position on the of the lower leaves.
C/P
Flower4 resize and rotate as needed to fit just above Flower6. Change
the vibrancy of this later to what you like best. Either up or Down.
C/P
the Dangle. Resize down and place on top of the two flowers..
Click
on these last layers individually and erase any parts that are inside
the frame with your eraser tool.
C/P
your tube into the center of the frame Duplicate and drag the layer
under your frame layer. On the top tube layer, erase sections of the
tail to make it look as though the tail is curling up from the
underside of the frame to up over it. Do the same with the upper
right wing.
C/P
the dragonflies from the tube where ever you wish.
Open
the paper you wish to add to your mask and the mask itself. C/P your
paper as new layer. Drag all the way to the bottom. Layers>New
Mask Layer>From Image. Select your mask from the drop down menu.
Close all layers but the mask layers. Merge Down. Open layers.
With
your sparkle brush. Add sparkles where ever you want them. Duplicate
layer and add a colorful shadow with a large blur set to hard light.
Duplicate the original layer again and set to hard light.
Take
one last look at your tag and add anything else that you wish to add.
Select
all layers (CTRL+click on each layer) Crop to Layer Opaque. Resize
shortest size to 750px. Sharpen each layer. Add your © and your name
with any effects that you wish to add.
If
you do not plan to animate. Stop here an save as png. You are done!
If
you are going to animate. Continue on.
Please
remember, there may be other ways of doing this, but this is the way
that I know how, and I'm not saying that is the absolute right way!!
Add
a new layer. Flood Fill this layer with whatever background color you
wish to use. My blog is a very dark grey, so I am using that as my
background color.
Open
Animation Shop and minimize for the time being.
In
PSP C/P the middle dragonfly tube layer as a new image. Zoom in to
about 3 or 400%
With
your lasso tool or other custom selection tool that you are
comfortable with, Make a selection around both of the wings. Go to
Edit>Cut.

Then
go to Edit>Paste As New Animation.
Back
in PSP deselect the wings and copy the body. In AS paste as new
animation.
One
more time.... In PSP Copy MERGED your tag, paste as new animation in
AS. You can minimize PSP. We are done with it now.
Back
in AS. Go to File>New. Make the width and height 300x300px and
make sure that Transparent is ticked.
Now
duplicate this so that you have a total of 21 frames. To do this
click on the Duplicate Frames button.... it looks like this.

If you look at the bottom of the frames window it will tell you how many frames you have so far.

If you look at the bottom of the frames window it will tell you how many frames you have so far.
When
you see frame 17, click on that and hit Duplicate Frames 3 more times
and that will give you a total of 21.
Do
the same for the Dragonfly body and your tag. Minimize those three
for right now.
Working
on your wings. Go to Effects>Insert Image Effect with the
following settings.

You
should now have 21 frames of the wings.
Are
ya with me so far? It really isn't hard once you get used to it.
Ok,
Maximize your Blank animation and the dragonfly body.
On
the dragonfly body click on the first frame and go to Edit>Select
All>Edit>Copy.
Now
be careful with this next part. Don't click on the canvas until you
are sure that you have the body where you want it...... If not you
will have to repeat these last few steps.
On
the Blank click on the first frame and go to Edit>Select
All>Edit>Paste>Into Selected frames. The body will kinda
be like stuck on your cursor. Hover your cursor where you want the
body to be placed. Make sure that there will be enough room for the
wings. Click once. Now all 21 frames should have the body. If it looks
ok you can go ahead and close the OLD body frames.
Now,
do the same thing with the wings. Select first frame, edit select all
edit copy.
On
the new body frames click on first frame etc....
Hover
the wings over the body and match it up to where the wings would
naturally be placed on the body. Click. Now all 21 frames should have
the whole dragonfly. Press the play button to view your dragonfly in action to make sure you pasted the wings ok. If not, just UNDO and retry it. The play button looks like this
Now
lets crop the transparent pixels.. Click on the crop tool and drag.
You know how it works :) Don't get too close as to chop any of the
animation off though.
Now
follow the same steps as above to get the dragonfly on your tag. I
wanted 2 but I didn't want them going in the same direction so I
selected all frames on the dragonfly again and mirrored and rotated
it.. Now play your animation to make sure that it runs smoothly. Got it? Great!! Just hit save and follow the prompts through the animation wizard!
That's
all Folks!! That is all there is to it! I know it seems hard but just
keep practicing and you will have it down in no time!!
This
tutorial was created by me, Mary Oakes aka Ariez Moon, on 11/10/2014.
Any similarity to any other tutorial is purely coincidental. Please
abide by my TOU and the TOU of Artists and Designers that you may
use.
I
hope you all enjoyed this tutorial, and I hope that I did not do too
bad of a job writing it. If you have any problems, questions,
comments, or suggestions just give me a hollar in my Cbox, or connect
with me on FB. I will get back to you as fast as I can.
As
always, Happy PSPing.... and Photoshop too :) !!

No comments:
Post a Comment