
This
tutorial was created with Photoshop CS6 but can be done with other
versions and/or programs.
Supplies:
Artist's
Tube of choice: I am using
Daughter of Skulls and she is the wonderful PTU work of Ian Daniels.
Please DO NOT use his images without the proper license. You can find
this tube here

Scrap
Kit of choice: I am using the
wonderful FTU kit Oh So Skully by Abstract Creations. You can find
this kit HERE
Fonts
of choice: I am using PF Rhonda
Seven for the © and JackLantern BB for the name/text.
Filters
of choice: Alien Skin Xenofex 2
- Lightning
Ok,
grab a cuppa joe, and a munchie, and let's go!!
Please
remember to SAVE your work often, RENAME
your layers, and if you feel you have really messed up.... Remember
that UNDO is your bestest friend!!
OK,
don't freak out, you need to open a large canvas, but it will be ok.
We will resize later.
Create
a new image 1200 x 1200, 72dpi with a transparent background. Drag
and drop element 24 onto your canvas. Duplicate and merge visible.
Duplicate.
Edit>Transform>Flip Vertically and rotate it to the right so
that the left bottom point meets the left bottom point of the first
layer. Merge Visible.
Duplicate.
Rotate to the right and position so that the arc is straight up.
Duplicate one more time, rotate and position that , when put together
all three look like a half webby circle. Merge Visible.
Duplicate,
Flip Vertically and move this half down until the middles meet. It
should look like a spiky web. Merge Visible. If you have any extra
transparent canvas go to Image>Trim. Transparent pixels ticked,
and all four boxes on the bottom checked. Click ok. Go to
Image>Resize, and change the Width to 800..
Drag
and drop paper1 onto the middle of you canvas. With your Ellipse
Shape tool. Set to feather 3.5, Circle and from middle, draw out a
large circle, invert the selectin and hit delete on your keyboard.
Drag
and drop element 35 onto the center of the canvas.. This is what we
are going to use for our frame. With your magic wand tool, hold the
Shift key and click inside each section, of the inside of the frame.
Seclect>Modify>Expand and expand by 10
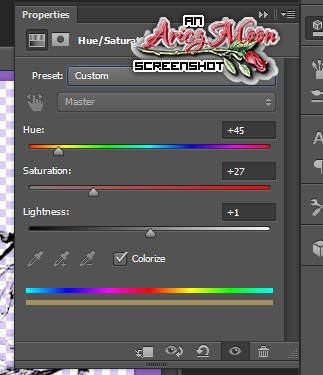
Open
paper 2. Go to Window, and look to make sure you have a check mark
next to Adjustments. This will make our adjustments panel available
in our palettes.
See
my screen shot. Click on Hue/Saturation and follow my settings, or
play until you find one you like. Select>All, Edit>Copy.

Back
to your working image. Layer>New Fill Layer>Solid color. Choose
white. Edit>Paste Special>Paste in place. Right click and
choose Create clipping mask. Change the layer mode to hard light.
Close your frame layer and your web layer then merge visible. Lower
the opacity of the lower down, to something that looks good for you.
Mine is about 40%.
Drag
and drop your tube, resize and place to the left of the frame.
Position right knee (our right) so that it looks like she is in part
of the frame. Erase the wood that sits on top of the skull medallion.
Now
add some elements from the kit. Any ones you want to make the tag
look like your own style. Resize, layer, rotate, recolor.....
Whatever you wish to do!
Take
a last look at your tag. Add drop varying drop shadows to some or all
of your layers. Add a glow around your moon if you used one.
Resize
your image, making sure that you keep styles and such to be reduced
along with the image. Resize to your choice. I brought my longes side
down to 700.
Add
your © and your name.
If
you don't wish to animate, you can add a lightning brush to a new
layer set to hard light on top of your frames background layer, then
stop here and save as a PNG-24
If
you are animating, please follow along here.
First
make sure your animation window is open down at the bottom of your
screen. If it is not there go to Window and click on Animation. Now
should see it. Click on the Create Frame Animation button right there
in the middle.
Add
a new raster layer and with your paint bucket fill it white. Drag the
layer all the way down to the bottom.
Click
on your frames background layer and duplicate it two times, so that
you actually have three layers of them.
Close
the top two layers and on the original layer hold your cursor over
the thumbnail and CTRL Click to make a selection around it, then go
to Filter>Xenofex 2>Lightning, with these settings and move the
circle for the starting position to match my example below.


Hide
that layer, and open the second layer. Don't change anything EXCEPT
hit the Random Seed button, then click ok. Close that layer and do
the same for the last layer.
While
on your last layer go to Selection>Inverse. Hit delete on your
keyboard. Close that layer. Click on the layer underneath. Open the
layer hit Delete. Close it. Do the same for the last layer only dont
close the layer off. Deselect.
Ok
here we go, in your layer palette you should have all layers open
EXCEPT the two top lightning layers. If you look down in your
animation window, you will see that your first frame is already
there.
Click
on the folded paper icon, if you hover your cursor over it, it will
say Duplicate frame.
In
your layer palette, close of the first layer, and open the second.
Back
to your animation window. Click on the Duplicate Frame button and in
your layer palette close of the second layer and open the last layer.
Are
you with me so far? Awesome! If not, you can go HERE to watch a video
of how to do it.
So
now, you should have 3 frames in your animation window. Now this took
me forever to get right, and me all day today forever! Click on the
very first frame. Then click on the Tween Animation Button, it is the
one right before your Duplicate Frame button.
When
the window pops up, type in the number 3 and hit ok. You will see
that more frames were added. Click on frame number 5 and hit the
Tween button. Make sure it says 3 still and then hit ok. Now do this
again for frame number 9 EXCEPT in the drop down menu where it says
Tween With, choose First Frame, hit ok!!
Click
on your very last frame and while holding the shift key click on your
very first frame. Just underneath the thumbnail of frame on is a tiny
arrow, click on that and choose 0.1 sec. Just underneath that you
have your looping options. Choose Forever.
Click
on the first Frame.
Hit
the play button to make sure that everything is running smooth
Is
it? Fantabulous!!
Click
on the first frame and then go to File>Save for Web with these
settings
OH
lala you are finished!!!
This
tutorial was created by me, Mary Oakes aka Ariez Moon, on 11/02/2014.
Any similarity to any other tutorial is purely coincidental. Please
abide by my TOU and the TOU of Artists and Designers that you may
use.
I
hope you all enjoyed this tutorial, and I hope that I did not do too
bad of a job writing it. If you have any problems, questions,
comments, or suggestions just give me a hollar in my Cbox, or connect
with me on FB. I will get back to you as fast as I can.
As
always, Happy PSPing.... and Photoshop too :) !!

No comments:
Post a Comment