Pages

Showing posts with label PTU Tube. Show all posts

Monday, February 23, 2015

CT TAGS Dance In The Rain Kiss Me I'm Irish Kit

Showin off an Adorable St. Patty kit by Dance In The Rain called Kiss Me I'm Irish. This is such a fun kit to work with, and it has so many possibilities for tags! Create tags just using the wonderful elements in the kit, or combine them with a tube.... It all comes together perfectly!!


You can purchase this kit HERE
Tube used in the first tag is St.Patrick'sDay by Kanenna.

I also made the Layer Style for the second tag. If you use Photoshop go ahead and snag it. CU OK but please do not share it. If someone wants it, send them here to download it. Please leave some love while downloading. Click on the sample image to take you to the download.


post signature

Friday, January 23, 2015

♥ Dreamland Fairy ♥ Double CT Tutorial Featuring ADI's Heather Valentin and Kit Breathe No More - Black Widow Creationz


This tutorial was created with Photoshop CS6 or CS2 depending on what filters I use. Some older filters will no longer work in CS6. Can be done with other versions and/or programs.

Supplies:
Artist's Tube of choice: I am using the adorable Izzybella, PTU art of Heather Valentin. Please DO NOT use her images without the proper license or permission. You can find this tube here

Scrap Kit of choice: I am using the wonderful PTU kit Breathe No More by Black Widow Creationz. You can find this kit here

Mask of choice: I am using mask ARZMN_%StarMask which I myself created and you can find it below. Click to make full size, then save.


Fonts of choice: I am using FFF Harmony for the © and Bumblebees Demo for the name/text.

Filters of choice: Penta.Com – Color Dot
MuRa's Miester - Copies

*TUTORIAL NOTE* at some point I forgot to record a step where I selected all layers to resize a bit... soo.... just take note that you may have to do that at some point. Whatch your elements, if they seem to large then that is when you should have resized using Free Transform.

Ok, grab a cuppa, and a munchie, and let's go!!

Please remember to SAVE your work often, RENAME your layers, and if you feel you have really messed up.... Remember that UNDO is your bestest friend!!

Abbreviations
C/P = Drag and Drop OR Edit>Select All>Edit>Copy>Edit>Paste
DS = Drop Shadow
MV = Merge Visible

Create a new image 700 x 700 , transparent background, 72dpi/ppi. Name the file whatever you wish and hit ok. Minimize for now.
Create another new image 1000 x 1000 transparent background. Place el 2 in center of canvas. Resize down to 60%. Filters>MuRa's >Copies with the following settings.

C/P to your 700 x 700 Image and then reduce it down to 80%. You can now close out the larger image without saving it.
Click on Raster 1 layer. Open and prepare your mask, C/P it to the center of your canvas.
If you do not know how to prepare your mask, please see HERE.
C/P PP4, right click on the layer in the layers palette and choose Create Clipping Mask. Close off your frame layer and layer 1 and MV. Open all layers.

C/P el 34 and reduce to 50%. Place on the bottom left of the frame.
C/P el 33 reduce to 50% and place bottom left on top of the stump.
C/P el 35, reduce to 45% and place on at the bottom of the stump.
C/P el 27, reduce to 75%, rotate it slightly to the right if you wish. Drag the layer below the frame layer in the layers palette.. Click on the top layer to make sure it is active.
C/P el 29, reduce to 80% and place in the upper right on top of the frame and leaves. Erase any bits with your Eraser Brush that you don't want to be seen.
C/P el 37, reduce size to your preference. Place at the bottom right.
C/P el 5, reduce 50% and flip horizontal. Place at the lower right on top of the mushroom cluster.
C/P el 26. Erase the stem and drag the layer under all the other layers in the layers palette. Position at the very bottom so that it looks like everything was sitting on the leaf.

Click on your frame layer to make it active. With your Magic Wand tool click inside the frame. Go to Select>Modify>Expand and expand the selection by 35 to 40 pixels. Again with your Magic Wand, Shift+click inside all the little openings of the frame where the petals meet. Zoom in to make sure you don't have any holes.

Create a new layer and flood fill the selection with white. Deselect and drag the layer under the frame layer, in the layers palette.
C/P pp 3, right click and choose Create Clipping Mask.
C/P pp4, go to Edit>Transform>Rotate 90°CW. Set the layer's Blend Mode to what ever looks best to you. Right click and create Clipping Mask. Close off all layers except the white, and the two paper layers, and MV. Open the rest of the layers.

C/P your tube. Resize down to what you like best. Erase any bits of the tube that stick out of the frame.
Go to Image>Adjustments>Hue/Saturation. Use 45 for saturation and -11 for lightness. Right click and create clipping mask. Close off all layers but your paper layers and the tube layer, and MV. Open up all layers and then Go to Filter>Penta.Com>Color Dot, with the following settings.

Take a last look at your tag, and make any adjustments that you wish to make. Add DS(s) to any or all layers.
Add your © info and your name with any layer styles that you wish to use.
Crop the transparent pixels around your image and resize to 600 X 600 pix.
Save for Web as PNG-24 and you are finished..

This tutorial was created by me, Mary Oakes aka Ariez Moon, on 01/22/2015. Any similarity to any other tutorial is purely coincidental. Please abide by my TOU and the TOU of Artists and Designers that you may use.

I hope you all enjoyed this tutorial, and I hope that I did not do too bad of a job writing it. If you have any problems, questions, comments, or suggestions just give me a hollar in my Cbox, or connect with me on FB. I will get back to you as fast as I can.

As always, Happy PSPing.... and Photoshop too :) !!

post signature

Tuesday, January 20, 2015

♥ Delicate Winter ♥ Forum Style Tutorial Featuring Misticheskaya


This tutorial was created with Photoshop CS6 or CS2 depending on what filters I use. Some older filters will no longer work in CS6. Can be done with other versions and/or programs.

Supplies:
Artist's Tube of choice: I am using the gorgeous PTU tube Faith by Misticheskaya. Please DO NOT use her images without the proper license or permission. You can find this tube here

Scrap Kit of choice: I am using the wonderful PTU kit Fall Sparkle by Tiny Turtle Designs. You can find this kit here

Mask(s) of Choice. I am using Forum Mask 5 by Moonbeams and Spiderwebs, and you can find them here

Fonts of choice: I am using Grixel Acme 7 Wide for the © and Always Black for the name/text.


Ok, grab a cuppa, and a munchie, and let's go!!

Please remember to SAVE your work often, RENAME your layers, and if you feel you have really messed up.... Remember that UNDO is your bestest friend!!

Abbreviations
C/P = Drag and Drop OR Edit>Select All>Edit>Copy>Edit>Paste
DS = Drop Shadow
MV/MD – Merge Visible/Merge Down

The Tag:
Create a new image 600 x 200 , transparent background, 72dpi/ppi. Name the file whatever you wish and hit ok..

Prepare your mask, and drag it to the center of your working canvas. If you are unsure how to prepare your mask, please go HERE  for a short tutorial.

C/P FS (48) above your mask layer. Place your cursor between the paper and the mask layers thumbnail, hold down ALT and click to make a clipping mask. This will “clip” your paper to your mask. MD

C/P FS (37) above your merged mask layer, and set the layers Blending Mode to Multiply.

C/P FS (01) above the paper layer. Duplicate. On the bottom duplicate right click on the layer and choose Blending Options. Click on DS and give it a very small light shadow of your choice. Click on Inner Glow and give it a small glow. Close all but those two layers in the layer's palette, and MV.

C/P FS (64). Duplicate. Give the bottom layer an Outer Glow. Close all layers but those two layers and MV.

C/P FS (70). Resize and position in the upper left corner. Rotate it a bit, if you would like.
C/P FS (96). Resize and place in the lower left corner.
C/P FS (78). Resize and rotate to the left so the nub of the twig is sitting snugly in the upper right corner. Duplicate. Go to Edit>Free Transform>Flip Vertical and position in the lower right corner.
C/P FS (33). Resize and rotate so that it sits horizontally. Position center right of the tag.
C/P FS (44). Reduce the size and rotate so the stem faces the upper right corner of the tag. Position to your liking.
C/P FS (60). Resize and position on top of the leaf.
C/P (124). Resize and rotate. Position to your liking on the lower right corner of the tag.

C/P your tube. Resize down to your liking and position center left of the tag.

Take one last look at your tag. Reposition elements and/or add anything else you wish to add. Ad DS(s) and/or glows to any or all layers, that you wish to add.

Create a new layer Select>All>Select>Modify>Border. Type in the amount of pixels you would like your border to be. Mine was 15. Choose a color that matches your image and click inside the selection a couple of times to make it nice and solid. Add a layer style of choice.
Add your © info and your name with any layer styles you wish to you use.

Save for Web as JPEG or PNG, DO NOT close your image just yet. We will need it in a just a sec.

The AV:
Create a new 150 x 150 image. Transparent background. 72 DPI, name the file whatever you wish.

Back on your main image. Click on the rectangle Tool. In your settings set the Tool Mode to Path. Click on the little gear icon located at the end of the Tool Settings. Tick the Square option. Click once somewhere on the background of your tag, that you would wish to use for the background of your AV. A pop up should appear. Enter the dimension of 150 in both the width and the height and tick From Center.
Click on the Paths tab, just above your Layers Palette. Right click on the Work Path and choose Make Selection. When that pop up shows, make sure Feather Selection is to 0.
If it isn't exactly where you want it, that is ok. We are going to fix that now.
Go to Select>Edit In Quick Mask Mode OR click on the Quick Mask button on your Tool Bar. Except your selection everything around it should be covered in red.
With your Move Tool or your arrow keys on your keyboard, nudge your square exactly as you like it.
Select>Edit In Q. M. Mode OR the button once more, and it should now be back to a regular selection.
Edit>Copy Merged

On your AV canvas now, go to Edit>Paste.
Create a new layer, in the the same steps as your main image, create your border.
Type your initial with the same layer styles as you did your name, and if your AV has the tube on, place © info. Save as JPEG or PNG and you are finished!!

OOOO O-o..... Very Pretty!!
This tutorial was created by me, Mary Oakes aka Ariez Moon, on 01/20/2015. Any similarity to any other tutorial is purely coincidental. Please abide by my TOU and the TOU of Artists and Designers that you may use.

I hope you all enjoyed this tutorial, and I hope that I did not do too bad of a job writing it. If you have any problems, questions, comments, or suggestions just give me a hollar in my Cbox, or connect with me on FB. I will get back to you as fast as I can.

As always, Happy PSPing.... and Photoshop too :) !!
post signature

Monday, January 19, 2015

♫ Winter Wonderland ♫ CT Tutorial S&CO featuring Di Halim, Designs By Joan and CT tag Bibi's Collection

I have a gorgeous new tut for you today called Winter Wonerland, and I just wanted to let you know to take a look at the bottom of the this tut for an alternate tag using the same gorgeous tube and actual matching kit by Bibi!! WOOT WOOT!!


This tutorial was created with Photoshop CS6 or CS2 depending on what filters I use. Some older filters will no longer work in CS6. Can be done with other versions and/or programs.

Supplies:
Artist's Tube of choice: I am using the gorgeous PTU tube named Witner Baby by Di Halim. Please DO NOT use her images without the proper license or permission. You can find this tube here

Scrap Kit of choice: I am using the wonderful IB PTU kit Winter Lovely by Designs By Joan. You can find this kit here

Stock Photo: I am using this gorgeous wintery pine photo taken by Engimono, called Russian Winter. You must register for an account (it's free) to use the stock. You can find it HERE.

Fonts of choice: I am using Teachers Pet for the © and Belluccia Pro/Swash for the name/text.

Ok, grab a cuppa, and a munchie, and let's go!!

Please remember to SAVE your work often, RENAME your layers, and if you feel you have really messed up.... Remember that UNDO is your bestest friend!!

Abbreviations
C/P = Drag and Drop OR Edit>Select All>Edit>Copy>Edit>Paste
DS = Drop Shadow
MV – Merge Visible

Create a new image. I made mine very large, to give me room to work. 1100 x 1100 , transparent background, 72dpi/ppi. Name the file whatever you wish and hit ok.
C/P element 12. Resize down to 80%. To so this, go to Edit>Free Transform and see my settings below. You can also find it HERE, with other helpful stuff.
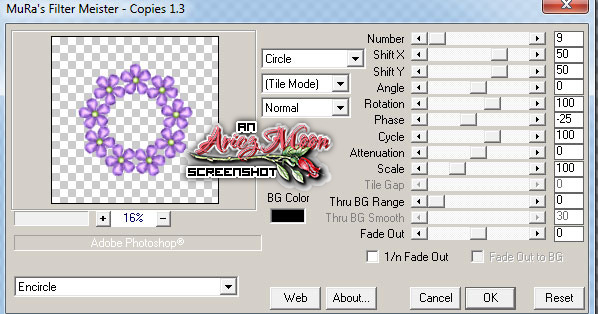
Duplicate the frame, and using Free Transform rotate it a bit making sure the bottom right of one frame touches the top right of the other.
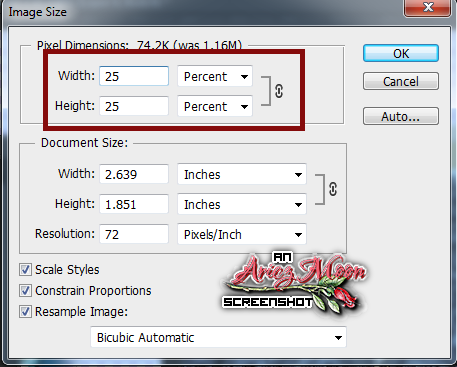
Open up your stock photo and go to Image>Image Size. Reduce the photo down to 25%.

 Drag the photo to your working canvas. Drag the layer under the frame layers and then use Free Transform to reduce the image to the size that you would like it. Position the photo where you choose.

With your eraser tool, erase the bottom half of the top frame, and top half of the bottom frame, and then erase the part of the stock photo that hangs out of the inside of both frames. Close all layers except the two frame layers and MV.

C/P element 45. Duplicate the fence and hide the duplicate in the layers palette for now. Drag the layer that is left open, under both frame layers but above your stock photo. Position the fence near the bottom of the frame. Erase the snow between the fence posts and around the outside of the frame. Indicated in the screenshot below.

Right click on the layer and choose Clipping Mask.. This will clip the fence to the photo. Double click on the layer and give the fence a slight DS.

Ok working from left to right....
C/P element 49. Resize 60%. Position at bottom of frame, a bit off to the left.

C/P Winter Baby tube. Resize to 55%. Place the layer under the bucket layer and place to tube over the left side of the frame, high enough to cover the bottom half of the frame.

C/P element 48. Resize 70%. Place layer under the tube layer and position so that the rabbit is peeking out from behind the tube.

C/P element 13 resize to your liking and position so the bird sits on the tube's shoulder. Drag the layer under the rabbit layer, in the layer's palette. CTRL+click on the layer's thumbnail to make a selection around the bird. Click on the tube layer to make it active, and with an eraser brush, erase the little part of the tube that covers the birds belly.

C/P element 94. Resize down to your liking, rotate it a bit. Make sure the layer is under the bunny layer.

C/P element 53. KEEP THIS OPEN ON YOUR WORKSPACE FOR NOW. We will be using it again in a bit.
Now, back to your working canvas....With Free Transform hold down your SHIFT+CTRL keys and with your mouse drag the bottom right node up to -10.9°. You will see a little black box with white numbers letting you know when to let go of the mouse. 

Place this layer under the violin layer so that it looks like the violin is being propped up by the log.

C/P element 55. Resize down your liking. Drag the layer under the log layer, and position as you choose.

C/P element 50. Resize if you wish and place on top of and to the right of the music sheets.

C/P element 11. Resize down and position a bit over the rabbit.

C/P element 38. Resize down, and rotate it so that it sits along the right side of the frame's edge. With your eraser brush, erase the bits that you do not want. Place this layer under the rabbit layer, in the layer's palette.

C/P element 30. Resize to your choosing and place under the flower cluster..

Open up the fence layer that we hid in the beginning of the tutorial. Drag the layer under your photo layer, in the layers palette. With your eraser brush set a 0 hardness, erase around the sides and bottom of your image. If there isn't enough of the snow peaking out from under the layers, use your move tool to bring it down some. You don't need to be neat and tidy about either. You want to erase it so that the edges look soft and natural. Go to Filters>Blur>Motion Blur, set the Angle to -90° and the Distance to 35 pixels.
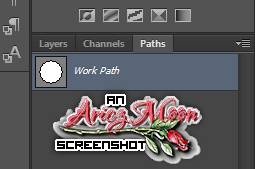
Did you remember to keep the log element open? Good! With your Lasso Tool make a selection around a part of the drifts from the log element. Edit>Copy. Then on your working canvas Click on the very top layer in the layers palette to make it active. Edit>Paste. Position as you like. Duplicate and position more as needed.

Take one last look at your tag. Reposition things as you may need.

Click on the very top layer, then shift click on the very bottom layer. With Free Transform, resize your image down to about 75 to 80%. You want enough canvas around your image to paste a paper, make a selection, and feather it. So, If you resized it too much or too little, just undo and do it again.

C/P PP=4. Drag the layer all the way down to the bottom of the layers Palette. With your Lasso Tool drag your mouse starting from the lower right corner where the rabbit is, all the way around your image. Again, you don't have to be neat about it. Put your own unique spin on it. When you get back to the starting point double click to get the selection. Go to Select>Modify>Feather. Feather anywhere between 10 to 20 pixels. Select>Inverse, then hit Delete on your keyboard. You should now see soft edges. If you dont like the way it looks. Undo, then play around with it some. You can also use your eraser brush set to 0 hardness to refine it more.

C/P PP-10. Drag this below PP-4. CTRL+click on PP-4's thumbnail to make a selection. Make sure PP-10 is the active layer, then once again feather the selection, around 5 to 10 pixels. Inverse>Delete. With your Move Tool, nudge the paper to the left. However looks best to you. Refine it more if you wish.

Apply any DS(s) or glows to whatever elements you wish to add them to.

Check the size of your tag, if it is still too big for you liking do as you did before with all the layers selected, size it down. Then trim your transparent pixels. Image>Trim

Add your © info and your name and/or other text with what ever layer styles you may wish to use. Save as PNG-24 and you have yourself a gorgeous tag!! Go show it off!

Here is an alternate tag, as promised, using the matching kit Winter Baby by Bibi!! You can also find this kit at


This tutorial was created by me, Mary Oakes aka Ariez Moon, on 01/18/2015. Any similarity to any other tutorial is purely coincidental. Please abide by my TOU and the TOU of Artists and Designers that you may use.

I hope you all enjoyed this tutorial, and I hope that I did not do too bad of a job writing it. If you have any problems, questions, comments, or suggestions just give me a hollar in my Cbox, or connect with me on FB. I will get back to you as fast as I can.

As always, Happy PSPing.... and Photoshop too :) !!


post signature

Friday, January 16, 2015

♥ Will You Be My Valentine, Darling? ♥ CT tutorial for Mellie Beans


This tutorial was created with Photoshop CS6 or CS2 depending on what filters I use. Some older filters will no longer work in CS6. Can be done with other versions and/or programs.

Supplies:
Artist's Tube of choice: I am using the awesome PTU art of Spazz'd Art. Please DO NOT use this image without the proper license or permission. Her name is Valerie, and you can find this tube here

Scrap Kit of choice: I am using the gorgeous PTU matching kit Valerie by Mellie Beans. You can find this kit here

Mask of choice: I am using mask ARZMN_Mask%07 by yours truly :) and you can find it at the bottom of the tutorial.

Fonts of choice: I am using FFF Harmony for the © and Signarita Chloe for the word art, and Scriptina for names.

Filters of choice: I used Xero – Porcelain at the default settings.


Ok, grab a cuppa, and a munchie, and let's go!!

Please remember to SAVE your work often, RENAME your layers, and if you feel you have really messed up.... Remember that UNDO is your bestest friend!!

Abbreviations
C/P = Drag and Drop OR Edit>Select All>Edit>Copy>Edit>Paste
DS = Drop Shadow
MV – Merge Visible

Create a new image 800 x 800 , transparent background, 72dpi/ppi. Name the file whatever you wish and hit ok.

Prepare your mask, and apply it to the center of the canvas. If you do not know how to prepare your mask, you can go here for a short tutorial.

C/P pp06 to the center of your canvas and create a Clipping Mask with your mask layer.
MV.
C/P ell to the center of the canvas. Rotate the frame to the left about 20 to 25 degrees.

Open the Valerie tube and choose which layers you wish to use. C/P your tube into your canvas. Scale Valerie down to 75%. and drag the layer under the frame layer. Position your tube in the frame as you would like it to appear.

With your magic wand select inside the frame on your canvas. Select>Modify>Expand about 6 pixels. Select>Inverse. Click on your tube layer in the layer palette and hit DELETE on your keyboard. Lower the opacity of your tube layer to 66 and set the layer blend mode to Hard Light.

C/P e17. Rotate the garland and place along the long side of the frame. Duplicate and place the duplicate along the other side of the frame.

C/P e61. Place in the upper right corner of the frame.
C/P e62 and e63. Place in the lower right corner of the frame.
C/P e21 and 32. Place in the lower left of the frame.

Select all layers in your layer palette and reduce the size of your image by 20% or until your image width has a size of about 700pixels.

C/P e60. Rotate and position where you would like it along the left side of the frame. Drag the layer under the frame and close up layer. Duplicate and position the duplicate to the right side of the frame. Delete any areas of the element that show inside the frame.
Go to Filter>Noise and about 15% noise to each one.

C/P Aimee one more time onto your canvas. Reduce the size of the tube by 40% or what ever looks best to you. Duplicate three more times, for a total of 4 tubes.

Close off two of the 4 tube layers in the layers palette. Select the other two tube layers in the layers palette (click on one, and then CTRL+click on the second one) With your move tool position them so that Aimee is standing in the middle of the canvas, which also looks as though she is standing in front of the middle of the frame. On the bottom tube go to Filters>Sharpen>Sharpen. Then Filters>Blur>Gaussian Blur and blur by 2. Add a slight DS.
On the top tube layer, make sure it is highlighted and then apply Xero – Porcelain at the default settings.
Unhide the other two tube layers and position one on each side of the frame. You can look at my tag for reference. Set each of the layers blending modes to Luminosity and lower the opacity of the layers to 45%.

C/P e02. Position the ribbon so that it swirls around the lower left where the bird and such are. Zoom in and carefully erase where it sits on the frame, and then erase where it circles on Aimee's legs. It will look as though the ribbon is passing through them.

Ok, last element. C/P e39. Position where you like it best. Duplicate it and give it a dark pink outer glow. Duplicate this layer and then set the blend mode to hard light.

Create a new layer on the very top of your layers palette.
Grab your Freeform Pen Tool and set it to path. In the settings palette you will see a little button that looks like a gear. Click that and set your curve fit any where between 5 and 10. Draw something that looks like a long S only with shorter tails where you would like your word art to go.

Grab your text tool with what ever font you wish to use. Set your color. Set your alignment to center. Place your cursor over the path and When your cursor changes click once to set your type position. Type “ Serez-Vous Mon Valentine, Ma Chérie?” ( Will you be my Valentine, darling?). Add any effects you wish to add to the text. Add DS or glows to any or all layers that you wish to add depth.
Add your name with effects and your © info.

Magnifique travail, mes amours! ( Wonderful job, my loves!)

Trim your image, and you are finished!!
Save for Web as PNG=24

This tutorial was created by me, Mary Oakes aka Ariez Moon, on 01/16/2015. Any similarity to any other tutorial is purely coincidental. Please abide by my TOU and the TOU of Artists and Designers that you may use.

I hope you all enjoyed this tutorial, and I hope that I did not do too bad of a job writing it. If you have any problems, questions, comments, or suggestions just give me a hollar in my Cbox, or connect with me on FB. I will get back to you as fast as I can.

As always, Happy PSPing.... and Photoshop too :) !!

Here is the mask for you all to enjoy. Hope it is useful to you! Please leave a THANK YOU!!

post signature

Thursday, January 15, 2015

♥ Faerie Glade ♥ CT Tutorial ADI~Charmaine Flannery and a new Mask!


This tutorial was created with Photoshop CS6 or CS2 depending on what filters I use. Some older filters will no longer work in CS6. Can be done with other versions and/or programs.

Supplies:
Artist's Tube of choice: I am using the lovely Aimee, PTU work of Charmaine Flannery. Please DO NOT use her images without the proper license or permission. You can find this tube here 

Scrap Kit of choice: I am using the gorgeous PTU kit Fairy Dust by Tiny Turtle Designs. You can find this kit here

Mask of choice: I am using a mask that I made. ARZMN_Mask%06. and you can grab it by clicking on it to bring it to full size then save the image. Or mask of choice.

A Poem or part of one and/or a quote: The one I used is named In Faerie Glade and was written by John Bliven Morin. It can be found HERE 

Fonts of choice: I am using FFF Harmony for the ©, Eutimia I for the name, and ALS Script for the poem.

You will also need my preset shape PNG file if you are using Paint Shop Pro

or
If using Photoshop, the actual shape file, which you can download here 

Ok, grab a cuppa, and a munchie, and let's go!!

Please remember to SAVE your work often, RENAME your layers, and if you feel you have really messed up.... Remember that UNDO is your bestest friend!!

Abbreviations
C/P = Drag and Drop OR Edit>Select All>Edit>Copy>Edit>Paste
DS = Drop Shadow
MV – Merge Visable

Create a new image 800 x 800 , transparent background, 72dpi/ppi. Name the file whatever you wish and hit ok.
C/P or apply the preset shape to the center of the canvas. Photoshop users, make sure your fill is set to white, or what ever color you wish to use and the stroke is set to null.
Prepare and apply the mask to the center of the canvas. C/P paper fairy dust (13) or whatever paper you wish to use, above your mask and create clipping mask. Duplicate the paper and with your burn tool darken up parts of the paper. The importance of using the shape under the mask is 1) The colors are so light that to actually see anything you would have to apply the mask twice. 2) Further down in the tut you will be adding some shadows that will give further depth to the image.

C/P fairy dust (83) to the upper right of the mask, and drag the layer under the mask layer, in the layer palette. With your eraser on a soft setting erase the part of the element that hangs inside the mask.

C/P fairy dust (5). Duplicate, and position each layer where you would like it to go. Erase parts of the glitter that fall on the hearts of the mask.

C/P fairy dust (80) and (108). Place one on each side of the mask and if needed erase a little of the trunks until they reach just the inside of the mask.

C/P your tube. Resize it down to what ever you desire. Place Aimee to the center and a little to the left, on top of the mask. Carefully erase around her knees so that it looks as if she is sitting inside of it. I left part of the cat too. Also carefully erase near her arms so more of the hearts show from the mask. See my tag above for reference.

C/P fairy dust (24), (22), and (114) Resize down and position to the right of Aimee and on top of the bottom of the tree.

C/P fairy dust (101) and place at the bottom half of Aimee.
Add any other elements that you wish to add.

Now lets brighten up some of the colors on our tube and butterflies.
Click on your tube layer to make Aimee active. Go to Image>Adjustments>Vibrance and play with the settings until you are happy with them. Do the same with the butterflies and other elements.

Add DS of choice to all elements except for your shape, mask and purple glitter.
Add the following DS to your SHAPE

Add the following DS to your MASK.

Select all layers in your layers palette. Do this by clicking on the top layer then hold your shift key and click on the last layer. Go to Edit>Transform>Scale. Reduce your image a bit. You want enough room to where you can fit a good size text around your image, without the text getting cut out of the canvas. Don't forget to hit the checkmark to apply the transformation.

Use the Sharpen>Unsharp Mask filter to sharpen your purple glitter. Then apply Noise at 15 gaussian. Add a slight DS.

Click on the very top layer in the layer palette. Select your Ellipse Tool with the following settings

Place your cursor near the center of the canvas, click and drag your mouse down and to the right until your circle goes completely around your image. Don't worry if it is off center, we will fix that now. In your layers palette, click the Paths tab. If you do not see it in your layers palette go to Window>Paths.

Click where it says Work Path, then right click on the actual path on your canvas and choose Free Transform Path. Click on your Move Tool and move your path to where you would like it.

Click back onto the layers tab. Choose your Text Tool. Select your font and font settings. Choose Center for your text alignment. Smooth for your anti-aliasing. Hover your cursor over your path until you see that the cursor has changed.

From this 
       
             
 to this
   

Click once then start typing your text from the poem. Add any layer styles that you wish to add to your text. Click on the Paths Tab one more time. Right click on the path and choose Delete Path. Click back on the layers tab.

Trim the empty space around your tag and resize it to 700 x 700. Place your name and © info. Save for Web as PNG-24

Oh lala, you are done!!

This tutorial was created by me, Mary Oakes aka Ariez Moon, on 01/14/2015. Any similarity to any other tutorial is purely coincidental. Please abide by my TOU and the TOU of Artists and Designers that you may use.

I hope you all enjoyed this tutorial, and I hope that I did not do too bad of a job writing it. If you have any problems, questions, comments, or suggestions just give me a hollar in my Cbox, or connect with me on FB. I will get back to you as fast as I can.

As always, Happy PSPing.... and Photoshop too :) !!

post signature