
This
tutorial was created with Photoshop CS6 or CS2 depending on
which filters I use, but can be done with other versions and/or
programs. Note some of your favorite older
filters will no longer work in CS6.
Supplies:
Artist's
Tube of choice: I am using the
wonderful animals that are in the kit for the main tubes.
Scrap
Kit of choice: I am using the
gorgeous PTU kit Autumn Walk by Mysterfeerie. You can find this
beautiful kit here
Mask
of choice: I am using mask
MPM_mask84 by Millie at Millie's PSP Madness and you can find it HERE
Fonts
of choice: I am using OH La La for the © and The Carpenter Regular for the name/text.
Ok,
grab a cuppa, and a munchie, and let's go!!
Please
remember to SAVE your work often, RENAME
your layers, and if you feel you have really messed up.... Remember
that UNDO is your bestest friend!!
C/P
= Copy and Paste/Drag and Drop
DS
– Drop Shadow
This
is actually going to be two tags in one tut!!
First
Tag
Create
a new image 800x800, transparent background, 72dpi.
C./P
52 to center of canvas.
C/P
all the animals from the kit and resize to your liking.
Duplicate
the kittens a couple of times and arrange them to how you like.
Alter
or recolor them so that they do not look so uniform.
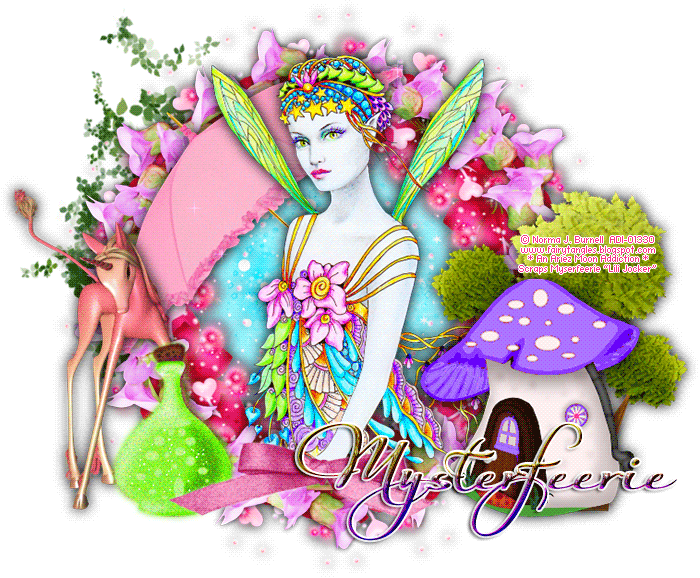
Here
is what I did.
On
two of the kittens use your Burn Tool Brush set at a small size 0%
hardness and set on Shadows, to lightly change how the kittens look.
On one kitten, I darkened up his chest area and the spot on his head,
between his ears.
On
the other kitten I touched up in different spots along his back,
chest,paws etc...
Choose
one of your kittens and with your Puppet Warp Tool. Set your pins all
around his main body, and 3 on his tail. Move the pins on his tail to
reshape it.
NOTE
I can't really teach you HOW to use the Puppet Warp if you have never
used it. I just learned about it myself, as in all my tutorials, I
try to use and try to have you use different tools to experiment
with. This is so you actually learn more about the program then just
tagging. You can go HERE to view the same tutorial I did, if that
is what you wish.
C/P
54. Resize way down and put it so that it looks like it is hanging
inside the stone arch.
C/P
60 and place the layer under your stone arch layer. Resize and
positon to the left of the arch.
C/P
29 and position in front of the tree. Resize.
Open
22 but do not place it on your canvas yet. With your Lasso Tool, make
a selection around the larges leaves. Edit>Copy. On your working
image go to Edit>Paste in Place.
Resize
the leaves dowm to what suits you best. Duplicate them as many times
as needed, rotate and position them all around the arch and the
animals to make it look like the ground is covered in them. Add a
slight DS to each leaf layer. Close all other layers but the leaves
and merge visible.
Back
to 22. Select>Deselct. C/P to canvas, resize and position on the
left of the arch to what you like best. Duplicate and flip it and
place on the right side of the arch.
Now
C/P any more elements that you wish to add.. I added flowers to frame
around the arch. And a pile of acorns.
Now
add DS's and/or glows., to any or all layers.
Prepare
your mask and C/P it to the center of your canvas. Drag the layer
down all the way to the bottom.
Open
paper 10. Duplicate it, then close the origianl. Don't C/P it to your
canvas yet.
Add
some sprays from the kit to it. Duplicate the sprays as many times as
you would like to add more effect or texture to it.
Merge
visible then C/P above your mask layer.
Right
click on the layer and choose create clipping mask. Duplicate. Set
the blend mode to the duplicate layer to hard light. Close all layers
but the three mask layers and merge visible.
With
your move tool, move the mask layer up a bit.
Now
before we add our © and name, lets trim the image down.
Go
to Image Trim. With these settings

Then
right click on your canvas and choose Image Size. Change the longest
side of your image to 700 px and make sure that all three options on
the bottom are checked.
Now
add you name and your © info. Save to Web as PNG=24 and you are
finished with this tag.
You
can stop here or continue on for the little name tag!
Create
a new Image. 500X500px, transparent background, 72dpi.
C/P
21 and resize it down. Duplicate and set the blend mode to hard
light. Merge visible.
C/P
20 and resize it down.
C/P
04 and resize it down. Place it so that it sits around the clock.
Now,
if not enough of your glitter scatter is showing, resize the the
clock and the wire down a bit more.
C/P
58. Resize down and Place around the wire on the left hand side. You
may need to rotate it a bit to get it how you want it. Duplicate and
flip it horizontally and place on the right hand side.. Erase any
part of the element that you don't want with a small soft brush.
C./P
55. Resize down and place on the upper right of the wire. Duplicate
and place the duplicate just down a bit from the first one.
C/P
50.. Resize down. Duplicat twice. Place each of the three flowers
under the charm on the wire. Layer them any way you want.
Not
take a last look at your tag, see if you want to add anything,. Add
DS to any or all elements.
Once
you have every thing the way you want it, merge visible, then resize
down a bit more. If something looks a lil blurry sharpen it up with
the unsharp mask or smart sharpen filter.
If
you have a smaller name you can add it now, if longer names then you
might have widen your canvas a bit. Right click on Canvas Size and
adjust as needed.
Add
any effects that you wish to add to your name. Trim the tranparent
pixels, Save as PNG=24 and you are done!
This
tutorial was created by me, Mary Oakes aka Ariez Moon, on 11/07/2014.
Any similarity to any other tutorial is purely coincidental. Please
abide by my TOU and the TOU of Artists and Designers that you may
use.
I
hope you all enjoyed this tutorial, and I hope that I did not do too
bad of a job writing it. If you have any problems, questions,
comments, or suggestions just give me a hollar in my Cbox, or connect
with me on FB. I will get back to you as fast as I can.
As
always, Happy PSPing.... and Photoshop too :) !!