

This
tutorial was created with PaintShop Pro x4 but can be done with other
versions and/or programs.
Supplies:
Artist's
Tube of choice: I am using the
gorgeous PTU work of Norma J. Burnell. Please DO NOT use her images
without the proper license. You can find this tube here
Scrap
Kit of choice: I am using the
wonderful PTU kit Lili Jocker by Mysterfeerie. You can find this kit from these stores
Fonts
of choice: I am using PF Rhonda
Seven for the © and Always Black for the name/text.
Filters
of choice: DSB Flux
Ok,
grab a cuppa, and a munchie, and let's go!!
Please
remember to SAVE your work often, RENAME
your layers, and if you feel you have really messed up.... Remember
that UNDO is your bestest friend!!
C/P
element 02 in center of canvas. After the two frames are on the
canvas, you may have to nudge this over to the right a bit.
C/P
element 04 in center of canvas
C/P
element 03 in center of canvas
C/P
element 86 Image>Mirror. Place to the upper left and slide under
your frame layers in the layers palette.
C/P
your tube to the center of canvas. Risize to your choice and place on
top of the frame. Go to Adjust>Hue/Saturation>Vibrance pull the
slider all the way over to 100. Do this one more time except slide
the slider to 80.
C/P
element 81, resize it a bit and place where the tubes hand should
actually be.
C/P
element 34 onto canvas. Rsize to your liking and plave to the right
of the frame.
C/P
element 83, resize an plave over the tree that you just placed.
Coloriz by using the Change to Target Brush. I changed mine to
purple. For a quick overview on how to use this brush, select the
brush tool itself, then go to View>Palettes>Learning Center. It
is really quick an easy to learn.
C/P
element 12. Resize and place on the frame over to the left.
C/P
element 22. Resize and place just near the unicorns feet. With your
lasso tool. Draw a selection around your potion bottle. Use your
Color Replacer Brush to change the color of the potion. Again, refer
to the the learning center for easy instrusctions on how to use this
tool. This is what we are animating. Fyi, so we will be revisiting
this layer.
Ok.
so take one last look at your tag. Add various drop shadows to your
layers. Give your potion and your bow a slight glow.
Crop
around your image. Resize if you would like.
Add
your name and your © info.
New
Raster layer. Flood fill with the color that you wouild like to have
for your background.
Merge
all layers visible except your bow and your potion. Duplicate your
main background layer twice so that you have a totale of 3. Duplicate
your potion twice, so that you have three layers of potion all
together. Duplicate your bow twice, so that you have 3 layers of bows
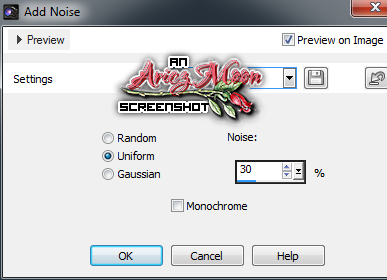
all together. Close off the top two layers of the potion Highlight
the first layer and draw a selection around just the bottle part of
the potion so that the cork dioesn't get effected. Choose Adjust>Add
Remove Noise>Add Noise with these settings

Close
off this layer. Open the second potion layer. Same settings for the
noise EXCEPT change the noise percentage to 35. Close the layer.
Do
the same for the third potion layer but change the noise percentage
to 40.
Ok,
so now you should have a total of 9 layers. Open the very bottom
background layer. The very bottom potion layer and the very bottom
bow layer. Merge visible Repeat with the rest of the layers. You
should now only have three full layers.
File>Save
Open
Animation Shop.
In
PSP Click on the bottom Layer to highlight it. Right click on the
image window and and choose copy. In AS right click and in the
workspace and choose Paste>As New Animation.
Back
in PSP click on the middle layer to activate it. Right click on the
image window. Copy
Back
to AS right click on the image window>Paste> Paste AFTER
current frame.
Follow
the same steps for the last layer.
Now up in the tool bar in AS you will see a little icon that looks like a
film strip. Click it and watch your animation go!! Now close the new
animation window that popped up.
Go
to File>Save Give your new animation a name and put it in the
directory of your choice.
Then
follow along with my settings.


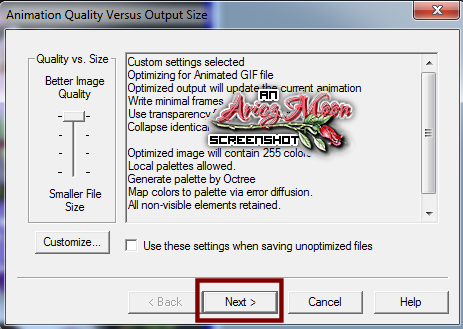
, Next, Next, Finish.
Yippie!!!
You are finished!!
OH, here is one done on a white BG too!
OH, here is one done on a white BG too!
This
tutorial was created by me, Mary Oakes aka Ariez Moon, on 11/03/2014.
Any similarity to any other tutorial is purely coincidental. Please
abide by my TOU and the TOU of Artists and Designers that you may
use.
I
hope you all enjoyed this tutorial, and I hope that I did not do too
bad of a job writing it. If you have any problems, questions,
comments, or suggestions just give me a hollar in my Cbox, or connect
with me on FB. I will get back to you as fast as I can.
As
always, Happy PSPing.... and Photoshop too :) !!

No comments:
Post a Comment