
This
tutorial was created with Photoshop CS6 but can be done with other
versions and/or programs.
Supplies:
Artist's
Tube of choice: I am using the
adorable PTU work of KennyK. Please DO NOT use his/her images without
the proper license or permission. You can find this tube here

Fonts
of choice: I am using ( font )
for the © and 4 Magic DNA, Ginebra Bolds, and Charlamagne STD for
the name/text.
Brushes
of choice: Small heart and
Stars (or you can create your own). The star brush I found by
searching Deviant Art, a long time ago. The heart brush was made by
me, and you can find it HERE Tutorial for making your own HERE-Coming Soon.
Filters
of choice: Xenofex - Constellation
Toadies
– What are you?
Filter
Factory L – Send Me An Angle
Ok,
grab a cuppa, and a munchie, and let's go!!
Please
remember to SAVE your work often, RENAME
your layers, and if you feel you have really messed up.... Remember
that UNDO is your bestest friend!!
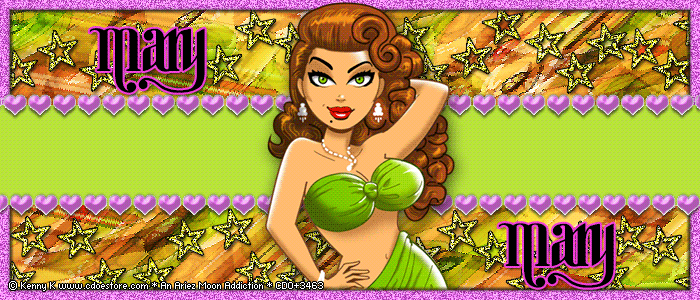
Create
a new Image 700x300px, transparent background 72 dpi. Name and save
the file whatever you wish.
Copy
and paste your closeup tube, over and over again flipping, rotating
and position until the whole canvas is covered. Merge Visible.
Go
to Filter>Toadies>What are you? With these settings.
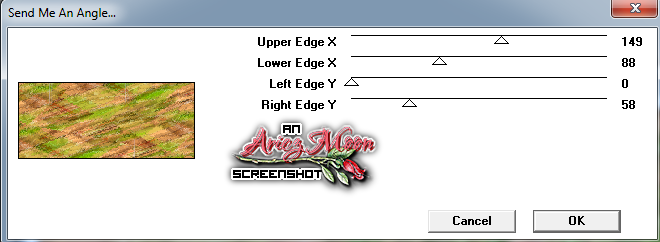
Then
apply Filter Factory L>Send Me An Angle with these settings.

Filter>Sharpen>Sharpen
Edges. Do this two or three times until you get an effect that you
like.
Apply
Xenofex>Constellation with settings of your choice.
Duplicate
and set the Blend Mode of this layer to Hard Light and Merge Visible.
Create
an new raster layer. Select>All >Select>Modify>Border.
Set it at 10px. Using your paint bucket, flood fill with a color of
your choice. Select>Deselect.
Filter>Noise>Add
Noise. 30% Uniform, Monochrome checked. Add a drop shadow of your
choice.
Create
new Raster layers.
On
the bottom Raster layer Grab your Rectangle tool and draw out a
rectangle that goes from left edge of the canvas, to the right edge.
Extend it out a bit so you make sure that you cover the edges.
Just
above your layers palette there is a tab that says Paths. Click on
that tab.
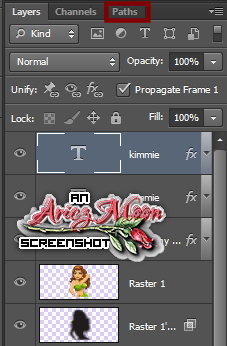
Right click on Work Path and choose Fill Path. Choose
whatever color you would like. Click back on your Layers tab.
Change
your Forground color to one of your choice. Grab your brush tool. And
choose your heart with the following settings.

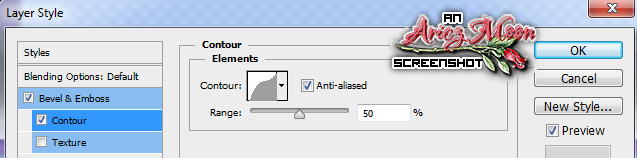
Make
the top layer active and click back on the Paths tab, right click and
this time choose stroke path. When the box pops up, choose Brush and
make sure the pressure setting is unticked. Right click on work path
for the last time and choose Delete Path. Apply the following layer
style.
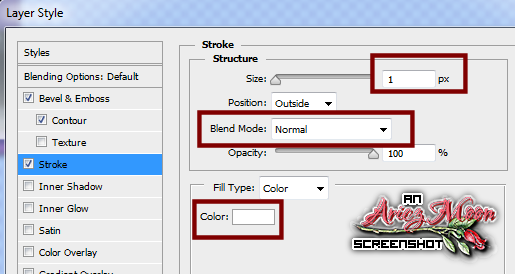
Right click on the hearts layer and choose Copy Layer Style. Then
go to Layer>Layer Style>Create Layers.
Right click again on your hearts layer and choose Paste Layer Style. Double click on the layer to bring up the Belding options. Uncheck all except the Drop Shadow. Leave all settings the same except the angle. Change that +90 degrees.
Close
off all layers except your hearts and your layer style and Merge
Visible.
Grab
your brush tool. Select your star and a color of your choice. With
the following brush settings
Create
a new layer and stroke your brush in an up and down fashion across
the upper half of your canvas, above the hearts.. Almost like drawing
rolling hills.
Create
a new layer and do the same thing on the lower half of your canvas.
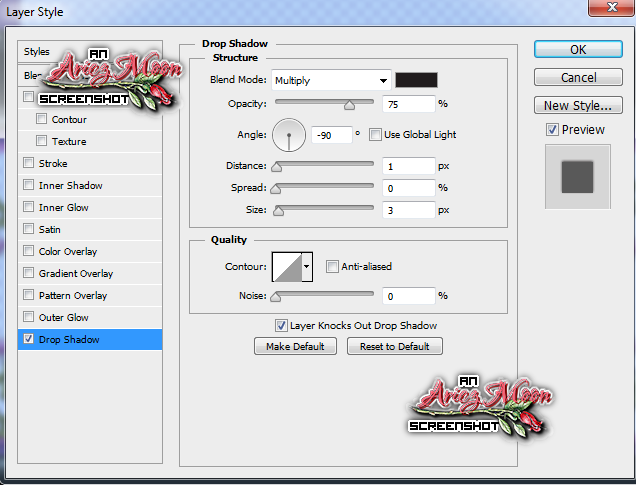
Apply
noise at 30% Gaussian, monochrome checked. Apply drop shadow and
stroke of choice.
Drag
and drop your tube to the middle of the canvas. Add a drop shadow.
.
Add your name and © information. With What ever effects you would
like to add.
Now,
if you do not plan on animating Add your word art however you would
like. Save to web as a JPEG and you are finished.
If
you are animating, please continue on.
Make
sure your Animation Window is open. If it isn't go to Window>Timeline
(CS6) or Animation (earlier versions). You should now be able to see
it at the bottom of your workspace.
Each
word HAS to go on it's own layer.
With
one type of font in a size and color of your choice. Type out
I'm
High
And
All
AGAIN,
each one on it's own layer. Add any effects that you wish to add.
In
another font size and color of choice type out
Class
Sass
Add
any effect you wish to add.
Position
I'm, and High layers to the left edge of the canvas just under your
hearts layer on top of the rectangle. Then position And, and All to
the right.
Position
Class below I'm and High. Position Sass below And and All.
Make
sure all your layes are where and how you want them to be..
Close
of all text layers except for your name and © info. Make sure all the rest of the layers are open.
Click
on the button that says Create Frame Animation (CS6.... earlier
versions don't have the timeline so it is already set)
You
will see that your first frame is there for you already FRAME 1.
Click on Duplicate frame. It looks like a piece of paper with a
folded corner.

In
your layer palette, unhide the words I'm and And You now have FRAME 2
Go
back to the animation window and click duplicate frame.
Back
to your layers palette, unhide High and All. Make sure they are
positioned next to the previous words. You now have FRAME 3
Back
to animation window. Click duplicate frame.
In
your layers palette, click on the word High and CTRL click on the
word All. With your move tool or your arrow keys, move these words
to the right, as far as you want them to go without cutting off any
shadow.
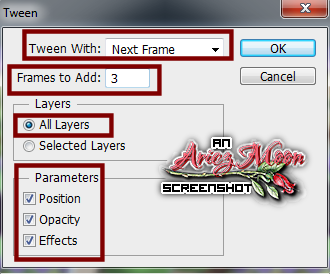
In
your animation window click on FRAME 3 then click on the Tween
Animation button. It is right before the Duplicate Frame button.
Looks like 4 fading squares.

When
the window pops up choose these settings

You
now have FRAMES 4 5 6 and 7.
Duplicate
FRAME 7. In your layers palette unhide Class and Sass. Activate the
Class layer by clicking on it then CTRL click on Sass. Lower the
opacity to O%. You now have FRAME 8. Duplicate FRAME 8.
In
your layers palette bring the opacity of the Class and Sass layers
back up to 100%, then lower the opacity of the I'm High and the And
All layers to 0%.
Click
on Frame 8 and then click on the tween button. Leave all settings the
same except change the number to 10. You should now have a total of
19 FRAMES!!.
Almost
done now. Duplicate FRAME 19 to make FRAME20.
Click on the tween button and this time change the drop down to With
First Frame, and change the number of frames to 2. You should now
have a total of 22 frames.
Since
Frame 22 is already selected SHIFT click on Frame one. Set your Frame
Delay to 0.1 seconds.

Click
on FRAME 2 and CTRL click on FRAMES 3 7 and 20. Change the Frame
Delay to 0.5.
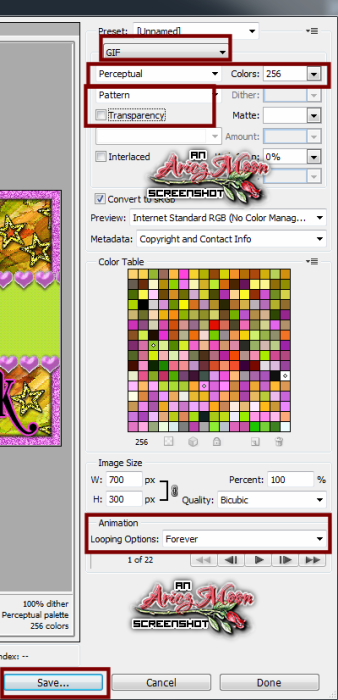
Set
your Looping, the button right under frame that currently says once,
to Forever.

Play
your animitation to make sure that it runs smoothly.
Save
to web, with the following settings

Congrats!!!
You are finished. Waaa Hoooo!!
This
tutorial was created by me, Mary Oakes aka Ariez Moon, on 11/05/2014.
Any similarity to any other tutorial is purely coincidental. Please
abide by my TOU and the TOU of Artists and Designers that you may
use.
I
hope you all enjoyed this tutorial, and I hope that I did not do too
bad of a job writing it. If you have any problems, questions,
comments, or suggestions just give me a hollar in my Cbox, or connect
with me on FB. I will get back to you as fast as I can.
As
always, Happy PSPing.... and Photoshop too :) !!

No comments:
Post a Comment