I have a gorgeous new tut for you today called Winter Wonerland, and I just wanted to let you know to take a look at the bottom of the this tut for an alternate tag using the same gorgeous tube and actual matching kit by Bibi!! WOOT WOOT!!

This
tutorial was created with Photoshop CS6 or CS2
depending on what filters I use. Some older
filters will no longer work in CS6. Can be done with other
versions and/or programs.
Supplies:
Artist's
Tube of choice: I am using the
gorgeous PTU tube named Witner Baby by Di Halim. Please DO NOT use
her images without the proper license or permission. You can find
this tube here
Scrap
Kit of choice: I am using the
wonderful IB PTU kit Winter Lovely by Designs By Joan. You can find
this kit here
Stock
Photo: I am using this gorgeous
wintery pine photo taken by Engimono, called Russian Winter. You must
register for an account (it's free) to use the stock. You can find it
HERE.
Fonts
of choice: I am using Teachers
Pet for the © and Belluccia Pro/Swash for the name/text.
Ok,
grab a cuppa, and a munchie, and let's go!!
Please
remember to SAVE your work often, RENAME
your layers, and if you feel you have really messed up.... Remember
that UNDO is your bestest friend!!
Abbreviations
C/P
= Drag and Drop OR Edit>Select All>Edit>Copy>Edit>Paste
DS
= Drop Shadow
MV
– Merge Visible
Create
a new image. I made mine very large, to give me room to work. 1100 x
1100 , transparent background, 72dpi/ppi. Name the file whatever you
wish and hit ok.
C/P
element 12. Resize down to 80%. To so this, go to Edit>Free
Transform and see my settings below. You can also find it HERE,
with other helpful stuff.
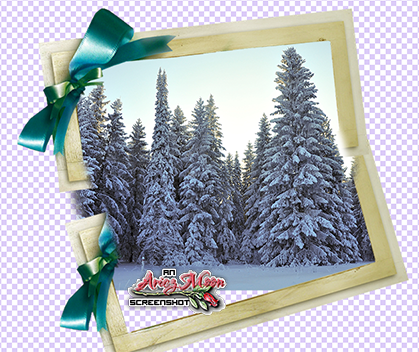
Duplicate
the frame, and using Free Transform rotate it a bit making sure the
bottom right of one frame touches the top right of the other.
Open
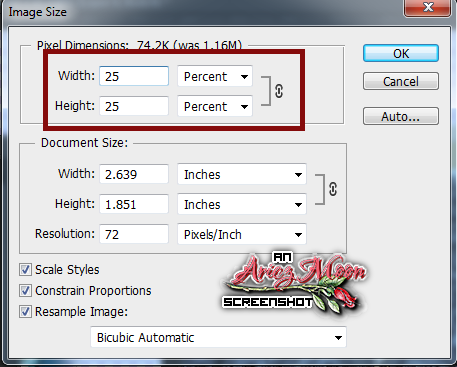
up your stock photo and go to Image>Image Size. Reduce the photo
down to 25%.

Drag the photo to your working canvas. Drag the layer
under the frame layers and then use Free Transform to reduce the
image to the size that you would like it. Position the photo where
you choose.
With
your eraser tool, erase the bottom half of the top frame, and top
half of the bottom frame, and then erase the part of the stock photo
that hangs out of the inside of both frames. Close all layers except the two frame layers and MV.

C/P
element 45. Duplicate the fence and hide the duplicate in the layers
palette for now. Drag the layer that is left open, under both frame
layers but above your stock photo. Position the fence near the bottom
of the frame. Erase the snow between the fence posts and around the
outside of the frame. Indicated in the screenshot below.

Right
click on the layer and choose Clipping Mask.. This will clip the
fence to the photo. Double click on the layer and give the fence a
slight DS.
Ok
working from left to right....
C/P
element 49. Resize 60%. Position at bottom of frame, a bit off to the
left.
C/P
Winter Baby tube. Resize to 55%. Place the layer under the bucket
layer and place to tube over the left side of the frame, high enough
to cover the bottom half of the frame.
C/P
element 48. Resize 70%. Place layer under the tube layer and position
so that the rabbit is peeking out from behind the tube.
C/P
element 13 resize to your liking and position so the bird sits on the
tube's shoulder. Drag the layer under the rabbit layer, in the
layer's palette. CTRL+click on the layer's thumbnail to make a
selection around the bird. Click on the tube layer to make it active,
and with an eraser brush, erase the little part of the tube that
covers the birds belly.
C/P
element 94. Resize down to your liking, rotate it a bit. Make sure
the layer is under the bunny layer.
C/P
element 53. KEEP THIS OPEN ON YOUR WORKSPACE FOR NOW. We will be
using it again in a bit.
Now,
back to your working canvas....With Free Transform hold down your
SHIFT+CTRL keys and with your mouse drag the bottom right node up to
-10.9°. You will see a little black box with white numbers letting
you know when to let go of the mouse.

Place this layer under the
violin layer so that it looks like the violin is being propped up by
the log.
C/P
element 55. Resize down your liking. Drag the layer under the log
layer, and position as you choose.
C/P
element 50. Resize if you wish and place on top of and to the right
of the music sheets.
C/P
element 11. Resize down and position a bit over the rabbit.
C/P
element 38. Resize down, and rotate it so that it sits along the
right side of the frame's edge. With your eraser brush, erase the
bits that you do not want. Place this layer under the rabbit layer,
in the layer's palette.
C/P
element 30. Resize to your choosing and place under the flower
cluster..
Open
up the fence layer that we hid in the beginning of the tutorial. Drag
the layer under your photo layer, in the layers palette. With your
eraser brush set a 0 hardness, erase around the sides and bottom of
your image. If there isn't enough of the snow peaking out from under
the layers, use your move tool to bring it down some. You don't need
to be neat and tidy about either. You want to erase it so that the
edges look soft and natural. Go to Filters>Blur>Motion Blur,
set the Angle to -90° and the Distance to 35 pixels.
Did
you remember to keep the log element open? Good! With your Lasso Tool
make a selection around a part of the drifts from the log element.
Edit>Copy. Then on your working canvas Click on the very top layer
in the layers palette to make it active. Edit>Paste. Position as
you like. Duplicate and position more as needed.
Take
one last look at your tag. Reposition things as you may need.
Click
on the very top layer, then shift click on the very bottom layer.
With Free Transform, resize your image down to about 75 to 80%. You
want enough canvas around your image to paste a paper, make a
selection, and feather it. So, If you resized it too much or too
little, just undo and do it again.
C/P
PP=4. Drag the layer all the way down to the bottom of the layers
Palette. With your Lasso Tool drag your mouse starting from the lower
right corner where the rabbit is, all the way around your image.
Again, you don't have to be neat about it. Put your own unique spin
on it. When you get back to the starting point double click to get
the selection. Go to Select>Modify>Feather. Feather anywhere
between 10 to 20 pixels. Select>Inverse, then hit Delete on your
keyboard. You should now see soft edges. If you dont like the way it
looks. Undo, then play around with it some. You can also use your
eraser brush set to 0 hardness to refine it more.
C/P
PP-10. Drag this below PP-4. CTRL+click on PP-4's thumbnail to make a
selection. Make sure PP-10 is the active layer, then once again
feather the selection, around 5 to 10 pixels. Inverse>Delete. With
your Move Tool, nudge the paper to the left. However looks best to
you. Refine it more if you wish.
Apply
any DS(s) or glows to whatever elements you wish to add them to.
Check
the size of your tag, if it is still too big for you liking do as you
did before with all the layers selected, size it down. Then trim your
transparent pixels. Image>Trim

Add
your © info and your name and/or other text with what ever layer
styles you may wish to use. Save as PNG-24 and you have yourself a
gorgeous tag!! Go show it off!
Here is an alternate tag, as promised, using the matching kit Winter Baby by Bibi!! You can also find this kit at

This
tutorial was created by me, Mary Oakes aka Ariez Moon, on 01/18/2015.
Any similarity to any other tutorial is purely coincidental. Please
abide by my TOU and the TOU of Artists and Designers that you may
use.
I
hope you all enjoyed this tutorial, and I hope that I did not do too
bad of a job writing it. If you have any problems, questions,
comments, or suggestions just give me a hollar in my Cbox, or connect
with me on FB. I will get back to you as fast as I can.
As
always, Happy PSPing.... and Photoshop too :) !!


No comments:
Post a Comment