
This
tutorial was created with Photoshop CS6 or CS2
depending on what filters I use. Some older
filters will no longer work in CS6. Can be done with other
versions and/or programs.
Supplies:
Artist's
Tube of choice: I am using the
adorable Izzybella, PTU art of Heather Valentin. Please DO NOT use her images
without the proper license or permission. You can find this tube here

Scrap
Kit of choice: I am using the
wonderful PTU kit Breathe No More by Black Widow Creationz. You can
find this kit here

Mask
of choice: I am using mask
ARZMN_%StarMask which I myself created and you can find it below. Click to make full size, then save.

Fonts
of choice: I am using FFF
Harmony for the © and Bumblebees Demo for the name/text.
Filters
of choice: Penta.Com – Color
Dot
MuRa's
Miester - Copies
*TUTORIAL
NOTE* at some point I forgot to record a step where I selected all
layers to resize a bit... soo.... just take note that you may have to
do that at some point. Whatch your elements, if they seem to large
then that is when you should have resized using Free Transform.
Ok,
grab a cuppa, and a munchie, and let's go!!
Please
remember to SAVE your work often, RENAME
your layers, and if you feel you have really messed up.... Remember
that UNDO is your bestest friend!!
Abbreviations
C/P
= Drag and Drop OR Edit>Select All>Edit>Copy>Edit>Paste
DS
= Drop Shadow
MV = Merge Visible
Create
a new image 700 x 700 , transparent background, 72dpi/ppi. Name the
file whatever you wish and hit ok. Minimize for now.
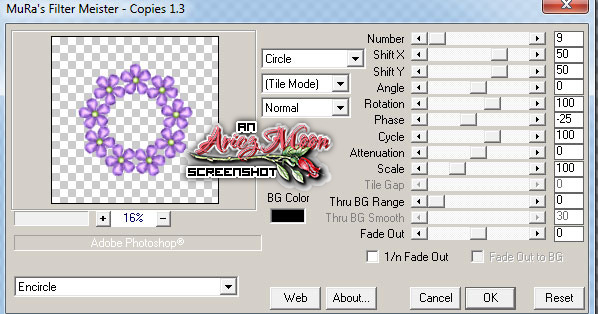
Create
another new image 1000 x 1000 transparent background. Place el 2 in
center of canvas. Resize down to 60%. Filters>MuRa's >Copies
with the following settings.
C/P
to your 700 x 700 Image and then reduce it down to 80%. You can now
close out the larger image without saving it.
Click
on Raster 1 layer. Open and prepare your mask, C/P it to the center
of your canvas.
If
you do not know how to prepare your mask, please see HERE.
C/P
PP4, right click on the layer in the layers palette and choose Create
Clipping Mask. Close off your frame layer and layer 1 and MV. Open
all layers.
C/P
el 34 and reduce to 50%. Place on the bottom left of the frame.
C/P
el 33 reduce to 50% and place bottom left on top of the stump.
C/P
el 35, reduce to 45% and place on at the bottom of the stump.
C/P
el 27, reduce to 75%, rotate it slightly to the right if you wish.
Drag the layer below the frame layer in the layers palette.. Click on
the top layer to make sure it is active.
C/P
el 29, reduce to 80% and place in the upper right on top of the frame
and leaves. Erase any bits with your Eraser Brush that you don't want
to be seen.
C/P
el 37, reduce size to your preference. Place at the bottom right.
C/P
el 5, reduce 50% and flip horizontal. Place at the lower right on top
of the mushroom cluster.
C/P
el 26. Erase the stem and drag the layer under all the other layers
in the layers palette. Position at the very bottom so that it looks
like everything was sitting on the leaf.
Click
on your frame layer to make it active. With your Magic Wand tool
click inside the frame. Go to Select>Modify>Expand and expand
the selection by 35 to 40 pixels. Again with your Magic Wand,
Shift+click inside all the little openings of the frame where the
petals meet. Zoom in to make sure you don't have any holes.
Create
a new layer and flood fill the selection with white. Deselect and
drag the layer under the frame layer, in the layers palette.
C/P
pp 3, right click and choose Create Clipping Mask.
C/P
pp4, go to Edit>Transform>Rotate 90°CW. Set the layer's Blend
Mode to what ever looks best to you. Right click and create Clipping
Mask. Close off all layers except the white, and the two paper
layers, and MV. Open the rest of the layers.
C/P
your tube. Resize down to what you like best. Erase any bits of the
tube that stick out of the frame.
Go
to Image>Adjustments>Hue/Saturation. Use 45 for saturation and
-11 for lightness. Right click and create clipping mask. Close off
all layers but your paper layers and the tube layer, and MV. Open up
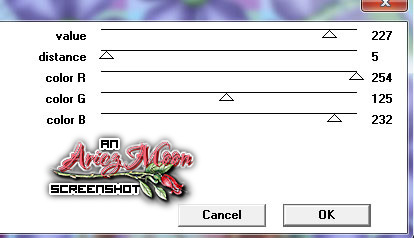
all layers and then Go to Filter>Penta.Com>Color Dot, with the
following settings.
Take
a last look at your tag, and make any adjustments that you wish to
make. Add DS(s) to any or all layers.
Add
your © info and your name with any layer styles that you wish to
use.
Crop
the transparent pixels around your image and resize to 600 X 600 pix.
Save
for Web as PNG-24 and you are finished..
This
tutorial was created by me, Mary Oakes aka Ariez Moon, on 01/22/2015.
Any similarity to any other tutorial is purely coincidental. Please
abide by my TOU and the TOU of Artists and Designers that you may
use.
I
hope you all enjoyed this tutorial, and I hope that I did not do too
bad of a job writing it. If you have any problems, questions,
comments, or suggestions just give me a hollar in my Cbox, or connect
with me on FB. I will get back to you as fast as I can.
As
always, Happy PSPing.... and Photoshop too :) !!

No comments:
Post a Comment