

This
tutorial was created with Photoshop CS3 but can be done with other
versions and/or programs.
Supplies:
Artist's
Tube of choice: I Chose the
tube that the kit was inspired by, Rainbow Kazuki and can be foundHERE. with the kit. My 2nd
Sample tag is using the art of Ismael Rac. As always, with any
artist, do not use tubes in which you do not have a proper license
for or permission to use.
Scrap
Kit of choice: I am using the
wonderful PTU kit Rainbow Kazuki by Scrappin' Krazy Designs. You can
find this kit here
 Fonts
of choice: I am using Oh La La
for the ©, Bumblebees for the word art, and Lobster for the name.
Fonts
of choice: I am using Oh La La
for the ©, Bumblebees for the word art, and Lobster for the name.
Filters
of choice: MuRa's Copies
Ok,
grab a cuppa, and a munchie, and away we gooo!!
Please
remember to SAVE your work often, RENAME
your layers, and if you feel you have really messed up.... Remember
that UNDO is your bestest friend!!
Create
a new Image. 600 x 250 px. Transparent background. 72 dpi. Name your
file and hit ok.
Copy
and paste your tube to the middle of the canvas..
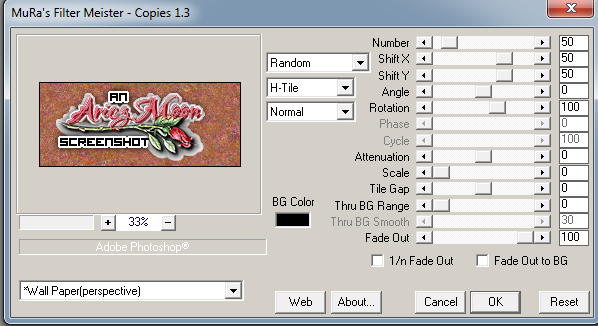
Filter>MuRa's
Copies with these settings
Then
Filter>Sharpen Edges. Do this a few times.
Open
Paper10 Select>Select All Edit>Copy. On your tag,
Select>Select all Edit>Paste Into. Lower the opacity of this
layer to 55%. With your Magic Wand Hold your shift key and click on
random dots of color on the paper. I chose all the purple dots. With
the same color as the dots and your Paint Bucket, create a new layer
and flood fill the selections. Select>Deselect. Filter>Add
Noise. 50% Uniform and Monochrome checked.
In
Blending Options add a whte stroke of choice and a Drop Shadow of
choice, making sure that Global Lighting is unticked. Do not merge as
you may have to reposition your dots.
Back
on your paper layer choose another dot color and repeat the same
steps as above.
Back
to your paper. Right click on the layer in the layer palette and
choose Create Clipping Mask. Merge Down.
Now,.
Let's place our elements.
Ele51,
Resize to your choice and rotate to the right, Place so that it goes
from the lower right corner, and diagonally upwards.
Ele03,
Resize down to your choice and position in the upper corner.
Duplicate, flip horizontally and place in the upper left corner.
Ele50.
Resize and rotate to the right and follow the same direction as the
netting.
Ele26.
Resize and place all the way to the right edge.
Ele05.
Resize way down and position. Sharpen. Duplicate. Position. Then
duplicate one last time and position.
Ele04.
Resize and place in the lower right corner.
Resize
and place your tube over to the left of the canvas, or wherever you
choose. Click on the Pony layer.
Ele34
Resize and place under Kazuki's right elbow.
Ele10..
Resize and place just under Kazuki's left arm pit.
Ele30.
Resize and place in lower left corner..
Now
reposition your dots to where you want them.
Take
one last look at your tag to see if you want to add any more
elements. I chose to add ele59, hard light with a pink glow.
Add
varying drop shadows to some or all of your layers, as you choose.
Add subtle glows to your stars and rainbows.
Make
the top layer active in the layer palette. Click on your text tool.
Font Bumblebees, size 34. Color doesn't matter because we wont see
it. If your font is to big or too small we weill fix that a minute.
Type out the word Rainbows. In your text settings click on the button
that looks like a T with a lil hill underneath it. Choose Arch.
Horizontal 50. The rest stay at zero. Click the check mark to apply
your text. In your layer palette you will see FILL. Bring that all
the way down to 0. Bring up your Blending Options. Apply a stroke and
drop shadow of your choice. Right click on layer and Rasterize Style.
Follow
the same steps for the word Rock but don;'t warp it if you don't want
too.
Close
your word art layers and merge the rest of the layers Visible. Bring
your word art layers back to the top. Close off your newly merged
layers. Open your word art layers and Merge Visible. Lower the
opacity of the layer to 50%
Type
out your name with the lobster font and add any styles that you wish
to add to it. Position where you like.
Select>All>Select>Modify>Border
and type in 8. Add a new Raster layer, choose your gradient tool. It
is in the same menu on the tool bar as the paint bucket. Choose the
rainbow gradient on linear. Starting at the upper left corner with
your mouse, drag to the lower right corner. Select>Deselect and
add an inner drop shadow.l Close off your name text layer and merge
visible. Bring your name back to the top.
Add
your copyright info and you have nailed it!!!
I
hardly ever make an av for my forum tags, simply because I use an
actual picture of me or a single decorated initial. If you wish to
make an Av create a new image 150 x 150 and paste your tag into it.
With your move tool, move the image around until you are satisfied
with it's position. Add the same size border as your tag. Add your
Initial, and copyright info if needed. That's all Folks!!!
This
tutorial was created by me, Mary Oakes aka Ariez Moon, on 10/08/2014.
Any similarity to any other tutorial is purely coincidental. Please
abide by my TOU and the TOU of Artists and Designers that you may
use.
I
hope you all enjoyed this tutorial, and I hope that I did not do too
bad of a job writing it. If you have any problems, questions,
comments, or suggestions just give me a hollar in my Cbox, or connect
with me on FB. I will get back to you as fast as I can.
Here is the cluster frame for you all to enjoy. Just click on the preview to download. I hope ya like it. Please abide by the TOU provided in the zip file. Please leave me some love if ya download.
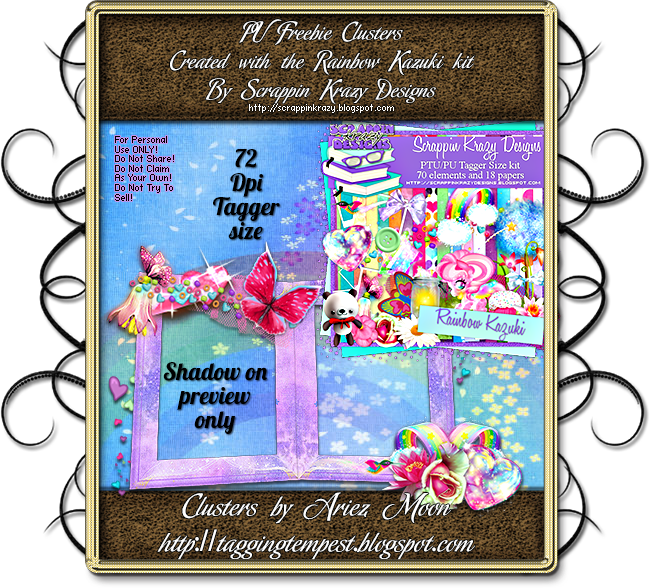
Here is the cluster frame for you all to enjoy. Just click on the preview to download. I hope ya like it. Please abide by the TOU provided in the zip file. Please leave me some love if ya download.
As
always, Happy PSPing.... and Photoshop too :) !!

No comments:
Post a Comment