
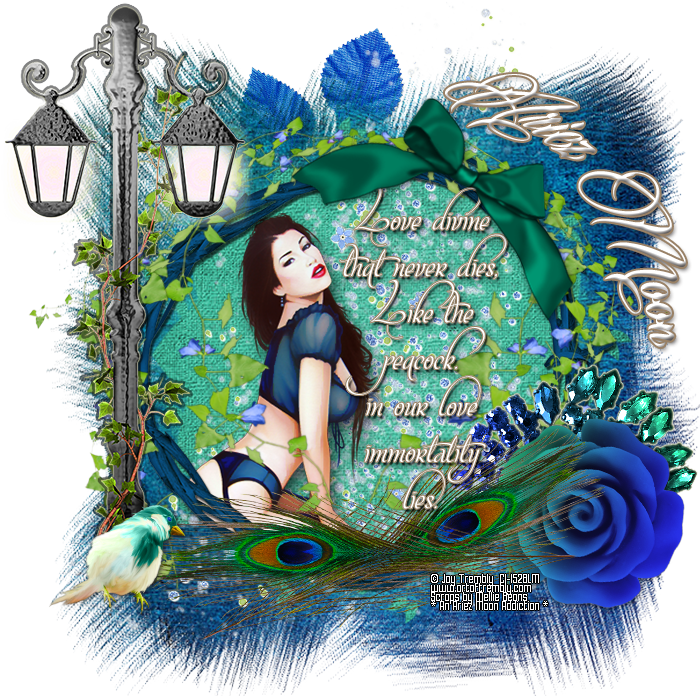
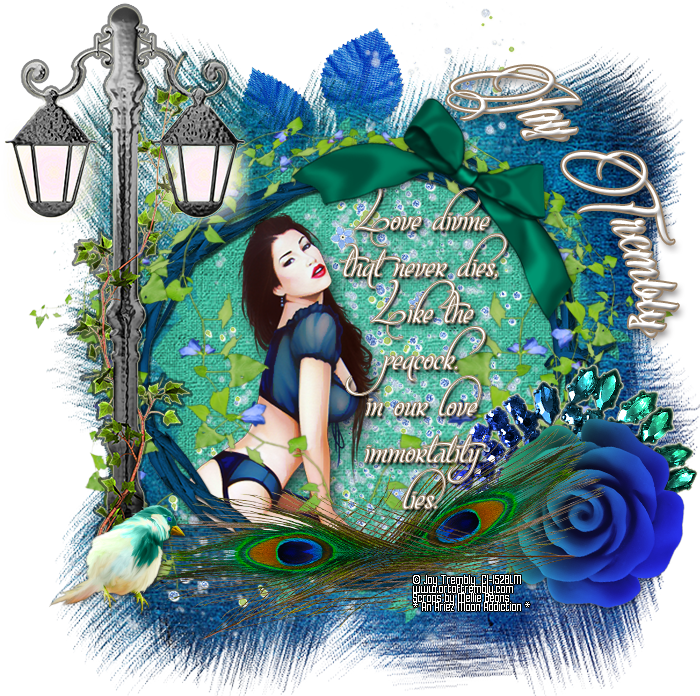
I love peacocks! I guess that is why I chose to work this kit. Besides the fact that it looked absolutely gorgeous from the preview. which it is.
In my childhood years, we had a friend who had peacocks. We would sit in the backyard on summer days and watch them just about all day long!! I loved how their feathers almost looked like prisms in the sunshine.
I am a big mythology fanatic, of any culture! I did a little research into mythology on peacocks, hence the name of this tutorial. MahaLakshmi was the Hindi goddess or deity of wealth, love, prosperity, fortune, and the embodiment of beauty. She was known to bring good luck and protection to her devotees from all kinds of misery and sorrows. The peacock feathers were used to symbolize these qualities. This is what I have learned of it anyway, If I am wrong you can correct me, but be nice about it.... LOL
Anyway..... Are you ready for the tutorial yet?? Ok! Here it is!
This
tutorial was created with Photoshop CS6 but can be done with other
versions and/or programs.
Supplies:
Artist's
Tube of choice: I am using the
PTU work of Jay Trembly. Please DO NOT use his images without the
proper license or permission. I purchased this tube through CILM,
but unfortunately he is not selling his tubes any where at the
moment.
Scrap
Kit of choice: I am using the
wonderful PTU kit Peacock In My Garden by Mellie Beans. You can find
this kit here

Mask
of choice: I am using 2 masks,
WSL_Mask116 and WSL_Mask 160 by Wee Scott Lass and you can find it
HERE
Fonts
of choice: I am using FFF Harmony for the © and Mutlu Ornamental for the quote and Billion Stars for my name.
Ok,
grab a cuppa, and a munchie, and let's go!!
Please
remember to SAVE your work often, RENAME
your layers, and if you feel you have really messed up.... Remember
that UNDO is your bestest friend!!
Open
a new canvas 900 x 900 72dpi, transparent background, and name your
file whatever you wish. I know it is big, but we will resize it later. Add a new Raster layer and call it Temp
Background. Flood fill white with your Paint Bucket Tool.
Drag
and drop mask 116. prepare it for use and center it in the canvas.
Follow the same steps for mask 160.
Make
116 the active layer and drag and drop your paper of choice (paper05)
from the kit. Right click on the paper layer in the layer palette and
choose Create Clipping Mask. Again, follow the same step for mask 160
(paper03).
Ok,
now onto the elements. Drag and drop your elements onto your canvas
and so as follows.
Apply
the frame (ele37) to the center of your canvas. I chose to recolor
mine to match my tube. You can do the same, if you so choose.
Ele35.
Duplicate. Flip horizontally, move each so that is surrounds the
frame. Merge the two layers and use warp to adjust the way you want
it. Sharpen.
Ele34.
Resize and position at top of frame. Drag layer under mask layers.
Ele23.
Resize and position on top of the left side of frame.
Ele39.
Resize and position over and at the bottom of ele23.
Ele03.
Rotate to your liking so that it sits on the bottom and slightly
right of the frame. Duplicate. Flip horizontally and position so the
edges of the eyes on the feather almost meet together. Merge and
LIGHTLY use your warp tool to form around bottom of frame.
Adjustments Vibrance, and whatever settings looks best to you.
Ele33.
Resize if you wish, and place just under the vines around your frame.
Ele28.
Resize 50%, place under peacock feather on the right hand side.
Rotate to you liking.
Ele30.
Resize 50%, rotate how you like and place over jewels.
Ele09.
Resize, rotate and place on top of the frame or where ever you
choose.
Resize
and place your tube where you wish and drag the layer under the frame
layer. Erase any part of the tube that sticks out. Duplicate and blur
the top layer silightly. Lower the opacity of the layer to 55 On the
bottom tube layer apply a soft chunky drop shadow.
Apply
Drop shadows of your choice to any or all layers. It's up to you.
Add
your word art/phrase. “ Love divine that never dies. Like the
peacock, in our love immortality lies. ” in what ever color you
choose. Add a stroke and a sharp drop shadow.
Add
your name. And while we are at it,let's warp our text a little around
the frame. In the text settings option click on the warp text button.
It looks like a T with a hill underneath it. When the pop up window
comes up., choose these settings.

Now
add any effects that you would like to it.
Trim the access canvas from around your tag. If it is still too big use image resize and resize it down, making sure that all three boxes on the bottom of the dialogue box are checked.
Add
your © info, Save for web as PNG=24 and you have your taggie!!
This
tutorial was created by me, Mary Oakes aka Ariez Moon, on 00/00/2014.
Any similarity to any other tutorial is purely coincidental. Please
abide by my TOU and the TOU of Artists and Designers that you may
use.
I
hope you all enjoyed this tutorial, and I hope that I did not do too
bad of a job writing it. If you have any problems, questions,
comments, or suggestions just give me a hollar in my Cbox, or connect
with me on FB. I will get back to you as fast as I can.
As
always, Happy PSPing.... and Photoshop too :) !!

No comments:
Post a Comment