
~ Let's Make Glitter With A Lil' Bling Bling ~

This tutorial was created by me, Mary Oakes aka
Ariez Moon on May 14, 2010. If there is another tutorial similiar to this, it
is purely coincidental, and this tutorial represents my own ideas and
preferences on methods shown. As with
any tutorial this just gives you an idea of how to do things, feel free to add
your own personal touch to your creation.
In this glitter tut, I am going to show you how to add sparkes to your tile. There is actually two different ways to do this. The first way with a sparkle tube, and the second with a plug-in. I posted up a seperate tut for the plug-in and you can find that HERE.
Supplies Needed:
 Paint Shop Pro® ~ Trial
 Animation Shop® ~ Trial
Supplies Needed:
Paint Shop Pro® ~ Trial Animation Shop® ~ Trial
My Sparkle tube HERE.
Are you comfy? Ready?
Let's begin...
Extract your tube into the following location... START-->MY DOCUMENTS-->MY PSP FILES-->PICTURE TUBE. You can save it in other locations and direct PSP to it but if you are new to PSP this is the best place to save it until you get used to working with and saving tubes.
If you did not follow along with my "Let's Make Glitter" tutorial and do not have a basic glitter tile, please go HERE, to learn how to make one. Follow the tut and at the bottom there is a link to bring you back here when you are finished.
If you did not follow along with my "Let's Make Glitter" tutorial and do not have a basic glitter tile, please go HERE, to learn how to make one. Follow the tut and at the bottom there is a link to bring you back here when you are finished.
You should still have your tile .pspimage minimized in PSP. Bring it back up onto your workspace. Make the bottom layer active by clicking on it and hide the other two layers by clicking on each layers eye.
Go to the top of PSP and click LAYERS-->NEW RASTER LAYER. A window will pop up. Where it says NAME enter in Sparkle 1. And click OK.
Click on your Picture Tube Too, it looks like a tube of paint. Click on the arrow in the settings tool bar for the drop down menu box and find "Sparkle1" among your tubes. Set your Scale to 50 ( you can also change the scale to a different setting every time you place the tube, this will give you different size sparkles). Step to 110, Placement Mode and Selection Mode both at Random.

Place a few sparkles randomly on your Sparkle 1 layer in your working canvas. About 5 or 6 will do. Leave this layer open so you can see where you are placing your tubes, and repeat the above steps for the other two layers. Leave the closed layers closed, while adding a new Raster Layer to them, it will be easier to place your sparkle tube. Don't forget to name your new layers, only name them Sparkle 2 and 3 so when it is time to animate, you wont get confused.
Stop!! Hit Save!!

Now, hide Sparkle 3 and 2. Click on Sparkle 1 layer to make it active. and click on it to make it active. RIGHT click on Sparkle 1 layer and go to MERGE--> MERGE VISIBLE.

Rename this layer One or 1. Hide the layer. And repeat the steps for layers Glitter/Sparkle 2 and Glitter/Sparkle 3. Only renaming them accordingly. Unhide all three layers. Unhide all three layers.
Now lets save this so we can use it in AS! Go to FILE-->SAVE AS name it whatever you would like, and save it as a *.psp file for Animation Shop, just like you did in the other tutorial.
Open up AS, click on FILE-->OPEN, and locate the file you just saved from PSP.
Click on your View Animation Button to make sure you like how it looks.
CONGRATULATIONS!! YOU ARE DONE!! GARSH!! Don't it look purty??
Let's not forget to save and optimize it! Just follow the directions at the end of the "Let's Make Glitter" tutorial!
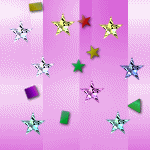
As an after thought I thought maybe you would like to know that you can make floaties the same way I just taught you on how to add the sparkles with the Sparkle tube. Instead of using the sparkle you can use hearts, stars, lips, flowers, gems, any thing your lil' ol' heart desires!! you can still even add the sparkle tube WITH the other tubes. Here are a few examples. The second tile is the same as the first, only at a slower speed.


Cool huh?
Soooo, you are thinking to yourself " Well this is all fun, fine, and good.... but what the heck do we do with these tiles?? " Well, you can do a lot of things with glitter tiles. You can fill text with them... like your name, you can use them as borders or frames or backgrounds..... ALL KINDS OF THINGS!! How about I show you how to make a Sig Tag using our glitter tile for your name? Find it HERE
I hope you enjoyed the learning experience you recieved while doing my tut. Enough infact that I hope you come back for more. I certainly loved showing you! If you have any questions or difficulties please do not hesitate to contact me via a comment or even by EMAIL! HAPPY PSPing!!!

I hope you enjoyed the learning experience you recieved while doing my tut. Enough infact that I hope you come back for more. I certainly loved showing you! If you have any questions or difficulties please do not hesitate to contact me via a comment or even by EMAIL! HAPPY PSPing!!!

No comments:
Post a Comment