
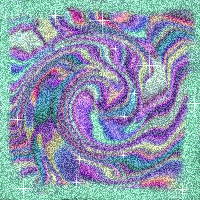
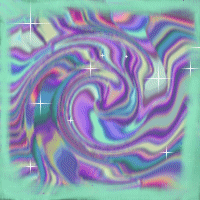
Let's Make Glitter ~ Plug-in Style!

This tutorial was created by me, Mary Oakes aka Ariez Moon on May 14, 2010, and is a spin off of my original "Lets Make Glitter" tut. If there is another tutorial similiar to this, it is purely coincidental, and
this tutorial represents my own ideas and preferences on methods shown. As with any tutorial this just gives you an
idea of how to do things, feel free to add your own personal touch to your
creation.
TOU
Do NOT copy or alter this tutorial in anyway, and try to claim it as your
own. If you would like to share my tutorial you may do so by letting the individuals
know where you have learned it from and send them here to my blog. Do NOT
attempt to sell this tutorial or the supplies within for any reason what so
ever! This tutorial is for learning purposes ONLY.
Supplies Needed:
 Paint Shop Pro® ~ Trial Version
  Animation Shop® ~Trial Version. $20.00 to buy.
Plug-ins Needed:
Click on the name of one of the filters to take you to Grafnet. Grafnet is a great resource site for Plug-ins and filters, and you wont have to worry about illegal downloads. If it is Free To Use you can download right from the site, if it is Pay To Use, it will take you to the developers site. All filters are listed alphabetically.
Grab a cup of coffee or soda, sit down and relax. This tutorial is a bit
lengthy but only becuase I have tried to teach you by exact detail.
Ready? Let's begin:
Install your filters into the appropriate directory. If this is your first time using filters/and or plugins, please go HERE to learn how to install them.
Install your filters into the appropriate directory. If this is your first time using filters/and or plugins, please go HERE to learn how to install them.
Open Paint Shop Pro and Animation Shop. Minimize Animation Shop for now. In
PSP click on File -->New or New Image. In the pop up window set your WIDTH
to 200 pixels and your HEIGHT to 200 pixels. Set your RESOLUTION to 72
pixels/inch. RASTER BACKGROUND ticked, and TRANSPARENT BACKGROUND ticked. Click
OK.

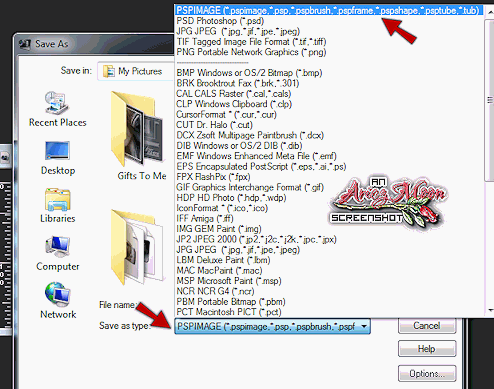
Always save your work continually while working on
it, that way if PSP ever crashes you will not have to start over again. Go to the top of PSP and click on
FILE-->SAVE. Go to the directory that you want to save your image in. Give
it a name. In File Type choose PSPIMAGE (*.pspimage,*psp,*pspbrush.*pspfrar...)
In your Materials Palette click on
FORGROUND AND STOKE PROPERTIES, and choose a color of your liking. I used a purple color and chose a texture to go with it, then I added some extra filter to get a swirly effect . If you cannot
see your Material Palette in your work space, look up at the top of PSP and
click on VIEW-->PALETTES-->MATERIALS and it should show up on the right
hand side of PSP.

Look over to the right hand side of PSP and find your LAYER PALETTE. Again,
if it is not there go to VIEW-->PALETTES-->LAYERS and it will show up.
This is what your Layer Palette looks like.


Now let's name your layers so they are easier to work with. Right click on (choose Rename) OR double click on the bottom layer that is at the moment called Layer 1. A pop up will appear. Where it says Name Enter in Glitter 1 or whatever you decide you would like to choose for a name. Click OK. Repeat the steps for the other two layers only renaming them Glitter 2 and 3.
Stop!! Hit Save!!
Now we are going to hide the top two layers. Hide the layers by clicking on
the EYE in the Layer Palette.

Go to EFFECTS-->PLUGINS-->DSB FLUX-->BRIGHT NOISE
with the following settings:

Click OK.
Now go to EFFECTS-->PLUGINS-->VM NATURAL--> SPARKLE
with the following settings:

Click OK.
Close out the layer by clicking on the eye for that layer.
Click on the second layer to make it active. Unhide the layer by clicking
on the layer's eye.
Again, go to EFFECTS-->PLUGINS-->DSB FLUX-->BRIGHT NOISE and click on the MIX button one time and click OK.
Go to EFFECTS-->PLUGINS-->VM NATURAL--> SPARKLE only this time just change the RANDOM SEED slider to wherever looks best for you. You can also, if you choose, change the slider on MAX SIZE.
Click OK.
Now do the same two steps for the last layer except click the MIX button TWICE for Bright Noise, and move the RANDOM SEED slider to your position of choice for the SPARKLE.
That's it!! Time to save if for use in AS!!
Click on FILE-->SAVE AS name your tile and save it as a PSP Animation Shop file *(.psp) in a directory of your choosing.

Click Save.
Are you ready to make it look pretty?
Lets Go!!
Bring Animation Shop up.**If you are a first time
user of AS please pay attention to these instructions we may have to do some
tweaking before you begin.**
FIRST TIME USERS

A pop up menu will appear. Click on the Layered Files tab. Follow
the settings:
Export frames to Paint Shop Pro as
layered images - Checked.
Keep layers
as separate frames - Ticked.
Preserve overall layer transparency
- Checked.

Unless there are other settings you need to change for different
animations you will never have to do this step again, the program will always
remember them. THAT'S IT!! YOU'RE ALL SET TO GO!!\
LET'S CONTINUE ON NOW:
Now this is the easiest part. Look at the top of AS
and you should see a button that looks like a film strip. If you hold
your cursor over it, it will say "View Animation". Click on it.
HEEEEEYYY!!! GUESS WHAT??? You have just made your own
lil glitter tile!!!!
You can slow it down or speed it up if you would like,
but I will show you how to do that in a different tut for a different
animation. Glitter tiles, in my opinion, always look best in the default settings. For
right now, let's go ahead and save this one just the way it is.
.
Close the window that popped up to show you your moving
animation.
On the original animation go to FILE-->SAVE. When the
menu opens find the directory that you want to save it in. Name it once again.
In FILE TYPE make sure CompuServe Graphics Interchange (*.gif) is selected.
Click Save.
An optimization window will pop up. On the first
window move the slider up to Better Image Quality.
Click on the Customize
button.


Click OK.
Click Next. Click Next. Click Next. Click Finish.
CONGRATULATIONS!! YOU ARE DONE!!
OK, so now you are sayin' "Wow, that is nifty, but what do I do with this lil' ol' glitter tile?"
Well, you can do a lot of things with them. You can animate your name, use them in frames, backgrounds and a whole lot more!! Follow me, and I will show you how you can animate your name!! Find me HERE!!
I hope you enjoyed the learning experience you recieved while doing my tut.
Enough infact that I hope you come back for more. I certainly loved showing
you! If you have any questions or difficulties please do not hesitate to
contact me via a comment or even by EMAIL! HAPPY
PSPing!!!


No comments:
Post a Comment