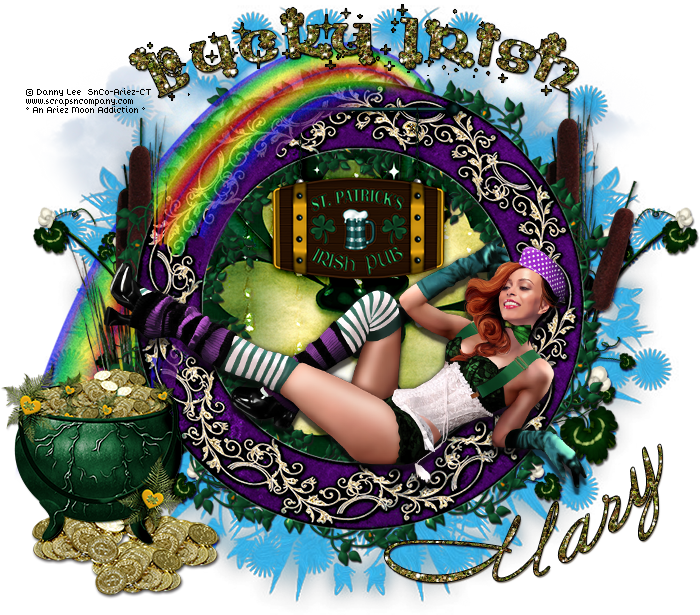
This
tutorial was created with Photoshop CS6 or CS2
depending on what filters I use. Some older
filters will no longer work in CS6. Can be done with other
versions and/or programs.
Supplies:
Artist's
Tube of choice: I am using the
PTU art of Danny Lee and the tubes name is Lucky. Please DO NOT use
this mage without the proper license or permission. You can find this
tube here
Scrap
Kit of choice: I am using the
matching kit Luck by Kai Kreations. You can also find this kit here
Mask
of choice: I am using mask
MPM_Mask84 by Millie's PSP Madness and you can find it HERE
Fonts
of choice: I am using FFF Regency for the © and AnnebelleJf for the name/text.
Ok,
grab a cuppa, and a munchie, and let's go!!
Please
remember to SAVE your work often, RENAME
your layers, and if you feel you have really messed up.... Remember
that UNDO is your bestest friend!!
Abbreviations
CP
= Drag and Drop OR Edit>Select All>Edit>Copy>Edit>Paste
DS
= Drop Shadow
MV
– Merge Visible
MD
– Merge Down
LS
– Layer Style/Blending Options
Create
a new image 700 x 700 , transparent background, 72dpi/ppi. Name the
file whatever you wish and hit ok.
Use
your Free Transform tool to resize your elements to your liking as
you work.
Prepare
and C/P your mask to the center of your working canvas. If you do not
know how to prepare your mask, please go HERE for a short tutorial.
Enlarge
the mask a bit, not so much that it touches the edges of the canvas.
CP p4. Create a clipping mask and change the blend mode of the layer
to multiply.
C/P
F4 to the center of your canvas.
Ctrl+click
on the thumbnail of frame 4 in the layer palette, to make a selection
around it. Go to Select>Inverse. Flood fill with white using your
paint bucket.
Now
carefully erase the outer white that surrounds the outside of the
frame. Select>Deselect. With a gold pattern fill or layer style
apply it to the layer. Drag this layer under the frame in the layer
palette.
C/P
F1 to the center of your canvas. Drag this layer under frame 4 and
the pattern/styled layer and duplicate it. On one of the frame 1
layers use your free transform tool to enlarge the frame so that it
peeks out from the outer edges of frame 4.
The
leaves of both layers of frame 1 should now be seen on the inside and
outside edges of frame 4. With an eraser brush. Erase the leaves that
show through the scrolls of frame 4. You will have to do this to both
layers.
Grab
your Magic Wand. Click inside frame 4. Select>Modify>Expand and
expand the selection by 5 or so.
Create
a new layer and flood fill white. Select>Deselect. Drag this layer
under all the frame layers.
CP
p3 and arrange it how you would like it to sit inside the frame. Once
you have it where you want it, hold your cursor between the
thumbnails of the paper and the white fill. Hold down Alt and click
to create a clipping mask.
CP
element 81. Position it how you would like it to sit inside the
frame.
Change
the blend mode of both the paper layer and the flower layer to Hard
Light.
CP
your tube. Make sure this layer is at the very top on your layers
palette. Reduce the size of the tube to your liking and rotate her a
bit. Position the tube so that she looks like she is lounging inside
of frame 4.
Using
a mask layer or your eraser tool, erase the little bit of her fingers
that are near her hat to make it look as though she is hanging on to
the frame.
CP
element 82 above the frame.
CP
element 79 resize down and place it upper center over the frame so
the sign is hanging from the frame.
CP
element 7 and place on the left hand side, on top of the frame. Erase
the bit that sits over frame 4 and drag the layer under the tube
layer in the layer palette.
CP
element 3, and place at the bottom of the rainbow. Resize it to what
ever suits you best. If a piece of the rainbow is peeking out, erase
that bit.
From
here on out, all elements will sit under all the frame layers but
above your mask, so make sure your paper layer for your mask is the
layer that is active in your layer palette.
CP
element 73. Duplicate and position the cloud where you would like to
have them.
CP
element 49. Free Transform, rotate to the right and position under
the right side of your frame. Erase the stem that peeks out.
Duplicate, flip horizontal, then place on the left side of the frame.
CP
element 57. Follow the same steps as you did with element 49.
Now
take one last look at your tag. Add or take away any elements that
suit you. I decided to add coins to the bottom of the pot of gold.
If
your wish is to resize the WHOLE image, now is the time to do it.
Add
any layer styles ie... DS/and or glows, to any or all layers.
Add
your name and the © info.
Save
for Web as PNG-24 and clap your hands lassies, you be done!!
This
tutorial was created by me, Mary Oakes aka Ariez Moon, on 03/03/2015.
Any similarity to any other tutorial is purely coincidental. Please
abide by my TOU and the TOU of Artists and Designers that you may
use.
I
hope you all enjoyed this tutorial, and I hope that I did not do too
bad of a job writing it. If you have any problems, questions,
comments, or suggestions just give me a hollar in my Cbox, or connect
with me on FB. I will get back to you as fast as I can.
As
always, Happy PSPing.... and Photoshop too :) !!


No comments:
Post a Comment