


This
tutorial was created with Photoshop CS6 or CS2
depending on what filters I use. Some older
filters will no longer work in CS6. Can be done with other
versions and/or programs.
Supplies:
Artist's
Tube of choice: I am using the
PTU art Zombie Pony of Charles Bristow. This is an Exclusive tube for Scraps & Company. Please DO NOT use this image
without the proper license or permission. You can find this tube here

Scrap
Kit of choice: I am using the
wonderful PTU kit Zombie Pony by Bibi's Collection. You can find this
kit here

Fonts
of choice: I am using FFF
Lighthouse for the © and Zombie Holocaust and Comic Sans for the
name/text.
Filter
of choice: Red Paw Media –
RPM Beautifier (OPTIONAL)
Ok,
grab a cuppa, and a munchie, and let's go!!
Please
remember to SAVE your work often, RENAME
your layers, and if you feel you have really messed up.... Remember
that UNDO is your bestest friend!!
Abbreviations
C/P
= Drag and Drop OR Edit>Select All>Edit>Copy>Edit>Paste
DS
= Drop Shadow
MV
– Merge Visible
MD
– Merge Down
LS
– Layer Style/Blending Options
Create
a new image 851 x 315 , transparent background, 72dpi/ppi. Name the
file whatever you wish and hit ok.
C/P
paper 7 as a new layer.
Create
a new layer. Click on your Gradient Tool. If you don't see it, right
click on your Fill Tool (paint bucket) and select the Gradient tool
(looks like a shaded rectangle). Load my gradient from the supplies,
or use one of your own. (if you are new to PS and would like to learn
how to modify gradients, you can look forward to seeing that tut
soon). Select the Radial Gradient option in the tool bar.
From
the left side of you tag, click and drag your cursor to the right
side of your tag. Set the layers blend mode to Overlay in the layers
palette.
C/P
element 93. Position just left of the center of the canvas. Duplicate
and position to the left upper corner and down a bit. Close off all
other layers and MV. Set the layer's blend mode to hard light.
C/P
element 83. Resize to 65% and position all the way to the left of the
canvas.
C/P
element 13. Do not resize. Position over the rock and moon element.
Set the layer's blend mode to hard light.
C/P
element 74. Resize to your liking and position in the upper right.
Duplicate and drag this layer to the left. Close all other layers and
MV.
C/P
element 104. Resize down to your liking and position the dragonfly
over your moon on the left hand side of the banner.
C/P
element 90. Resize to your liking and place in the lower center of
the banner. Duplicate, move it to the right and down a bit.
Duplicate, then again move this duplicate to the right and down a
bit. Close off all other layers and MV.
C/P
element 87 resize to what suits you best. Position to about the
bottom center and flip horizontally.
C/P
Zombie Pony. Resize down to your liking and position the right of the
banner.
Take,
one last look at your tag. Add or remove elements as you wish. Now
consider your light sources and then add LS/DS to any or all layers.
Click
on your very top layer, in your layer palette. C/P a paper of your
choice. I chose paper 4. Stretch out the paper so that it fits the
entire canvas. Go to Select>All>Select>Modify>Border. Set
it to 5px. Select>Inverse. Hit Delete on your keyboard. Add a DS
of choice.
Don't
forget that you cannot have anything without prominent text on it, so
add your name or a phrase.
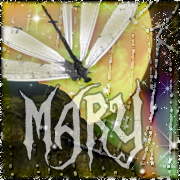
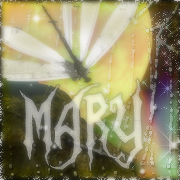
I
have two examples for this. In the second example I used a filter.
Red Paw Media – RPM Beautifier. It gave the banner a more muted and
blended effect. If you choose to do this, here are the steps. MV the
entire banner. Duplicate. On the top layer Filter>Blur>Gaussian
Blur. Blur by 2. Lower the opacity of the layer between 60 and 70%
On
the bottom layer Filter>Sharpen>Sharpen, Filter>Red Paw
Media – RPM Beautifier at default settings.
Then
MV.
Add
© info.
Save
for Web as Jpg. And continue on for the avatar.
Create
a new image 180 by 180 px. Transparent background. Name the file
whatever you wish and hit ok.
On
your banner image.... it doesn't matter where at this point, with
your Rectangular Marquee Tool, hold the down your SHIFT key and drag
out a square that is 180 x 180 pixels. As you drag you will see your
cursors position that will tell you the width and height as you drag.
Once you reach 180 x 180 let go of your mouse button, THEN let go of
the SHIFT key.
Back
to your tools, click on the Edit Mask Mode Button ( Second Button
from the bottom ).
All
but your square should be red. This is normal. With your Move Tool
position the square around the area that you would like your
background of your AV to look like.
Click
on the Edit Mask Mode button again.
Edit>Copy
Merged Select>Deselect
On
your AV canvas Edit>Paste.
Create
your border the same as you did for your main image.
Add
your name and © info as needed.
Save
for Web as Jpg, and you are finished!
This
tutorial was created by me, Mary Oakes aka Ariez Moon, on 03/12/2015.
Any similarity to any other tutorial is purely coincidental. Please
abide by my TOU and the TOU of Artists and Designers that you may
use.
I
hope you all enjoyed this tutorial, and I hope that I did not do too
bad of a job writing it. If you have any problems, questions,
comments, or suggestions just give me a hollar in my Cbox, or connect
with me on FB. I will get back to you as fast as I can.
As
always, Happy PSPing.... and Photoshop too :) !!

No comments:
Post a Comment