
This
tutorial was created with PaintShop Pro X4 but can be done
with other versions and/or programs.
Supplies:
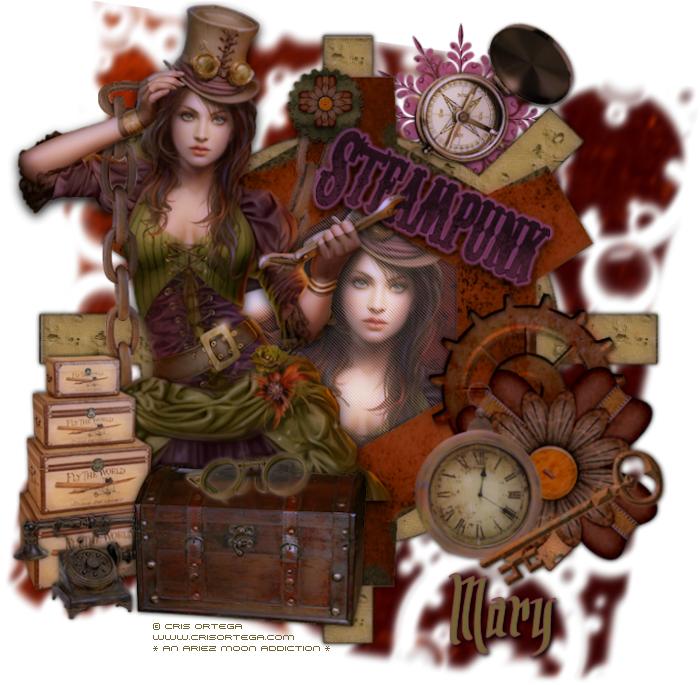
Artist's
Tube of choice: I
am using the FTU work of Cris Ortega. Please Cris graciously lets us
use her art as general permission. Please abide by her TOU. You can
find her artwork HERE
Scrap
Kit of choice: I am using the
wonderful PT kit Steam Punked by Mellie Beans. You can find this kit
here

Brush
of choice: A cool lookin retro
circle brush. All kinds found on Deviant Art!
Fonts
of choice: I am using FFF
Galaxy for the © and ARRR Matey BB for the name/text.
Filters
of choice: Xero – Radiance
and Porcelain, Penta.com - Jeans
Ok,
grab a cuppa, and a munchie, and let's go!!
Please
remember to SAVE your work often, RENAME
your layers, and if you feel you have really messed up.... Remember
that UNDO is your bestest friend!!
Abbreviations
C/P
– Copy and Paste
DS
= Drop Shadow
MV
– Merge Visible
Create
a new image 800x800, transparent background, 72dpi/ppi. Go to Save,
name and place the file wherever you wish.
C/P
frame 1 as a new layer.
With
your magic wand select inside the frame. Selections>Modify>Expand.
Expand by 3px.
Create
a new layer and drag the layer under your frame layer.
With
your flood fill tool choose a color from your tube. I chose a dark
muave color. Flood fill the selection.
C/P
paper 4 as a new layer. Selections>Invert and hit delete on your
keyboard. Invert again. Set the layers blend mode to multiply
C/P
your tube as a new layer above your Paper layer. Position to your
liking. Selections>Invert and hit delete on your keyboard. Apply
Xero Radiance.
Close
off your Frame layer and MV. Use a filter on this new merged layer,
if you so desire. I used Penta.com – Jeans
C/P
and paste your tube on top of the frame and position to the left..
Resize down to your choice.
Copy
and paste elements 22, 28, and 29. Resize each element down to choice
and layer as you like to hide the flat edge of the tube.
C/P
element 20. Resize way down and with your eraser tool erase the ear
stems of the glasses and position the elements as if they are resting
on the chest.
C/P
element and resize down to your choice. Drag the layer under the
tube layer so that it sits behind the tube but on top of the frame.
See my tag for position. Selections>Float>Selections>defloat.
Click on your tube layer to make it active and with your eraser tool
erase a bit of the tube to make it look like the chain is coming over
her left side. Using the selection will stop your from erasing bits
that you don't want to erase.
C/P
elements 4 and 13. Resize these way down and layer to your liking.
Place them at the top of the chain that sits on the frame.
C/P
the word art StTEAMPUNK. Resize down, and rotate. Place on top of the
frame just right of the chain.
C/P
elements 24 and 11. Resize, rotate and layer to your liking. Keep the
compass layer above the frame and drag the flower all the way down in
the layers palette so it sits under the frame. Upper right hand side.
Now,
let's create a faux mask. C/P a paper of your choice. I chose paper
3. Selections>Select All. Selections>Modify>Contract by
about 10 or so px. Selections>Invert and hit delete on your
keyboard.
With
your eraser tool choose a retro cirlcle brush of your choice. Click
all over the canvas with the eraser. UMMM don't go to wild with it
you want bits of the paper left. LOL.
Selections>Select
All>Selections Float>Selections>Defloat
Selections>Modify>Feather
about 10px or so.
Selections>Invert
and hit delete.
With
a soft eraser brush lightly squiggle over any sharp edges that you
might still have.
I
also added a motion blur and a gaussian blur to mine. If it looks too
large still for your tag use your pick to and resize it down a bit.
There ya go, A mask without an actual mask!
Ok,
lets resize our image so that we may add our name, ©, and
shadows/glows.
Go
ahead, resize your image to however you like it.
Close
your faux mask layer and MV apply Xero – Porcelain at default
settings to whole image. Open mask layer.
Add
© info and your name. Export as PNG and you are done!! Woo hoo!
This
tutorial was created by me, Mary Oakes aka Ariez Moon, on 11/19/2014.
Any similarity to any other tutorial is purely coincidental. Please
abide by my TOU and the TOU of Artists and Designers that you may
use.
I
hope you all enjoyed this tutorial, and I hope that I did not do too
bad of a job writing it. If you have any problems, questions,
comments, or suggestions just give me a hollar in my Cbox, or connect
with me on FB. I will get back to you as fast as I can.
As
always, Happy PSPing.... and Photoshop too :) !!

No comments:
Post a Comment