

This
tutorial was created with Photoshop CS6 or CS2
depending on what filters I use. Some older
filters will no longer work in CS6. Can be done with other
versions and/or programs.
Supplies:
Artist's
Tube of choice: I am using the
gorgeous PTU Poser that our scrap kit was inspired by, and her name
is Raine. It is the gorgeous work of GraphFreaks. Please DO NOT use
her images without the proper license or permission. You can find
this tube here

Scrap
Kit of choice: I am using the
gorgeous PTU kit Fantasy Raine by Scrappin Krazy Designs You can find
this kit here

Mask
of choice: I am using mask
ARZMN_Mask%02 by yours truly :) Click for full size then save image. Please do not change file name or claim as your own. Please do not share. May use in other tags and tuts of your own, but must have a link back to me.
Fonts
of choice: I am using Celtic
Bitty for the © and Cafe Lounge 19 for the name/text.
Filters
of choice: Xero - Softmood
Ok,
grab a cuppa, and a munchie, and let's go!!
Please
remember to SAVE your work often, RENAME
your layers, and if you feel you have really messed up.... Remember
that UNDO is your bestest friend!!
Abbreviations
C/P
= Drag and Drop OR Edit>Select All>Edit>Copy>Edit>Paste
DS
= Drop Shadow
MV
– Merge Visible
Create
a new image 900 x 900 , transparent background, 72dpi/ppi. Name the
file whatever you wish and hit ok.
Prepare
and apply your mask. C/P paper 6 above your mask layer, and create a
clipping mask. MV, duplicate and set the layer blend mode to either
hard light or multiply.
C/P
element 39 to the center of your canvas.
With
you magic wand click inside the frame. Select>Modify>Expand and
expand by 5px.
Click
on your very bottom layer, which should be a blank layer.
Open
Paper 7 Select>All Edit>Copy. Back to your main canvas
Edit>Paste into.
Now
you should see that a layer mask has been added. Go to Layer>Layer
Mask>Apply.
Duplicate
the paper layer and change the blend mode of the layer to multiply.
Hide
your frame layer and MV.
C/P
element 41 to the center of your canvas. Resize down so that it fits
inside the frame, and drag the layer under your frame layer in the
layers palette.
C/P
your tube to the center of the canvas above the frame.
C/P
element 55 and place at the bottom of your tubes feet. Duplicate
twice. Drag one of the duplicates over to the right a bit, then with
a soft eraser brush, erase just enough to blend with the original..
With
the second duplicate place the layer under the frame layer but above
the pathway and rotate it to match the angle of your frame.
C/P
element 61. Resize to your choice and place above the grass, at your
tubes feet.
C/P
element 32 Resize down to your choice and place on the top upper left
of the frame.
C/P
element 21. Resize down and place on the bottom lower right. Drag the
layer below one of the grass layer.
Now
keep going, add and layer more elements until you are happy with it.
Add
DS and glows to any or all layers.
Close
off the crow and the cat. MV the rest of the layers and apply Xero –
Softmood at the default settings. Unhide the crow and the cat.
Trim
and resize your image's longest edge to 750px.
Apply
your name with any effects that you wish to add along with your ©
info.
Save
for web as PNG=24 and you are finished!! Oh so pretty!!
This
tutorial was created by me, Mary Oakes aka Ariez Moon, on 00/00/2014.
Any similarity to any other tutorial is purely coincidental. Please
abide by my TOU and the TOU of Artists and Designers that you may
use.
I
hope you all enjoyed this tutorial, and I hope that I did not do too
bad of a job writing it. If you have any problems, questions,
comments, or suggestions just give me a hollar in my Cbox, or connect
with me on FB. I will get back to you as fast as I can.
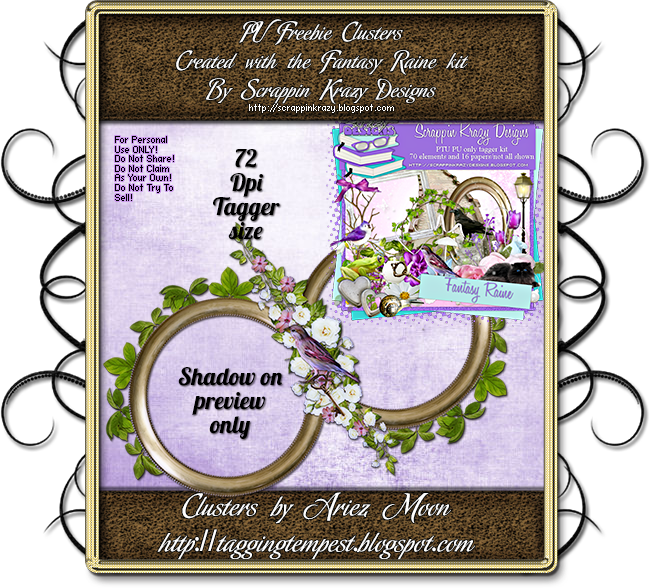
Don't forget to grab your freebie cluster frame! TOU included in the zip file. Click on the preview to download and enjoy!!
As
always, Happy PSPing.... and Photoshop too :) !!

No comments:
Post a Comment