

This
tutorial was created by me, Mary Oakes aka Ariez Moon, on 10/09/2014.
Any similarity to any other tutorial is purely coincidental. Please
abide by my TOU and the TOU of Artists and Designers that you may
use.
This
tutorial was created with Photoshop CS6 but can be done with other
versions and/or programs.
Supplies:
Scrap
Kit of choice: I am using the
wonderful PTU kit My Honey by Scrappin Krazy Designs. You can find this
kit here

Mask
of choice: I am using mask SKDSset3-4 also by Kaci, so while you are on her site, go ahead and grab
this too :)
Fonts
of choice: I am using PF Arma 5 for the © and Bumblebees Demo for the name/text as a chunky text
works best for this tutorial..
Filters
of choice: Xero - Fritillary
Ok,
grab a cuppa, and a munchie, and let's go!!
Please
remember to save your work often. And if you really feel that you have messed up, just rmember that UNDO is your bestest friend!
First
we need to make a pattern for our text. Open Paper ll, right click on
the top of the image window and select Duplicate, then hit OK. Close
the original. Right click on the image window and choose Image Size
and reduce the size to 250 x 250 and click OK.
FILTERS>OTHER>OFFSET
with these settings, or what looks best to you for a seamless
pattern.

In
your tool bar click on your Burn Tool, choose a small soft brush,
size around 25, hardness at 2%. Darken the edges of dripping honey,
paint in light shadows here and there through out the image.
EDIT>DEFINE
PATTERN. When the pop up displays, name your pattern whatever you
choose and hit OK. Now onto the tag!
Create
a new image 600 x 300 pixels, transparent background, 72 ppi. Name it
whatever you want to name it and hit OK.
On
your Tool Bar select your Text Tool. Use the following settings..
Front
Bumblebees Demo, size 36pts, Anti – A;lias Smooth, Centered, and
the color white.
Type
out your name and apply by clicking the checkmark on your settings
tool bar. Right click and choose Duplicate and then duplicate one more time so that you have
a total of 3 text layers. On the top and middle layers, reduce the
Fill all the way down to 0.

Now
working from the bottom text layer up
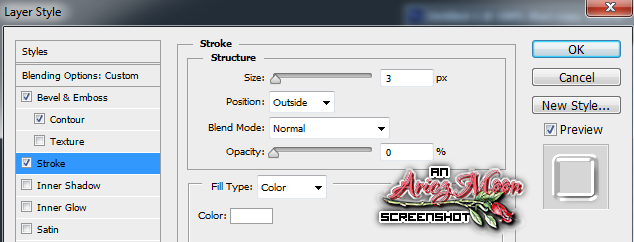
Right
click on bottom text layer and choose Blending Options. Click on
Pattern Overlay. Leave all the settings as they are except under
Pattern, click the menu arrow and from they fly out choose the
pattern you just created. With Blending Options still open, drag your
mouse inside the TEXT on your working canvas, to position your
pattern where it looks best.

Click
on Inner Glow, with these settings

Click
on Drop Shadow with these settings, then click OK.

Middle
layer with these settings


Top
layer with these settings


LAYERS>GROUP
LAYERS. Then IMAGE>TRIM with these settings

Open
the frame ele13. Duplicate and close the original. FILE>SAVE. Name
your tag what ever you want and save it as PSD. Right click on top of
it's window and choose Image Resize change the Resolution to 72. Notice how it changes the width and heigth? So now we have to change those back to 650 x650. Click OK. Right click on the window again but this time choose Canvas size. Resize to 950 x 950. It's big, I
know, but we will resize it later. This will give us plenty of room to work.
Click
on your text image. In your Layers Palette, right click and choose
Duplicate Group. In the pop up you will see Destination and then
Document. Click the Menu Arrow and choose the document name that you
just saved ( your Frame copy ). Hit OK. Now close your text image, We
no longer need it. Double click on the frame layer and Rename to
Frame.
Open
ele02 and drag the Bee Fae onto your working canvas. Rename this
layer to Fae. With your Move Tool position the Fae so that she is
between to letters of your text. We are going to make it look as if
she is squeezing between the letters.
In
your text group in the Layers Palette, click the little arrow to
expand the group. On the bottom text layer hold your CTRL key down
and click on the text thumbnail all at the same time. This will make
a selection around your text.
Grab
your Eraser Tool with a hard brush. Click on the Fae layer and erase
inside the selection of the letter that you want her behind. On my
tag for Kaci, I chose the letter C and a little parts of the I and A.
SELECT>DESELECT.
Open
and drag ele07 onto your working canvas. Position at the top of your
frame. Drag the layer all the way to the bottom in the Layers
Palette. With the same steps as above, make a selection around the
branch. Click on the Frame layer, lower the opacity down so you can
see what you are doing. With your eraser tool erase on the leaf just
above the bee hive so that it shows on top of the frame. See my tag
for reference. Rename this layer Branch and bring the opacity up on
your frame. Deselect.
Drag
ele15 onto your working canvas. Rename the Layer Yellow Flower. Scale
it down to a suitable size and place on top of the frame. Open ele16
and place over the frame just a down a bit from the yellow flower,
and Rename the layer R/Y Flower. View my tag for placement.
Make
a selection around the Yellow flower, click on the R/Y Flower in your
Layers Palette. With your eraser tool erase a petal from the R/Y
Flower. This will make it look as if the yellow flower is overlapping
it a bit.
Drag
ele11 onto your canvas and scale down, Place over to the left of the
flowers. And drag the layer under the flowers in the Layers Palette.
Name this layer Honey Pot
Drag
ele.49 onto your canvas, scale down and position to the left.
EDIT>TRANSFORM> FLIP HORIZONTAL. Drag the layer under the two
flower layers, but on top of the honey pot. Rename this layer Honey
Dipper.
Drag
ele51 on to your canvas. EDIT>TRANSFORM>ROTATE. Rotate the
polaroids around and scale them down so that they almost follow the
flow of the frame on the right hand side. Rename this layer
Polaroids.
Open
elements 04, 46. 03 and papers 13 and 15. Drag ele04 under the top
polaroid and position the fae's face inside the frame. Close off the
layer in the layers palette. Drag P13 on to your canvas and position
over to the right under the polaroid and the Fae. Close off this
layer. Drag ele46 onto the canvas and position inside the middle
polaroid frame. Place this layer under the fae layer of the polaroid.
Close the layer. Now drag the last element and the last paper under
the polaroid all the way under the others. Scale the crown down and
position how you want it to be. Close off these layers.
So,
under the polaroid frames you should have
face
of fae
face
of bee
paper
crown
paper
and
all of these layers should be closed except the polaroids.
Click
on the polaroid layer to make it active and click on your Magic Wand
Tool. Make sure Add To Selection button is pressed. Click inside each
square of the frames. SELECT>MODIFY>EXPAND and expand by 3
pixe.s. SELECT>INVERSE
Now
open up all 5 of the layers that you closed. Click on each one, one
at a time and hit Delete on your keyboard. This will get rid of all
the extra that sits around the outside of your frame.
On
the Bee and the crown layer, add a default shadow. Then close off all
the except for the face of fae, face of bee, the crown and the two
papers. Right click and merge visible.
FILTER>XERO>FRITILLARY
on default settings. Then the same filter one more time. Open the
polaroid layer and merge visible. Now you can open the rest of the
layers.
Drag
ele24 onto your canvas scale the butterfly down and place on top of
the polaroid.
Place
ele26 onto your canvas and position it on top of the bottom of the
large frame. Scale it a bit if you so choose Drag the layer all the
way down under the honey pot layer in the layers palette.
Now
take a good look at your tag and see if there are any changes you
wish to make.
Apply
drop shadows on what ever layers you want to apply them to.
Click
on the bottom layer and then Shift + click on the top layer. Right
click and choose Convert To Smart Objects. Close off the layer.
We
turned these layers into a Smart Object because we are going be
scaling them down by transforming them instead of resizing them,
Since we have layer styles the smart object will keep those styles
from losing their natural appearance after they are smaller. ERRRR I
guess that is a good way to explain it LOL. Don't worry you can still
get to all those layers if you need to edit them.
Add
a new Raster Layer.
Prepare
and apply your mask to the center of the canvas by holding your shift
key as you drag it to the working canvas. If you don't know how to
prepare your mask you can find a tutorial HERE.
Open
P04 and drag that paper to the center of your canvas. Create a
clipping mask by ALT + clicking between your mask and the papers
thumbnail in the layers palette. When you do this and you hold your
cursor between the two you will see a half square arrow. And after
you click you will see the mask thumbnail next to the layer. Right
click and Merge Visible.
Grab
your Ellipse Tool at these settings.

Eyeball
out the middle of your mask, click and drag your ellipse out until
your ellipse reaches just outside of the mask blank center. Release
your mouse button.
Click
on the paper layer that you applied to make it active, then open and
drag p5 and drag it out to the center of your working canvas. Click
on the tab in your Layers Palette that says Paths. You will see a
layer that says Work Path. Right click on that and choose Make
Selection. Then click back on your Layers Tab.
SELECT>INVERSE.
And hit Delete on your keyboard. Drag the layer all the way to the
bottom under your mask layer in the layers palette. Merge Visible.
Rename the layer Mask. Click on the Path Tab, right click and hit
Delete Path, then go back to your layers tab.
Now
open up your Smart Object layer. EDIT>TRANSFORM>SCALE and scale
down until it fits into the center of your mask layer. Right click on the top of your image window and choose Image Size. Check and make sure your Resolution is still at 72. If it isn't take note of what your Width and Height are, change the Resolution back to 72 and change the Width and Height back to what it is supposed to be.
Image Trim the image resize, and resize to your desired tag size.
Add
your copyright info. Since we didn't use a licensed tube here, we can
give all the credit to Miss Kaci!!! YAY!!! Font , size 8pts.
Anti - Alias off, Left position color what ever you want and effects.
Merge
Visible FILE> SAVE FOR WEB, save as PNG- 24, transparency ticked
and you are done!!! undo your merge visible though then Hit Save so
you can use it for your tag template if you wanna make gifts for
those siggie piggies!
I
hope you all enjoyed this tutorial, and I hope that I did not do too
bad of a job writing it. If you have any problems, questions,
comments, or suggestions just give me a hollar in my Cbox, or connect
with me on FB. I will get back to you as fast as I can.
As
always, Happy PSPing.... and Photoshop too :) !!
OH!! and here is another example I made using the same text effect and Kaci's adorable kit!!

OH!! and here is another example I made using the same text effect and Kaci's adorable kit!!

No comments:
Post a Comment