
This
tutorial was created with Photoshop CS6 or CS2
depending on what filters I use. Some older
filters will no longer work in CS6. Can be done with other
versions and/or programs.
Supplies:
Artist's
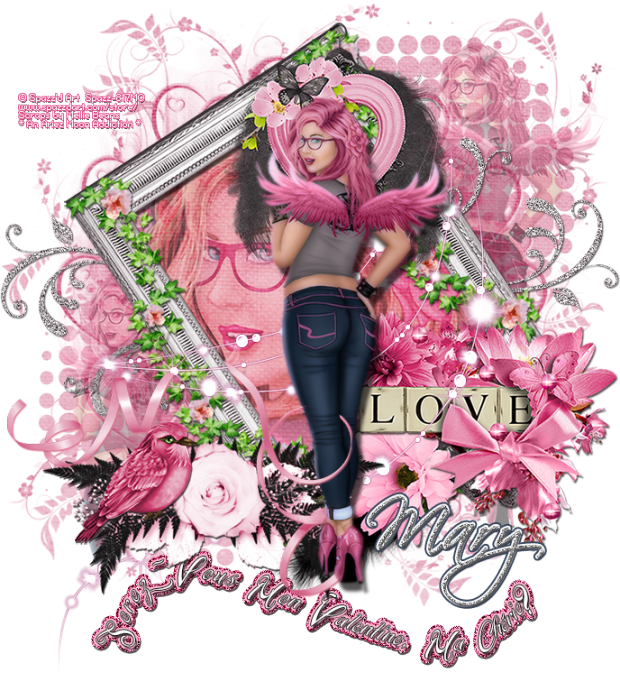
Tube of choice: I am using the
awesome PTU art of Spazz'd Art. Please DO NOT use this image without
the proper license or permission. Her name is Valerie, and you can
find this tube here

Scrap
Kit of choice: I am using the
gorgeous PTU matching kit Valerie by Mellie Beans. You can find this kit here

Mask
of choice: I am using mask
ARZMN_Mask%07 by yours truly :) and you can find it at the bottom of
the tutorial.
Fonts
of choice: I am using FFF
Harmony for the © and Signarita Chloe for the word art, and
Scriptina for names.
Filters
of choice: I used Xero –
Porcelain at the default settings.
Ok,
grab a cuppa, and a munchie, and let's go!!
Please
remember to SAVE your work often, RENAME
your layers, and if you feel you have really messed up.... Remember
that UNDO is your bestest friend!!
Abbreviations
C/P
= Drag and Drop OR Edit>Select All>Edit>Copy>Edit>Paste
DS
= Drop Shadow
MV
– Merge Visible
Create
a new image 800 x 800 , transparent background, 72dpi/ppi. Name the
file whatever you wish and hit ok.
Prepare
your mask, and apply it to the center of the canvas. If you do not
know how to prepare your mask, you can go here for a
short tutorial.
C/P
pp06 to the center of your canvas and create a Clipping Mask with
your mask layer.
MV.
C/P
ell to the center of the canvas. Rotate the frame to the left about
20 to 25 degrees.
Open
the Valerie tube and choose which layers you wish to use. C/P your
tube into your canvas. Scale Valerie down to 75%. and drag the layer
under the frame layer. Position your tube in the frame as you would
like it to appear.
With
your magic wand select inside the frame on your canvas.
Select>Modify>Expand about 6 pixels. Select>Inverse. Click
on your tube layer in the layer palette and hit DELETE on your
keyboard. Lower the opacity of your tube layer to 66 and set the
layer blend mode to Hard Light.
C/P
e17. Rotate the garland and place along the long side of the frame.
Duplicate and place the duplicate along the other side of the frame.
C/P
e61. Place in the upper right corner of the frame.
C/P
e62 and e63. Place in the lower right corner of the frame.
C/P
e21 and 32. Place in the lower left of the frame.
Select
all layers in your layer palette and reduce the size of your image by
20% or until your image width has a size of about 700pixels.
C/P
e60. Rotate and position where you would like it along the left side
of the frame. Drag the layer under the frame and close up layer.
Duplicate and position the duplicate to the right side of the frame.
Delete any areas of the element that show inside the frame.
Go
to Filter>Noise and about 15% noise to each one.
C/P
Aimee one more time onto your canvas. Reduce the size of the tube by
40% or what ever looks best to you. Duplicate three more times, for a
total of 4 tubes.
Close
off two of the 4 tube layers in the layers palette. Select the other
two tube layers in the layers palette (click on one, and then
CTRL+click on the second one) With your move tool position them so
that Aimee is standing in the middle of the canvas, which also looks
as though she is standing in front of the middle of the frame. On the
bottom tube go to Filters>Sharpen>Sharpen. Then
Filters>Blur>Gaussian Blur and blur by 2. Add a slight DS.
On
the top tube layer, make sure it is highlighted and then apply Xero –
Porcelain at the default settings.
Unhide
the other two tube layers and position one on each side of the frame.
You can look at my tag for reference. Set each of the layers blending
modes to Luminosity and lower the opacity of the layers to 45%.
C/P
e02. Position the ribbon so that it swirls around the lower left
where the bird and such are. Zoom in and carefully erase where it
sits on the frame, and then erase where it circles on Aimee's legs. It
will look as though the ribbon is passing through them.
Ok,
last element. C/P e39. Position where you like it best. Duplicate it
and give it a dark pink outer glow. Duplicate this layer and then set
the blend mode to hard light.
Create
a new layer on the very top of your layers palette.
Grab
your Freeform Pen Tool and set it to path. In the settings palette
you will see a little button that looks like a gear. Click that and
set your curve fit any where between 5 and 10. Draw something that
looks like a long S only with shorter tails where you would like your
word art to go.
Grab
your text tool with what ever font you wish to use. Set your color.
Set your alignment to center. Place your cursor over the path and
When your cursor changes click once to set your type position. Type “
Serez-Vous Mon Valentine, Ma Chérie?” ( Will you be my Valentine,
darling?). Add any effects you wish to add to the text. Add DS or glows to any or all layers that you wish to add depth.
Add
your name with effects and your © info.
Magnifique
travail, mes amours! ( Wonderful job, my loves!)
Trim
your image, and you are finished!!
Save
for Web as PNG=24
This
tutorial was created by me, Mary Oakes aka Ariez Moon, on 01/16/2015.
Any similarity to any other tutorial is purely coincidental. Please
abide by my TOU and the TOU of Artists and Designers that you may
use.
I
hope you all enjoyed this tutorial, and I hope that I did not do too
bad of a job writing it. If you have any problems, questions,
comments, or suggestions just give me a hollar in my Cbox, or connect
with me on FB. I will get back to you as fast as I can.
As
always, Happy PSPing.... and Photoshop too :) !!
Here is the mask for you all to enjoy. Hope it is useful to you! Please leave a THANK YOU!!


No comments:
Post a Comment