

This
tutorial was created with Photoshop CS6 or CS2
depending on what filters I use. Some older
filters will no longer work in CS6. Can be done with other
versions and/or programs.
Supplies:
Artist's
Tube of choice: I am using the
PTU work of Renee L. Lavoie. This lovely lady is called Callista.
Please DO NOT use Renee's images without the proper license or
permission. You can find this tube here
Brushes
of choice: I am using various
sponge and marble like brushes, and 1 floral flourish brush., found
in various places around the web. Although mine didn't come from
there, Deviant Art is a great place to find free to use brushes by
the hundreds!
Fonts
of choice: I am using PF
Tempesta Five for the © and Passions Conflict ROB for the name/text.
Ok,
grab a cuppa, and a munchie, and let's go!!
Please
remember to SAVE your work often, RENAME
your layers, and if you feel you have really messed up.... Remember
that UNDO is your bestest friend!!
Abbreviations
C/P
= Drag and Drop OR Edit>Select All>Edit>Copy>Edit>Paste
DS
= Drop Shadow
MV
– Merge Visible
Create
a new image 600 x 200px , transparent background, 72dpi/ppi. Name the
file whatever you wish and hit ok.
C/P
your tube at full size, making sure she fills the hole canvas. Go to
Filter>Blur>Motion Blur, and play with the settings until you
get something that you like. Don't go too high though or you'll blur
out all the color completely. Add noise at about 15% gaussian, and
monochrome checked.
Now
take your brushes., creating a new layer for each brush tip and color
from your tube that you want to use, and start dabbing all over the
canvas. If the natural opacity of your brush is too light click a few
times to darken it up.
As
you did with your large tube layer. Apply the motion blur on each
layer. Once that is done, close your bottom layer and MV. Set the
layers blend mode to screen. You can open your bottom layer back up
now.
C/P
your tube once again, but this time resize her down to 40%. Slide her
all the way over to the left. Duplicate, flip horizontally and slide
the duplicate all the way over to the right.
Apply
a soft chunky DS to one of the tube layer. Copy the style and paste
to the other tube layer and change the direction of the shadow to
make it match the first.
Create
a new raster layer, and with your floral flourish brush paint some
flourishes n between the two tubes.. Drag the layer under the tube
layers. Add any effects you want to them. I added a black stroke and
a DS.
Create
a new raster layer. Select>All Select>Modify>Border 5px.
Flood fill with a complimentary color for your tube. Make sure you
click a few times inside the selection to make it nice and solid..
Deselect. Add an inner DS and normal DS.
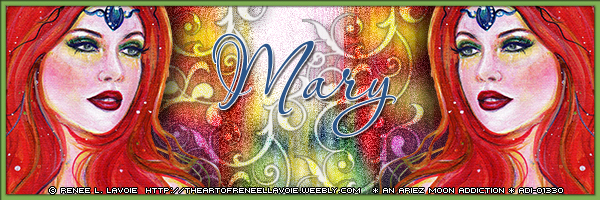
Place
your name and your © info and you are finished with your main tag.
Short and sweet and gorgeous too!! Save as Save for Web as JPG. Don't
close it out though.
Avatar:
Create
a new image 150 x 150 px.
Click
on your rectangular marquee tool and make your settings
New
Selection button pressed
Feather
0
Style
Fixed
Width
and height both set to 150px
Click
once on your main tag somewhere that looks good to you. If it isn't
exactly where you want it press Q on you keyboard to enter quick mask
mode. Everything around your selection should be red. With your mover
tool move your selection to where want it, then tap the Q key again.
Go to Edit>Copy Merged.
On
your new lil canvas go to Select>All Edit>Paste Into..
Follow
the same steps as you did for your main tag to create your border.
If
need be add © and your Initial.
Save
for Web as JPG and you are absolutely stylin' with a new tag!!
Yippee!!!
This
tutorial was created by me, Mary Oakes aka Ariez Moon, on 00/00/2014.
Any similarity to any other tutorial is purely coincidental. Please
abide by my TOU and the TOU of Artists and Designers that you may
use.
I
hope you all enjoyed this tutorial, and I hope that I did not do too
bad of a job writing it. If you have any problems, questions,
comments, or suggestions just give me a hollar in my Cbox, or connect
with me on FB. I will get back to you as fast as I can.
As
always, Happy PSPing.... and Photoshop too :) !!

No comments:
Post a Comment