Pages

Showing posts with label CT S&Co. Show all posts

Thursday, March 12, 2015

☿ Be Afraid ☿ Timeline Tutorial


This tutorial was created with Photoshop CS6 or CS2 depending on what filters I use. Some older filters will no longer work in CS6. Can be done with other versions and/or programs.

Supplies:
Artist's Tube of choice: I am using the PTU art Zombie Pony of Charles Bristow. This is an Exclusive tube for Scraps & Company. Please DO NOT use this image without the proper license or permission. You can find this tube here

Scrap Kit of choice: I am using the wonderful PTU kit Zombie Pony by Bibi's Collection. You can find this kit here

Fonts of choice: I am using FFF Lighthouse for the © and Zombie Holocaust and Comic Sans for the name/text.

Filter of choice: Red Paw Media – RPM Beautifier (OPTIONAL)


Ok, grab a cuppa, and a munchie, and let's go!!

Please remember to SAVE your work often, RENAME your layers, and if you feel you have really messed up.... Remember that UNDO is your bestest friend!!

Abbreviations
C/P = Drag and Drop OR Edit>Select All>Edit>Copy>Edit>Paste
DS = Drop Shadow
MV – Merge Visible
MD – Merge Down
LS – Layer Style/Blending Options

Create a new image 851 x 315 , transparent background, 72dpi/ppi. Name the file whatever you wish and hit ok.
C/P paper 7 as a new layer.

Create a new layer. Click on your Gradient Tool. If you don't see it, right click on your Fill Tool (paint bucket) and select the Gradient tool (looks like a shaded rectangle). Load my gradient from the supplies, or use one of your own. (if you are new to PS and would like to learn how to modify gradients, you can look forward to seeing that tut soon). Select the Radial Gradient option in the tool bar.
From the left side of you tag, click and drag your cursor to the right side of your tag. Set the layers blend mode to Overlay in the layers palette.

C/P element 93. Position just left of the center of the canvas. Duplicate and position to the left upper corner and down a bit. Close off all other layers and MV. Set the layer's blend mode to hard light.

C/P element 83. Resize to 65% and position all the way to the left of the canvas.

C/P element 13. Do not resize. Position over the rock and moon element. Set the layer's blend mode to hard light.

C/P element 74. Resize to your liking and position in the upper right. Duplicate and drag this layer to the left. Close all other layers and MV.

C/P element 104. Resize down to your liking and position the dragonfly over your moon on the left hand side of the banner.

C/P element 90. Resize to your liking and place in the lower center of the banner. Duplicate, move it to the right and down a bit. Duplicate, then again move this duplicate to the right and down a bit. Close off all other layers and MV.

C/P element 87 resize to what suits you best. Position to about the bottom center and flip horizontally.

C/P Zombie Pony. Resize down to your liking and position the right of the banner.

Take, one last look at your tag. Add or remove elements as you wish. Now consider your light sources and then add LS/DS to any or all layers.

Click on your very top layer, in your layer palette. C/P a paper of your choice. I chose paper 4. Stretch out the paper so that it fits the entire canvas. Go to Select>All>Select>Modify>Border. Set it to 5px. Select>Inverse. Hit Delete on your keyboard. Add a DS of choice.

Don't forget that you cannot have anything without prominent text on it, so add your name or a phrase.
I have two examples for this. In the second example I used a filter. Red Paw Media – RPM Beautifier. It gave the banner a more muted and blended effect. If you choose to do this, here are the steps. MV the entire banner. Duplicate. On the top layer Filter>Blur>Gaussian Blur. Blur by 2. Lower the opacity of the layer between 60 and 70%
On the bottom layer Filter>Sharpen>Sharpen, Filter>Red Paw Media – RPM Beautifier at default settings.
Then MV.

Add © info.

Save for Web as Jpg. And continue on for the avatar.

Create a new image 180 by 180 px. Transparent background. Name the file whatever you wish and hit ok.

On your banner image.... it doesn't matter where at this point, with your Rectangular Marquee Tool, hold the down your SHIFT key and drag out a square that is 180 x 180 pixels. As you drag you will see your cursors position that will tell you the width and height as you drag. Once you reach 180 x 180 let go of your mouse button, THEN let go of the SHIFT key.

Back to your tools, click on the Edit Mask Mode Button ( Second Button from the bottom ).
All but your square should be red. This is normal. With your Move Tool position the square around the area that you would like your background of your AV to look like.
Click on the Edit Mask Mode button again.
Edit>Copy Merged Select>Deselect

On your AV canvas Edit>Paste.
Create your border the same as you did for your main image.
Add your name and © info as needed.

Save for Web as Jpg, and you are finished!

This tutorial was created by me, Mary Oakes aka Ariez Moon, on 03/12/2015. Any similarity to any other tutorial is purely coincidental. Please abide by my TOU and the TOU of Artists and Designers that you may use.

I hope you all enjoyed this tutorial, and I hope that I did not do too bad of a job writing it. If you have any problems, questions, comments, or suggestions just give me a hollar in my Cbox, or connect with me on FB. I will get back to you as fast as I can.

As always, Happy PSPing.... and Photoshop too :) !!
post signature

Monday, March 9, 2015

Show off Tags for Scraps N Company Toriya and Bibi's Collection

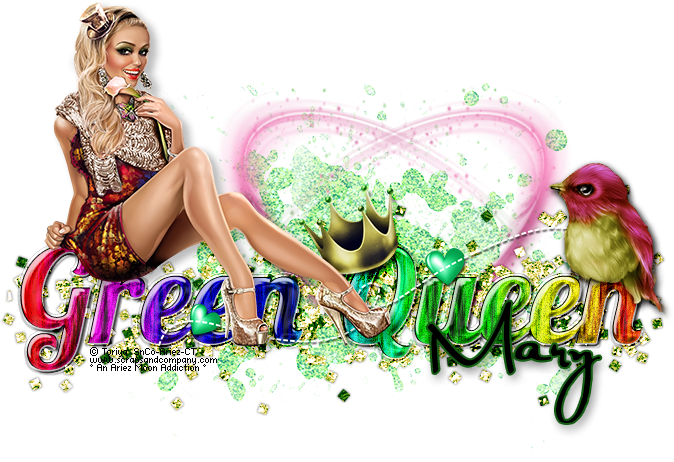
Here, my wonderful Peeps, are two tags made from the gorgeous Green Queen kit by Bibi, and the beautiful Patty tube by Toriya!!
Patty comes with two different layers and Green Queen has a wowzer of 135 elements and 10 papers!! Between the two, talk about St. Pats and tagger heaven!!
You can find the kit HERE
and the tube HERE.

Don't stop reading yet folks! I got a goodie for you. Scroll down!


I have made a matching Incredimail Stat for you all. The stat is an expanding stat. No boring side border stats from this girl. I am learning how to make even more interesting stats as we speak so they will just keep getting better and better for you. If ya like it. click on the preview to download. Please leave some love on 4 Shared if ya do, it would be greatly appreciated!


As always Happy PSPing.... and Photoshop too!!


post signature

Wednesday, March 4, 2015

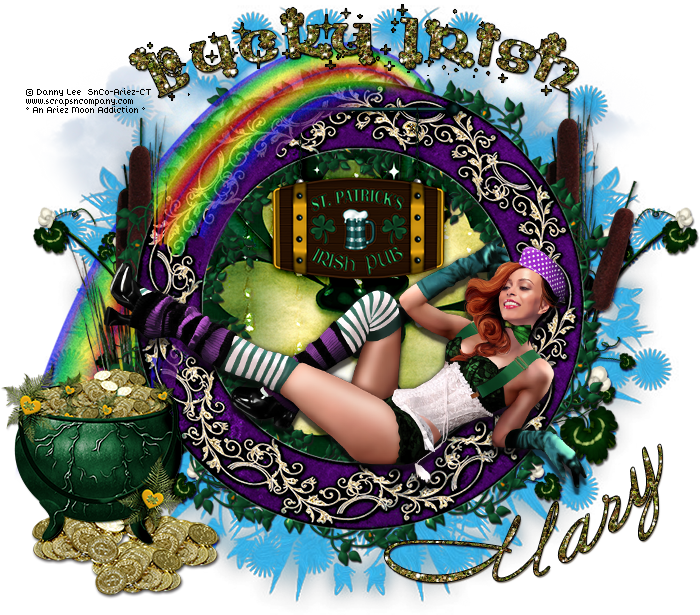
♥ Lucky Lady ♥


This tutorial was created with Photoshop CS6 or CS2 depending on what filters I use. Some older filters will no longer work in CS6. Can be done with other versions and/or programs.

Supplies:
Artist's Tube of choice: I am using the PTU art of Danny Lee and the tubes name is Lucky. Please DO NOT use this mage without the proper license or permission. You can find this tube here

Scrap Kit of choice: I am using the matching kit Luck by Kai Kreations. You can also find this kit here

Mask of choice: I am using mask MPM_Mask84 by Millie's PSP Madness and you can find it HERE

Fonts of choice: I am using FFF Regency for the © and AnnebelleJf for the name/text.

Ok, grab a cuppa, and a munchie, and let's go!!

Please remember to SAVE your work often, RENAME your layers, and if you feel you have really messed up.... Remember that UNDO is your bestest friend!!

Abbreviations
CP = Drag and Drop OR Edit>Select All>Edit>Copy>Edit>Paste
DS = Drop Shadow
MV – Merge Visible
MD – Merge Down
LS – Layer Style/Blending Options

Create a new image 700 x 700 , transparent background, 72dpi/ppi. Name the file whatever you wish and hit ok.

Use your Free Transform tool to resize your elements to your liking as you work.

Prepare and C/P your mask to the center of your working canvas. If you do not know how to prepare your mask, please go HERE for a short tutorial. 
Enlarge the mask a bit, not so much that it touches the edges of the canvas.
 CP p4. Create a clipping mask and change the blend mode of the layer to multiply.

C/P F4 to the center of your canvas.

Ctrl+click on the thumbnail of frame 4 in the layer palette, to make a selection around it. Go to Select>Inverse. Flood fill with white using your paint bucket.
Now carefully erase the outer white that surrounds the outside of the frame. Select>Deselect. With a gold pattern fill or layer style apply it to the layer. Drag this layer under the frame in the layer palette.

C/P F1 to the center of your canvas. Drag this layer under frame 4 and the pattern/styled layer and duplicate it. On one of the frame 1 layers use your free transform tool to enlarge the frame so that it peeks out from the outer edges of frame 4.
The leaves of both layers of frame 1 should now be seen on the inside and outside edges of frame 4. With an eraser brush. Erase the leaves that show through the scrolls of frame 4. You will have to do this to both layers.

Grab your Magic Wand. Click inside frame 4. Select>Modify>Expand and expand the selection by 5 or so.
Create a new layer and flood fill white. Select>Deselect. Drag this layer under all the frame layers.

CP p3 and arrange it how you would like it to sit inside the frame. Once you have it where you want it, hold your cursor between the thumbnails of the paper and the white fill. Hold down Alt and click to create a clipping mask.

CP element 81. Position it how you would like it to sit inside the frame.
Change the blend mode of both the paper layer and the flower layer to Hard Light.

CP your tube. Make sure this layer is at the very top on your layers palette. Reduce the size of the tube to your liking and rotate her a bit. Position the tube so that she looks like she is lounging inside of frame 4.

Using a mask layer or your eraser tool, erase the little bit of her fingers that are near her hat to make it look as though she is hanging on to the frame.

CP element 82 above the frame.

CP element 79 resize down and place it upper center over the frame so the sign is hanging from the frame.

CP element 7 and place on the left hand side, on top of the frame. Erase the bit that sits over frame 4 and drag the layer under the tube layer in the layer palette.

CP element 3, and place at the bottom of the rainbow. Resize it to what ever suits you best. If a piece of the rainbow is peeking out, erase that bit.

From here on out, all elements will sit under all the frame layers but above your mask, so make sure your paper layer for your mask is the layer that is active in your layer palette.

CP element 73. Duplicate and position the cloud where you would like to have them.

CP element 49. Free Transform, rotate to the right and position under the right side of your frame. Erase the stem that peeks out. Duplicate, flip horizontal, then place on the left side of the frame.

CP element 57. Follow the same steps as you did with element 49.

Now take one last look at your tag. Add or take away any elements that suit you. I decided to add coins to the bottom of the pot of gold.

If your wish is to resize the WHOLE image, now is the time to do it.

Add any layer styles ie... DS/and or glows, to any or all layers.

Add your name and the © info.

Save for Web as PNG-24 and clap your hands lassies, you be done!!

This tutorial was created by me, Mary Oakes aka Ariez Moon, on 03/03/2015. Any similarity to any other tutorial is purely coincidental. Please abide by my TOU and the TOU of Artists and Designers that you may use.

I hope you all enjoyed this tutorial, and I hope that I did not do too bad of a job writing it. If you have any problems, questions, comments, or suggestions just give me a hollar in my Cbox, or connect with me on FB. I will get back to you as fast as I can.

As always, Happy PSPing.... and Photoshop too :) !!
post signature

Friday, February 27, 2015

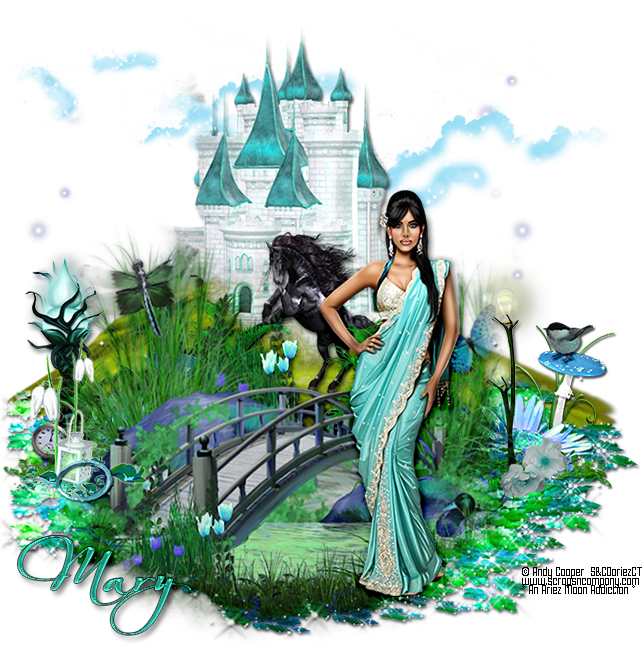
☼ Gala Sari ☼


This tutorial was created with Photoshop CS6 or CS2 depending on what filters I use. Some older filters will no longer work in CS6. Can be done with other versions and/or programs.

Supplies:
Artist's Tube of choice: I am using the PTU Gala Sari tube by Andy Cooper. Please DO NOT use any images without the proper license or permission. You can find this tube here

Scrap Kit of choice: I am using the wonderful PTU kit of the same name by JoJo's Creations. You can find this kit also at

Fonts of choice: I am using FFF Majestica for the © and Always Black for the name/text.

Ok, grab a cuppa, and a munchie, and let's go!!

Please remember to SAVE your work often, RENAME your layers, and if you feel you have really messed up.... Remember that UNDO is your bestest friend!!

Abbreviations
C/P = Drag and Drop OR Edit>Select All>Edit>Copy>Edit>Paste
DS = Drop Shadow
MV – Merge Visible
MD – Merge Down
LS – Layer Style/Blending Options

Create a new image 700 x 700 , transparent background, 72dpi/ppi. Name the file whatever you wish and hit ok.

C/P element 16. Duplicate it, and position the clouds where you would like them. Resize if needed, rotate etc.... then MV.

C/P element 28. Resize down to about 65-70 %. Position the castle where you would like it on your canvas. With a soft eraser brush erase the snow and the trees from around the castle.

C/P element 20. Position this under your castle layer in your layer palette. Duplicate. On the original hill layer, Image>Transform>Skew, and alter the hills a bit, so that they look a bit more flowing and rolling. Close all other layers and MV. Use Transform once again, and tug it down a bit. This can be adjusted a bit more after you add the next element.

Make sure your hill layer is the active layer in your layer palette. C/P element 67. Position near the lower middle. Now if your hill layer does not extend to fully meet the bridge layer, use your Transform to tug it down a bit more.

Make your hill layer the active layer once again, C/P element 65. Resize the element to 40% and position it to the mid right of the canvas. View my tag for reference.
Duplicate the layer and position the duplicate over to the mid left just enough so that the little mushroom is just peeking out from behind the weeds.

Now make your very bottom layer the active layer in your palette. This should be the blank layer named Layer 1. C/P element 73. Position so that it reaches behind the mushrooms and meets the hill. Now duplicate and position this as many times as needed to get the effect you would like.

C/P element 26. Resize to your liking and place where you think the horse would look best. I placed it in between the castle and the bridge, in the middle of the hill.

Now C/P your Gala Sari. Place you where you want her. I chose the right hand side of my canvas. Resize in accordance with your tag elements. Larger size up front, smaller in back.

C/P a few more elements to give your tag a little more character.
I used some lamps, a bird, a flower, watch, and some sparkles.

Tag a last took at your tag. Add or remove anything you wish. Resize your tag down if you would like. Add DS's/LS to any or all layers.

Add your name and © info.

Save for Web as PNG=24.

This tutorial was created by me, Mary Oakes aka Ariez Moon, on 02/027/2015. Any similarity to any other tutorial is purely coincidental. Please abide by my TOU and the TOU of Artists and Designers that you may use.

I hope you all enjoyed this tutorial, and I hope that I did not do too bad of a job writing it. If you have any problems, questions, comments, or suggestions just give me a hollar in my Cbox, or connect with me on FB. I will get back to you as fast as I can.

As always, Happy PSPing.... and Photoshop too :) !!
post signature

Monday, January 19, 2015

♫ Winter Wonderland ♫ CT Tutorial S&CO featuring Di Halim, Designs By Joan and CT tag Bibi's Collection

I have a gorgeous new tut for you today called Winter Wonerland, and I just wanted to let you know to take a look at the bottom of the this tut for an alternate tag using the same gorgeous tube and actual matching kit by Bibi!! WOOT WOOT!!


This tutorial was created with Photoshop CS6 or CS2 depending on what filters I use. Some older filters will no longer work in CS6. Can be done with other versions and/or programs.

Supplies:
Artist's Tube of choice: I am using the gorgeous PTU tube named Witner Baby by Di Halim. Please DO NOT use her images without the proper license or permission. You can find this tube here

Scrap Kit of choice: I am using the wonderful IB PTU kit Winter Lovely by Designs By Joan. You can find this kit here

Stock Photo: I am using this gorgeous wintery pine photo taken by Engimono, called Russian Winter. You must register for an account (it's free) to use the stock. You can find it HERE.

Fonts of choice: I am using Teachers Pet for the © and Belluccia Pro/Swash for the name/text.

Ok, grab a cuppa, and a munchie, and let's go!!

Please remember to SAVE your work often, RENAME your layers, and if you feel you have really messed up.... Remember that UNDO is your bestest friend!!

Abbreviations
C/P = Drag and Drop OR Edit>Select All>Edit>Copy>Edit>Paste
DS = Drop Shadow
MV – Merge Visible

Create a new image. I made mine very large, to give me room to work. 1100 x 1100 , transparent background, 72dpi/ppi. Name the file whatever you wish and hit ok.
C/P element 12. Resize down to 80%. To so this, go to Edit>Free Transform and see my settings below. You can also find it HERE, with other helpful stuff.

Duplicate the frame, and using Free Transform rotate it a bit making sure the bottom right of one frame touches the top right of the other.

Open up your stock photo and go to Image>Image Size. Reduce the photo down to 25%.

 Drag the photo to your working canvas. Drag the layer under the frame layers and then use Free Transform to reduce the image to the size that you would like it. Position the photo where you choose.

With your eraser tool, erase the bottom half of the top frame, and top half of the bottom frame, and then erase the part of the stock photo that hangs out of the inside of both frames. Close all layers except the two frame layers and MV.

C/P element 45. Duplicate the fence and hide the duplicate in the layers palette for now. Drag the layer that is left open, under both frame layers but above your stock photo. Position the fence near the bottom of the frame. Erase the snow between the fence posts and around the outside of the frame. Indicated in the screenshot below.

Right click on the layer and choose Clipping Mask.. This will clip the fence to the photo. Double click on the layer and give the fence a slight DS.

Ok working from left to right....
C/P element 49. Resize 60%. Position at bottom of frame, a bit off to the left.

C/P Winter Baby tube. Resize to 55%. Place the layer under the bucket layer and place to tube over the left side of the frame, high enough to cover the bottom half of the frame.

C/P element 48. Resize 70%. Place layer under the tube layer and position so that the rabbit is peeking out from behind the tube.

C/P element 13 resize to your liking and position so the bird sits on the tube's shoulder. Drag the layer under the rabbit layer, in the layer's palette. CTRL+click on the layer's thumbnail to make a selection around the bird. Click on the tube layer to make it active, and with an eraser brush, erase the little part of the tube that covers the birds belly.

C/P element 94. Resize down to your liking, rotate it a bit. Make sure the layer is under the bunny layer.

C/P element 53. KEEP THIS OPEN ON YOUR WORKSPACE FOR NOW. We will be using it again in a bit.
Now, back to your working canvas....With Free Transform hold down your SHIFT+CTRL keys and with your mouse drag the bottom right node up to -10.9°. You will see a little black box with white numbers letting you know when to let go of the mouse. 

Place this layer under the violin layer so that it looks like the violin is being propped up by the log.

C/P element 55. Resize down your liking. Drag the layer under the log layer, and position as you choose.

C/P element 50. Resize if you wish and place on top of and to the right of the music sheets.

C/P element 11. Resize down and position a bit over the rabbit.

C/P element 38. Resize down, and rotate it so that it sits along the right side of the frame's edge. With your eraser brush, erase the bits that you do not want. Place this layer under the rabbit layer, in the layer's palette.

C/P element 30. Resize to your choosing and place under the flower cluster..

Open up the fence layer that we hid in the beginning of the tutorial. Drag the layer under your photo layer, in the layers palette. With your eraser brush set a 0 hardness, erase around the sides and bottom of your image. If there isn't enough of the snow peaking out from under the layers, use your move tool to bring it down some. You don't need to be neat and tidy about either. You want to erase it so that the edges look soft and natural. Go to Filters>Blur>Motion Blur, set the Angle to -90° and the Distance to 35 pixels.

Did you remember to keep the log element open? Good! With your Lasso Tool make a selection around a part of the drifts from the log element. Edit>Copy. Then on your working canvas Click on the very top layer in the layers palette to make it active. Edit>Paste. Position as you like. Duplicate and position more as needed.

Take one last look at your tag. Reposition things as you may need.

Click on the very top layer, then shift click on the very bottom layer. With Free Transform, resize your image down to about 75 to 80%. You want enough canvas around your image to paste a paper, make a selection, and feather it. So, If you resized it too much or too little, just undo and do it again.

C/P PP=4. Drag the layer all the way down to the bottom of the layers Palette. With your Lasso Tool drag your mouse starting from the lower right corner where the rabbit is, all the way around your image. Again, you don't have to be neat about it. Put your own unique spin on it. When you get back to the starting point double click to get the selection. Go to Select>Modify>Feather. Feather anywhere between 10 to 20 pixels. Select>Inverse, then hit Delete on your keyboard. You should now see soft edges. If you dont like the way it looks. Undo, then play around with it some. You can also use your eraser brush set to 0 hardness to refine it more.

C/P PP-10. Drag this below PP-4. CTRL+click on PP-4's thumbnail to make a selection. Make sure PP-10 is the active layer, then once again feather the selection, around 5 to 10 pixels. Inverse>Delete. With your Move Tool, nudge the paper to the left. However looks best to you. Refine it more if you wish.

Apply any DS(s) or glows to whatever elements you wish to add them to.

Check the size of your tag, if it is still too big for you liking do as you did before with all the layers selected, size it down. Then trim your transparent pixels. Image>Trim

Add your © info and your name and/or other text with what ever layer styles you may wish to use. Save as PNG-24 and you have yourself a gorgeous tag!! Go show it off!

Here is an alternate tag, as promised, using the matching kit Winter Baby by Bibi!! You can also find this kit at


This tutorial was created by me, Mary Oakes aka Ariez Moon, on 01/18/2015. Any similarity to any other tutorial is purely coincidental. Please abide by my TOU and the TOU of Artists and Designers that you may use.

I hope you all enjoyed this tutorial, and I hope that I did not do too bad of a job writing it. If you have any problems, questions, comments, or suggestions just give me a hollar in my Cbox, or connect with me on FB. I will get back to you as fast as I can.

As always, Happy PSPing.... and Photoshop too :) !!

post signature

Sunday, November 23, 2014

♥ Merry Christmas Baby ♥ CT tutorial S&Co and Bibi's Collection ~ Merry and matching kit.


This tutorial was created with Photoshop CS6 or CS2 depending on what filters I use. Some older filters will no longer work in CS6. Can be done with other versions and/or programs.

Supplies:
Artist's Tube of choice: I am using the PTU art of Vi Nina and the tube's name is Merry. Please DO NOT use her images without the proper license. You can find this tube here

Scrap Kit of choice: I am using the matching PTU kit that is also called Merry by Bibi's Collection. You can find this kit also at S&Co here

Mask of choice: I am using mask ARZMN_Mask%01 by yours truly :) and you can find it at the bottom of this post. Bring to full size then save image as.

Fonts of choice: I am using PF Tempesta Seven for the © and Traditio for the word art and Santa's Sleigh Full Deluxe for my name.

Filters of choice: MuRa's - Copies

Ok, grab a cuppa, and a munchie, and let's go!!

Please remember to SAVE your work often, RENAME your layers, and if you feel you have really messed up.... Remember that UNDO is your bestest friend!!

Abbreviations
C/P = Drag and Drop OR Edit>Select All>Edit>Copy>Edit>Paste
DS = Drop Shadow
MV – Merge Visible
CNL – Create New Layer

Create a new image 800x800, transparent background, 72dpi/ppi. Name the file whatever you wish and hit ok.

Prepare and apply ARZMN_Mask%01. App;y paper 4 or paper of choice. Right click and choose clipping mask. Hide all layers except the mask layers and MV Duplicate and MV again. Minimize your canvas for now.

Create another new image 1000x1000. This is because you will need plenty of room to run the copies filter.
C/P element 89 or an element of your choice, to the middle of the canvas. Resize down to 55%. Apply the MuRa's – Copies filter with the following settings.

 Maximize your main canvas now and C/P the new frame to the center of the canvas. You may now close the copies image. We no longer need it.
Resize your frame down to a size that is suitable for you..

With your magic wand tool click inside the frame. Select>Modify>Expand and expand by 2px. Activate layer 1 then CNL. Flood fill the new layer with a soft pink or matching color of your tube.

C/P paper 6 above the filled layer. Right click and choose create clipping mask. Set the blend mode for this layer to hard light. Add an Inner DS of your choice.
C/P a close up of your tube above the paper layer, right click and choose clipping mask. Apply a DS of your choice.
Close your frame layer and layer 1. MV Open up the closed layers.

With your magic wand tool SHIFT+Click inside all of the stars. Zoom in real close so you can see what you are doing. Make sure your get all the points of the stars too. Expand the selection by 2px.

Activate your closup layer, and CNL. Choose a light to midtone brown and flood fill the selection with your fill tool. Deselect.
In your blending options choose Bevel & Emboss and give it a bevel of your choice. The idea here is to make it look like a cookie.

Now give your frame a slight DS. Merge the frame and the “cookie” layer visible.

Now start placing your elements. Use whatever you want or use similar to my tag, It's all up to you :) Stack, layer, rotate. Make it look like your own.

Now, making Merry look like she is getting ready to open the present. This is going to take a lot of concentration unless you are skilled with the brush tool. Which I am not lol. And there is probably an easier way to do this, but I don't know of it.

C/P your tube and resize and position where you want her to go. C/P the present. Risize it down so that it looks small enough to sit between her legs.
On the present layer lower the opacity of the layer down enough that you can clearly view both the present AND the details of the tube.
With a very soft eraser brush start erasing ON THE PRESENT layer following the tubes details. Lower and higher the opacity of the layer as needed to check your progress. When finished it should look like by tag above.

Add your word art “Merry Christmas Baby” and your name with any effects that you wish to add. It takes me a while when doing this step because I play with the blending options A LOT!

Trim your transparent pixels and resize the whole tag down to your prefered size.

Take a last look at your tag, and decide if you want to make any changes. Add DS and/or glows to any or all layers, as you please.

Add your © and you are finished. Save for Web as PNG-24!!

This tutorial was created by me, Mary Oakes aka Ariez Moon, on 11/22/2014. Any similarity to any other tutorial is purely coincidental. Please abide by my TOU and the TOU of Artists and Designers that you may use.

I hope you all enjoyed this tutorial, and I hope that I did not do too bad of a job writing it. If you have any problems, questions, comments, or suggestions just give me a hollar in my Cbox, or connect with me on FB. I will get back to you as fast as I can.

As always, Happy PSPing.... and Photoshop too :) !!


post signature