
This
tutorial was created with Photoshop CS6 or CS2
depending on what filters I use. Some older
filters will no longer work in CS6. Can be done with other
versions and/or programs.
Supplies:
Artist's
Tube of choice: I am using the
PTU Gala Sari tube by Andy Cooper. Please DO NOT use any images
without the proper license or permission. You can find this tube here

Scrap
Kit of choice: I am using the
wonderful PTU kit of the same name by JoJo's Creations. You can find
this kit also at

Fonts
of choice: I am using FFF
Majestica for the © and Always Black for the name/text.
Ok,
grab a cuppa, and a munchie, and let's go!!
Please
remember to SAVE your work often, RENAME
your layers, and if you feel you have really messed up.... Remember
that UNDO is your bestest friend!!
Abbreviations
C/P
= Drag and Drop OR Edit>Select All>Edit>Copy>Edit>Paste
DS
= Drop Shadow
MV
– Merge Visible
MD
– Merge Down
LS
– Layer Style/Blending Options
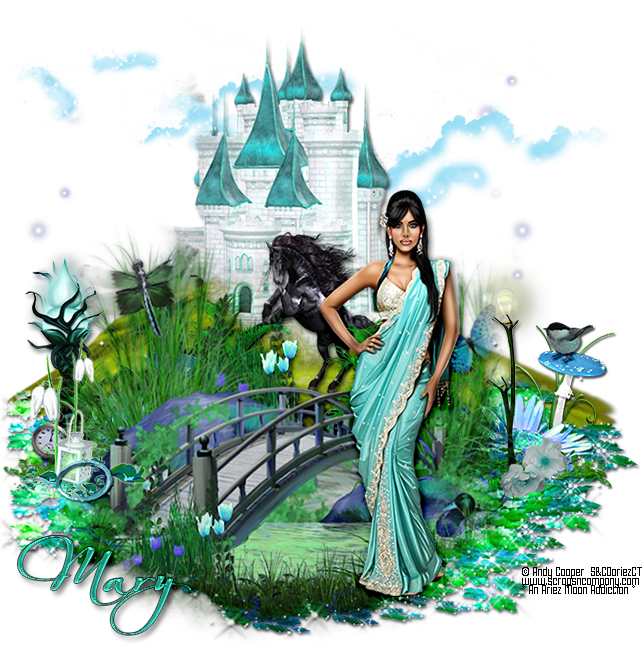
Create
a new image 700 x 700 , transparent background, 72dpi/ppi. Name the
file whatever you wish and hit ok.
C/P
element 16. Duplicate it, and position the clouds where you would
like them. Resize if needed, rotate etc.... then MV.
C/P
element 28. Resize down to about 65-70 %. Position the castle where
you would like it on your canvas. With a soft eraser brush erase the snow and the trees from around the castle.
C/P
element 20. Position this under your castle layer in your layer
palette. Duplicate. On the original hill layer, Image>Transform>Skew,
and alter the hills a bit, so that they look a bit more flowing and
rolling. Close all other layers and MV. Use Transform once again, and
tug it down a bit. This can be adjusted a bit more after you add the
next element.
Make
sure your hill layer is the active layer in your layer palette. C/P
element 67. Position near the lower middle. Now if your hill layer
does not extend to fully meet the bridge layer, use your Transform to
tug it down a bit more.
Make
your hill layer the active layer once again, C/P element 65. Resize
the element to 40% and position it to the mid right of the canvas.
View my tag for reference.
Duplicate
the layer and position the duplicate over to the mid left just enough
so that the little mushroom is just peeking out from behind the
weeds.
Now
make your very bottom layer the active layer in your palette. This
should be the blank layer named Layer 1. C/P element 73. Position so
that it reaches behind the mushrooms and meets the hill. Now
duplicate and position this as many times as needed to get the effect
you would like.
C/P
element 26. Resize to your liking and place where you think the horse
would look best. I placed it in between the castle and the bridge, in
the middle of the hill.
Now
C/P your Gala Sari. Place you where you want her. I chose the right
hand side of my canvas. Resize in accordance with your tag elements.
Larger size up front, smaller in back.
C/P
a few more elements to give your tag a little more character.
I
used some lamps, a bird, a flower, watch, and some sparkles.
Tag
a last took at your tag. Add or remove anything you wish. Resize your
tag down if you would like. Add DS's/LS to any or all layers.
Add
your name and © info.
Save
for Web as PNG=24.
This
tutorial was created by me, Mary Oakes aka Ariez Moon, on
02/027/2015. Any similarity to any other tutorial is purely
coincidental. Please abide by my TOU and the TOU of Artists and
Designers that you may use.
I
hope you all enjoyed this tutorial, and I hope that I did not do too
bad of a job writing it. If you have any problems, questions,
comments, or suggestions just give me a hollar in my Cbox, or connect
with me on FB. I will get back to you as fast as I can.
As
always, Happy PSPing.... and Photoshop too :) !!

No comments:
Post a Comment